kopia lustrzana https://github.com/cloudflare/wildebeest
62 wiersze
4.5 KiB
Markdown
62 wiersze
4.5 KiB
Markdown
[Index](../README.md) ┊ [Back](requirements.md) ┊ [Access policy](access-policy.md)
|
|
|
|
## Getting started
|
|
|
|
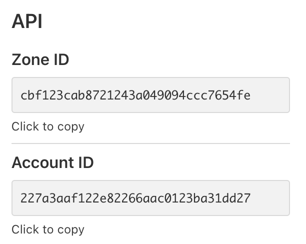
Before we start you need to take note of your Zone and Account IDs. To find them, [login](https://dash.cloudflare.com/) into your account and select the zone (domain) where you plan to use Wildebeest. Then, on the **_Overview_** page you will see something like this:
|
|
|
|
|
|
|
|
Take note, you need this information later. Let's start the installation process.
|
|
|
|
Wildebeest uses [Deploy to Workers](https://deploy.workers.cloudflare.com/) to automate the installation process.
|
|
|
|
**Click here to start the installation.**
|
|
|
|
[<img src="https://deploy.workers.cloudflare.com/button"/>](https://deploy.workers.cloudflare.com/?url=https://github.com/cloudflare/wildebeest&authed=true&fields={%22name%22:%22Zone%20ID%22,%22secret%22:%22CF_ZONE_ID%22,%22descr%22:%22Get%20your%20Zone%20ID%20from%20the%20Cloudflare%20Dashboard%22}&fields={%22name%22:%22Domain%22,%22secret%22:%22CF_DEPLOY_DOMAIN%22,%22descr%22:%22Domain%20on%20which%20your%20instance%20will%20be%20running%22}&fields={%22name%22:%22Instance%20title%22,%22secret%22:%22INSTANCE_TITLE%22,%22descr%22:%22Title%20of%20your%20instance%22}&fields={%22name%22:%22Administrator%20Email%22,%22secret%22:%22ADMIN_EMAIL%22,%22descr%22:%22An%20Email%20address%20that%20can%20be%20messaged%20regarding%20inquiries%20or%20issues%22}&fields={%22name%22:%22Instance%20description%22,%22secret%22:%22INSTANCE_DESCR%22,%22descr%22:%22A%20short,%20plain-text%20description%20of%20your%20instance%22}&apiTokenTmpl=[{%22key%22:%22d1%22,%22type%22:%22edit%22},{%22key%22:%22page%22,%22type%22:%22edit%22},{%22key%22:%22images%22,%22type%22:%22edit%22},{%22key%22:%22access%22,%22type%22:%22edit%22},{%22key%22:%22workers_kv_storage%22,%22type%22:%22edit%22},{%22key%22:%22access_acct%22,%22type%22:%22read%22},{%22key%22:%22dns%22,%22type%22:%22edit%22},{%22key%22:%22workers_scripts%22,%22type%22:%22edit%22},{%22key%22:%22account_rulesets%22,%22type%22:%22edit%22}]&apiTokenName=Wildebeest)
|
|
|
|
Please pay attention to all the steps involved in the installation process.
|
|
|
|
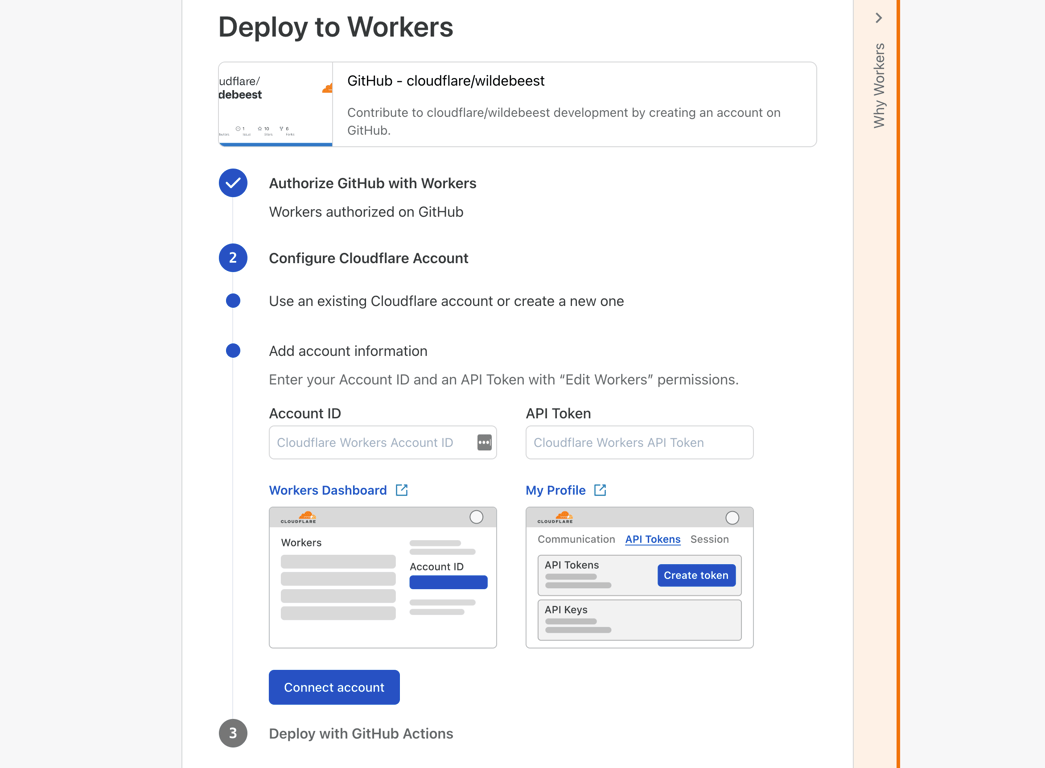
- Authorize Workers to use your GitHub account.
|
|
- Enter your **Account ID** (from the previous section)
|
|
- Press the **Create token** button first, to create it, it will redirect you to a token template with all the required permissions pre-configured. Then enter the **API token** in the form.
|
|
- Enter the **Zone ID**, **Domain**, **Title**, **Admin Email** and **Description** for your instance.
|
|
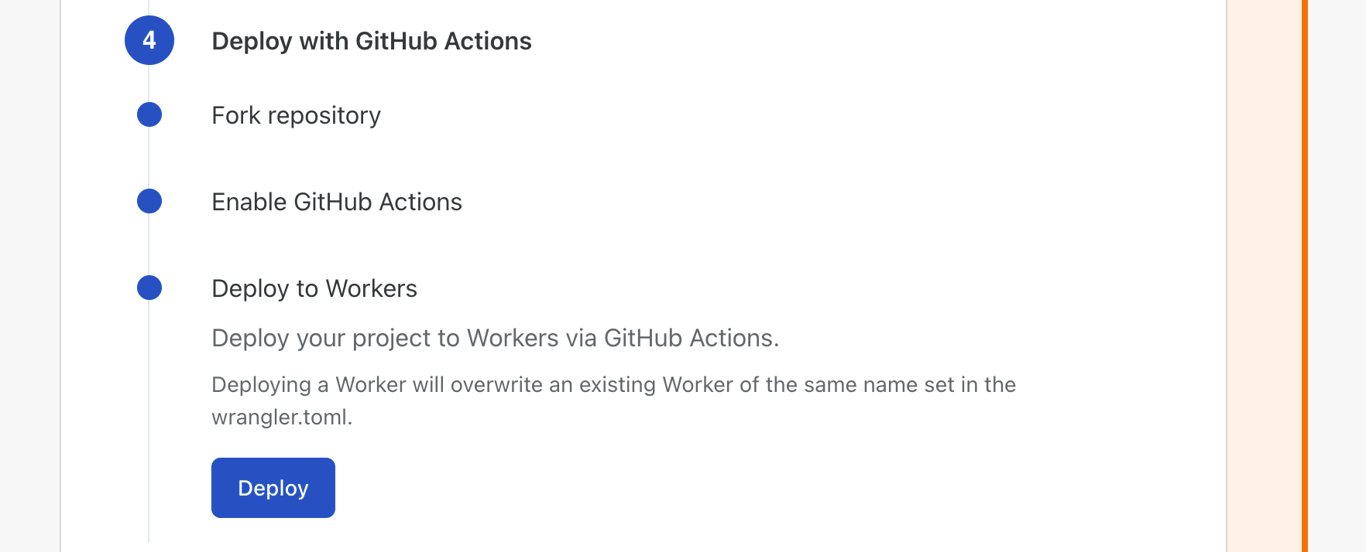
- Fork the repository into your personal GitHub account.
|
|
- Enable GitHub Actions.
|
|
- Deploy.
|
|
|
|
Here is each step again, with screenshots:
|
|
|
|
### Authorizations and API Token
|
|
|
|
The first steps are authorizing Workers to use your GitHub account and entering your **Account ID**, pressing the **Create token** button and pasting the token in the **API Token** field.
|
|
|
|
|
|
|
|
### Instance configuration
|
|
|
|
Here we configure the instance/project with the **Zone ID**, **Domain** (the full FQDN domain of your zone, where you want to deploy your Wildebeest server), **Title**, **Admin Email** and **Description**.
|
|
|
|

|
|
|
|
Now click **_Fork the repository_**.
|
|
|
|
Then enable GitHub Actions and confirm by clicking **_Workflows enabled_**.
|
|
|
|
And finally click **_Deploy_**.
|
|
|
|
|
|
|
|
The installation script will now build and deploy your project to Cloudflare Pages and will run a [Terraform script](https://github.com/cloudflare/wildebeest/blob/main/tf/main.tf) to configure D1, Workers, DNS, Images and Access settings automatically for you.
|
|
|
|
Make sure the deploy was successful by looking at the GitHub Actions logs. If it wasn't, take a look at errors, we did our best trying to make then clear.
|
|
|
|
## Finish installation
|
|
|
|
If you followed all the steps, you should see a successful GitHub Actions build.
|
|
|
|

|
|
|
|
You can also confirm in the Cloudflare [dashboard](https://dash.cloudflare.com) that the Pages project, DNS entry, KV namespace, D1 database and Access rule were all created and configured.
|
|
|
|
[Index](../README.md) ┊ [Back](requirements.md) ┊ [Access policy](access-policy.md)
|