Wildebeest is an [ActivityPub](https://www.w3.org/TR/activitypub/) and [Mastodon](https://joinmastodon.org/)-compatible server whose goal is to allow anyone to operate their Fediverse server and identity on their domain without needing to keep infrastructure, with minimal setup and maintenance, and running in minutes.
Wildebeest runs on top of Workers and Cloudflare's Supercloud, uses [Workers](https://workers.cloudflare.com/) and [Pages](https://pages.cloudflare.com/), the [D1 database](https://developers.cloudflare.com/d1/) to store metadata and configurations, [Zero Trust Access](https://www.cloudflare.com/en-gb/products/zero-trust/access/) to handle authentication and [Images](https://www.cloudflare.com/en-gb/products/cloudflare-images/) for media handling.
* Inbox and Outbox notes (text, mentions and images), follow, announce (reblog), accept (friend), like.
* Server to server federation.
* Web client for content exploration (read-only).
* Compatibility with other Mastodon client apps (Mobile iOS/Android and Web).
Cloudflare will continue to evolve this open-source project with additional features over time and listen to the community feedback to steer our priorities. Pull requests and issues are welcome too.
## Requirements
Wildebeest is a full-stack app running on top of Cloudflare Pages using a [Functions Worker](https://developers.cloudflare.com/pages/platform/functions/). We are of course assuming that you have a Cloudflare account (click [here](https://dash.cloudflare.com/sign-up) if you don't) and have at least one [zone](https://www.cloudflare.com/en-gb/learning/dns/glossary/dns-zone/) using Cloudflare. If you don't have a zone, you can use [Cloudflare Registrar](https://www.cloudflare.com/en-gb/products/registrar/) to register new a new domain or [transfer](https://developers.cloudflare.com/registrar/get-started/transfer-domain-to-cloudflare/) an existing one.
Some features, like data persistence, access controls, media storage, are handled by other Cloudflare products:
* [D1](https://developers.cloudflare.com/d1/) for the database.
* [Workers KV](https://developers.cloudflare.com/workers/learning/how-kv-works/) for object caching.
* [Zero Trust Access](https://www.cloudflare.com/en-gb/products/zero-trust/access/) to handle user authentication and SSO on [any identity provider](https://developers.cloudflare.com/cloudflare-one/identity/idp-integration/).
* [Images](https://www.cloudflare.com/en-gb/products/cloudflare-images/) for media handling.
Most of out products offer a [generous free plan](https://www.cloudflare.com/en-gb/plans/) that allows our users to try them for personal or hobby projects that aren’t business-critical. However you need to activate one of the ***Images*** plans.
### Images plan
To activate ***Images***, please login into your account, select ***Images*** on the left menu, and then select the plan that best fits your needs.
Before we begin, you also need to create an API token in your Cloudflare account. To do that, [login](https://dash.cloudflare.com/) into your account, and press the ***Create Token*** button under ***My Profile (top right corner) / API Tokens***.
You can limit the token to the specific zone where you will using Wildebeest if you want. Don't set a TTL.
Now ***Continue to Summary***, review your settings, and ***Create Token***. Take note of your token and store it in your password manager, you're going to need it later.
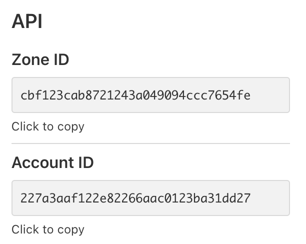
### Zone and Account IDs
You also need to take note of your Zone and Account IDs. To find them, [login](https://dash.cloudflare.com/) into your account and select the zone (domain) where you plan to use Wildebeest. Then, on the ***Overview*** page you will the following information:
We're all set now, let's start the installation process.
## Getting started
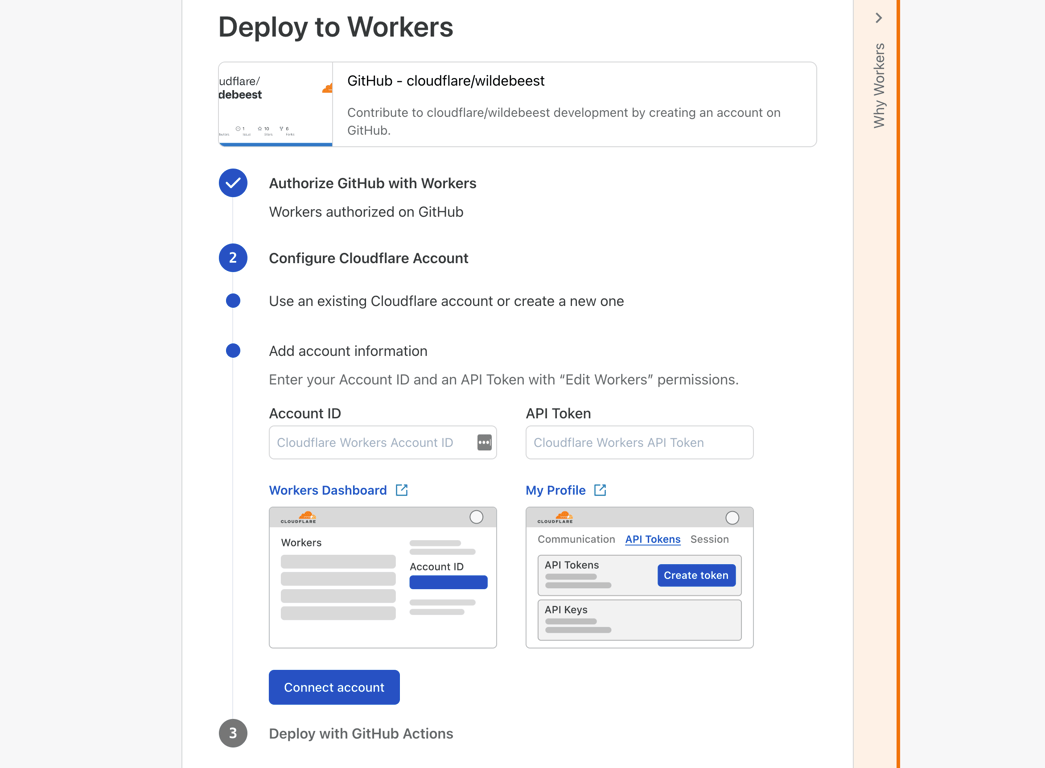
Wildebeest uses [Deploy to Workers](https://deploy.workers.cloudflare.com/) to automate the installation process.
Please pay attention to all the steps involved in the installation process.
* Authorize Workers to use your Github account.
* Enter the ***Account ID*** and the ***API token*** that you created previously.
* The script will then fork this repo into your personal Github account.
* Enable Github Actions
* Create two secrets (CF_ZONE_ID and CF_DEPLOY_DOMAIN) under the Github Actions settings. **See section below for detailed intructions**.
The installation script will now build and deploy your project to Cloudflare Pages and a [Terraform script](https://github.com/cloudflare/wildebeest/blob/main/tf/main.tf) to configure the D1, KV, DNS and Access settings automatically for you.
### Github Actions secrets
In the installation script above, after you ***Enable Github Actions***, you need to create two secrets under your forked repo ***Settings / Secrets / Actions***. They are:
* **CF_ZONE_ID** - Use the Zone ID that you got from the requirements above.
* **CF_DEPLOY_DOMAIN** - The full FQDN domain where you want to deploy your Wildebeest server. Example: social.example.com
**This step is critical. If you miss it, your deployment will fail.**
You can also confirm in the Cloudflare [dashboard](https://dash.cloudflare.com) that the Pages project, DNS entry, KV namespace, D1 database and Access rule were all created and configured.
Almost there, only two last steps missing:
### Configure the access rule
The installation process automatically created a [Zero Trust Access application](https://developers.cloudflare.com/cloudflare-one/applications/) called `wildebeest-your-github-user` for you. Now you need to create a [policy](https://developers.cloudflare.com/cloudflare-one/policies/) that defines how and who can have access to your Wildebeest instance.
Go to https://one.dash.cloudflare.com/access and select your account, then select ***Access / Applications*** and Edit the `wildebeest-your-github-user` application. Now edit the existing policy on the next screen.
Open your browser and go to your newly deployed Wildebeest domain `https://social.example.com/start-instance` (replace social.example.com with your domain). Fill in the title, administrator Email and description. Press ***Configure***.
Wildebeest is Mastodon API compatible, which means that you should be able to use most of the Web, Desktop, and Mobile clients with it. However, this project is a work in progress, and nuances might affect some of their functionality.
This is the list clients that we have been using successfully while developing and testing Wildebeest:
* [Pinafore](https://pinafore.social/) web client ([source](https://github.com/nolanlawson/pinafore)).
* Mastodon [official](https://joinmastodon.org/apps) mobile client for [iOS](https://apps.apple.com/us/app/mastodon-for-iphone/id1571998974) ([source](https://github.com/mastodon/mastodon-ios)) and [Android](https://play.google.com/store/apps/details?id=org.joinmastodon.android) ([source](https://github.com/mastodon/mastodon-android)).
Wilebeest also provides a read-only web client in your instance URL, where you can explore the timelines (local and federated), posts and profiles. We will continue to improve this web client and eventually add suport to posting content as well.
If you want to receive Email at your @social.example.com domain, you can enable [Email Routing](https://developers.cloudflare.com/email-routing/get-started/enable-email-routing/) for free and take advantage of sophisticated Email forwarding and protection features. Simply log in to your account, select the Wildebeest zone and then click on Email to enable.
Sometimes things go south. The GitHub Actions deployment can fail for some reason, or some configuration changed or was accidentally removed.
### Starting over
If you attempted to deploy Wildebeest in your account and something failed, or you simply want to reinstall everything from scratch again, you need to do manual checkups and cleaning before you start over.
* Go to your zone DNS settings and delete the CNAME record that points to `wildebeest-username.pages.dev`
* Go to your account Pages section and delete the `wildebeest-username` project.
* Go to your account Workers / KV section and delete the `wildebeest-username-cache` namespace.
* Go to your account Workers / D1 and delete the `wildebeest-username` database.
* Launch [Zero Trust](https://one.dash.cloudflare.com/), select your account, go to Access / Applications and delete the `wildebeest-username` application.