Rollback AU915 to FSB2 add DualPlan and AS923 |
||
|---|---|---|
| .vscode | ||
| console-decoders | ||
| img | ||
| include | ||
| main | ||
| .clang-format | ||
| .gitignore | ||
| LICENSE | ||
| README.md | ||
| platformio.ini | ||
| tbeam-workspace.code-workspace | ||
README.md
TTGO T-Beam Mapper for the Helium LoRaWAN Network.
by Max-Plastix
TL;DR
This code loads onto LilyGo TTGO T-Beam v1.1 board to make a Helium Network Mapper. To build one: download this build, configure some files, and upload it to your device. Go travel the world to contribute to the Helium Network Coverage Maps!
Purpose
The goal of this software is to have a TTGO T-Beam Mapper that's ideally suited to walking or driving, taking cues from the USB Power source and movement for activity level.
This device uploads GPS coordinates from the TTGO T-Beam to the Helium network, be used for tracking and determining signal coverage of LoRaWAN gateways and hotspots. With this software and a T-Beam device, one can contribute to the Helium Network Mapper or Cargo projects. Details for the Mapper project can be found here and details for Cargo can be found here. It also works with Coverage Map, a new Heatmap view of Helium hotspots and coverage.
The Mapper is intended to be highly active while the vehicle is in motion, and quieter when the vehicle is stationary. By default, it is not miserly with Data Credits. If you want to conserve Data Credits or battery power, tune the configuration to send packets less frequently.
But do I get PAID for Mapping?!
No, you do not. I put this here because it seems to be the #1 FAQ. You do not earn HNT or Data Credits by mapping. Mapping costs you very little -- One Penny (USD $0.01) for every thousand mapping packets. It helps the Helium network by providing a coverage map, and it helps you by providing clarity on your own local Helium environment. It's all volunteer.
But do I get to flag and delist spoofing gamer Hotspots?!
No, you do not. It's the #2 FAQ. The Mapper data and coverage maps are not involved in any POC challenges or used for gaming denylists.
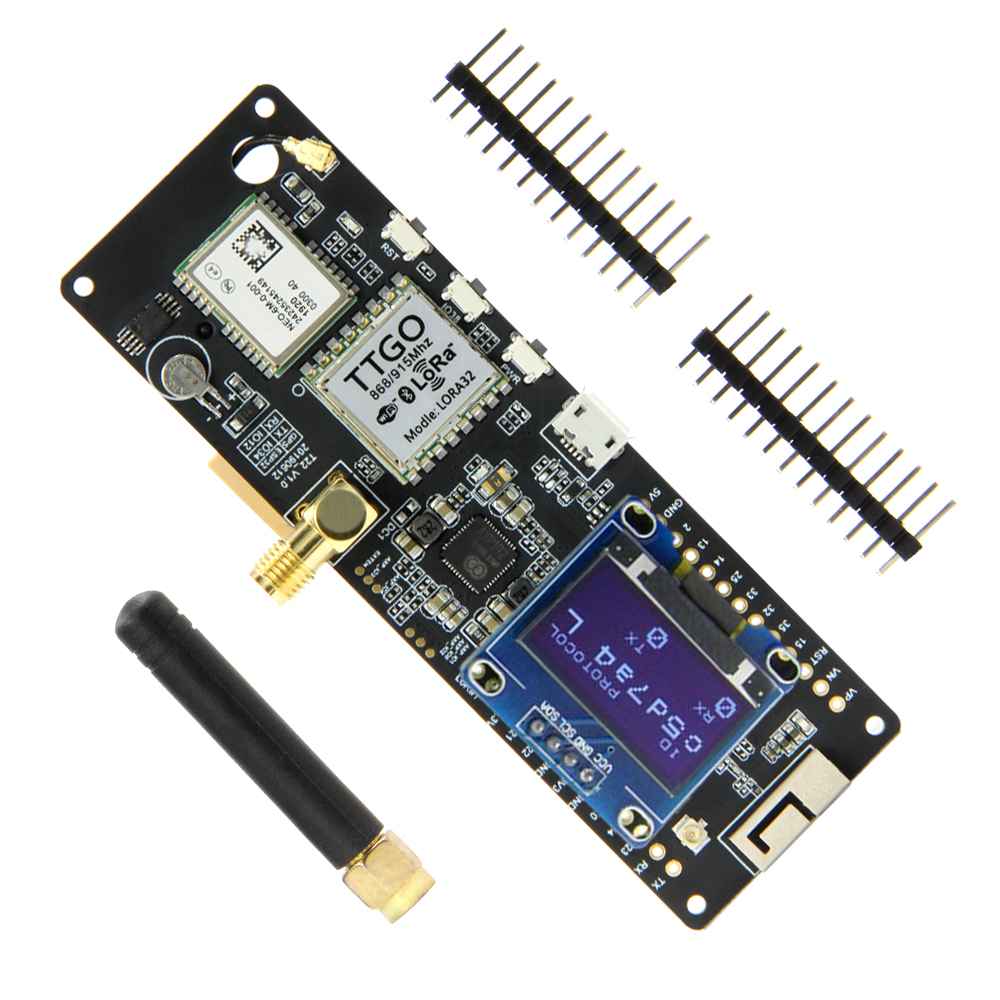
Supported Hardware
I tested this software on (many) LilyGo TTGO T-Beam v1.1 devices, all on US915. Others have enjoyed success on EU688 and other worldwide bands, with the matching device. These are commonly available as "Meshtastic" devices from AliExpress, Amazon, Banggood, eBay, etc, usually as a kit with an unsoldered OLED screen and SMA antenna for around USD $30.00.
If you have an older v0.7 board or different region, adjust the configuration to match. If you have a unique variant and find something not working, open an Issue and provide what information you can.
Semtech LoRa Radio
This build uses the MCCI Catena LMIC Library for LoRaWAN on the Semtech SX1276 or SX1272 radio modules.
Note that the T-Beam device with a U.FL / I-PEX LoRa antenna connector and uBlox NEO-8M GPS module comes with a Semtech SX1262 radio, which is NOT supported by the LMIC library.
Do Not Buy this incorrect device for use on Helium! It will not work.
OLED Display
Most T-Beam units arrive with no OLED Display attached. You can operate the mapper without an OLED display, if you would like. Of course, the status and menu will be invisible, but there may be applications where a display is not required.
The most common OLED Display used is a 0.96" screen with SSD1306 controller. You may also use 1.3" displays, or displays with an SH1106 controller. The software should auto-detect the correct controller protocol and display i2c address, but if you have an unusual display, file an issue to see if it can be supported. When an OLED display is installed, you should see the detected type and address in the startup messages on UART.
Soldering the 4-pin OLED connection
Since the display is not pre-installed, the buyer must solder the 4-pin connection between the T-Beam and OLED. Be very careful to match the pinout and position of the display! Some OLED displays have VCC and GND reversed from the expected pinout, and require some creative wiring to adapt. If your OLED came with the T-Beam, it's probably correct and ready-to-solder.
If you incorrectly power the OLED, short connections, or damage the Pin 21/22 connections (i2c), it is very likely that both the OLED and the AXP Power management unit are unreachable, and the board may fail in unexpected ways. It's a good idea to program the device and check the UART Monitor output before installing the OLED, for some confidence that the board works before soldering. (Nobody actually does this, but it's a good idea.)
Mandatory Configuration
Before Buliding and Uploading, you will probably want to inspect or change some items in these three files:
platformio.inimain/configuration.hmain/credentials.cppThe comments and text below will guide you on what values to look out for.
Geographic Region, and Frequency
By default, this build is for the US915 region. Change the declaration in platformio.ini for a different locale, to select the correct operating rules and frequency for your country.
PlatformIO Communication port
You might have to adjust the COM Port in platformio.ini for Uploading and Monitoring if PlatformIO doesn't auto-detect your port correctly. If you have a single T-Beam on a Windows computer, PlatformIO will usually auto-detect it correctly. If you have a bunch of Serial USB devices, unusual USB topography, or weird device drivers, you might have to set this to a fixed port. Note that Upload and Monitor are set separately, and have different auto-detection logic.
On MacOS, it can be significantly more complicated to connect PlatformIO to your device. Ask in the Discord for help.
Helium Device IDs
Each LoRaWAN device on Helium is identified by the three OTAA values used in Joining the network: DevEUI, AppEUI, and AppKey.
You should choose your own private AppKey value in credentials.cpp. Either take the random value generated by the new Console Device entry, or make up one of your own. Read the notes in credentials.cpp for details. The value in the build must match the value in Console, regardless of how you achieve that.
By default, the DevEUI is generated automatically to be unique to each unit, but you may want to hardcode it in credentials.cpp instead. There is an explanation there of why you might want to go either way.
Mapper uplink period and behavior
Read through the comments in configuration.h to see if the default Mapper behavior suits your needs, especially in the area of default time/distance between Uplink packets.
Building and Programming
This code started off as an Arduino IDE project, with .ino filenames, but the complexity of managing installed libraries in Arduino IDE made it difficult to sustain. Now, the code must be built with PlatformIO and Visual Studio Code. These is an excellent free/open-source IDE for ESP32 platforms, and allows each project to pull in the required libraries to complete the build, as well as program it into the device.
There are excellent guides to installing and using PlatformIO, but for this project, your goal is to open the project, edit the configuration files, and then select Build and Upload to program the T-Beam device.
MacOS Guide
Building and programming with PlatformIO on MacOS is mostly the same, but has some unique challenges. @Rob Cryft wrote this excellent guide on "Getting Started with Helium Mapping" that walks through the whole process on Mac.
Battery life and power consumption
The T-Beam is not the lowest-power Mapper device, because it has a powerful dual-core ESP32 CPU, Power Management IC (PMIC or PMU), and other design decisions that lead to a pretty high operating current of 110mA or so.
There is an excellent Lithium-Ion 18650 battery management and charger built-in, so you can install a battery cell, and operate it from USB power while it charges and maintains the battery. The USB port can draw up to 1 Amp, with 750mA or so going to battery charging.
Battery Selection
If you plan to run the Mapper primarily on battery with infrequent charging, you will want a battery with the highest mAh (milliamp-hour) rating, typically 3000 mAh or more. Some battery cells like Sony's excellent VTC6, are optimized for very high current discharge (heaters, drones, scooters). These are expensive, and may make other compromises in capacity. You don't need high current at all, so look for a good balance of cost and capacity.
If you expect to have USB power available most of the time, then the cheapest 18650 cells will do just fine -- don't feel bad about using an old or low-capacity one.
Battery Fitment
The included battery holder in the TTGO T-Beam is small and tight. Your battery cell must have NO Protruding bump or nipple on the Positive end. Look for a flat or low-profile positive end. (If you must, you may be able to crush the spring-terminals at the ends of the battery holder, but this should be done carefully to avoid damaging the attached PCB or cracking the holder.)
Always insert the cell carefully and deliberately, noting the + and - orientation but also supporting the PCB to avoid bending the whole assembly with force.
Some battery cells have a built-in Protection Circuit, advertised as "protected" or safe cells. These batteries are longer in size, and won't easily fit in the battery holder.
Runtime and Battery Life
While the T-Beam Mapper is typically USB powered from a vehicle, it can run for weeks from the built-in 18650 cell responding to occasional movement.
The GPS receiver is the single largest power consumer on the Mapper, so settings that allow for more GPS-off time will save battery.
Runtime
It depends on configuration, of course, but here's a ballpark figure: Without any sleep, the fully-operating Mapper should track for about 24 hours of nonstop movement. (3000mAh cell, 105mA operating current, reasonable battery margins and uplink rate)
When mostly stationary, the mapper can wait for movement or events for about a month! (3000mA cell, mostly 2.23mA sleep, some wake and activity.)
Operating power
In the full-operating state, with the GPS tracking, Mapper uplinks, and OLED display on, the T-Beam draws about 100 to 120mA from the 18650 cell. (Searching for GPS fix is the highest power, 120mA, and when it has a solid fix, closer to 110mA.) There is a little extra power consumed for a short while as it charges the GPS coin cell automatically.
OLED Screen OFF
Turning off the OLED Display is done more to save the screen from pixel burn-in than to save power. It draws just under 10mA when lit with text display, so the Mapper drops to about 101.6mA when the screen is off.
LoRa power?
Uplink transmissions use more power (200mA), but they are usually short and infrequent. Back-to-back SF10 transmissions could start to weigh on battery life, of course.
Rest or Sleep
With the GPS and OLED off, and the ESP32 waiting for USB power, button press, or movement checks, it is in the lowest-power operating state. This draws 2.23mA from the battery.
Power Off
Powered off, the circuit still draws 3.22 μA (micro-amps). Not significant, but not zero. Remove the battery cell at about half to 80% charge for long-term storage longer than a month or two.
Operation: How it Works
When your car is started, and USB Power appears, the Mapper will power on, acquire GPS, and continue mapping. It re-uses the last network Join state for faster connection and fewer packets.
The Mapper is always looking to see if it's been a long time, or you moved some distance from the last report. Whichever one happens first causes a transmission to be sent, plotting a point on the Helium map. Time or Distance are the two main factors in determining when to send Uplinks.
When moving, the Mapper will send out a packet every time GPS indicates it has moved MIN_DIST meters. This is the primary knob to turn for more/fewer packets. A Helium hex cell is about 340meters across, so the default 68-meter packet distance will send quite a few redundant packets for each mapped cell. DC is incredibly cheap, but adjust the distance if you want to send fewer packets.
This is the normal operation of the Mapper in motion: every MIN_DIST meters, one Uplink is sent reporting position while the battery charges from USB. If the speed of motion is fast, it may even result in back-to-back packet sends (at greater distance) limited by the bandwidth of your chosen Spreading Factor (Data Rate) and country restrictions. (In the United States US915, at SF10, this is about two seconds maximum speed. In Thailand, it can be 37 seconds or more.)
When the Mapper comes to a stop, staying within MIN_DIST meters, it sends a heartbeat ping every STATIONARY_TX_INTERVAL seconds (default: 60). This serves to keep it visible on the map and report battery voltage. (Too often for you? Dial up the STATIONARY_TX_INTERVAL to a longer interval.)
After being stationary a long time (parked) with a decreasing battery voltage, we change to a slower pace of "not moving" updates. This happens after REST_WAIT seconds (default: 30 minutes). In the Rest state, the Mapper transmits every REST_TX_INTERVAL seconds (default: 5 minutes).
After an even longer time (parked, not moving, no USB), the Mapper will power off the GPS to save significant power. It will go into the lowest power state, waiting for USB power to come back. Periodically, it will power up the GPS, get a location fix and see if it moved while sleeping. It may have missed significant movement during sleep time, and wake to full Mapping. Or it hasn't moved at all and goes back to sleep.
Eventually, the ~100mA power drain of the mapper (with OLED screen & GPS) runs the battery down below BATTERY_LOW_VOLTAGE volts, and the Mapper will save state and completely power off.
Regardless of battery or sleep state, the Mapper will power on and resume when USB power appears.
Detailed Operation
Buttons
The TTGO T-Beam has three buttons on the underside:
- Power: Nearest the USB connector is the Power button.
- Menu: short press while on will enter the Menu display. Use the Power button to step through options, and the Middle button to select a menu entry.
- Off: long press on this button will turn the unit completely off (5 seconds).
- On: A 1-second press will turn it back on.
- Middle Button
- A short press will select the active Menu entry.
- A long press will force an Uplink packet to be sent right now.
- Reset
- The button furthest from USB is the Reset button. It instantly reboots the device, and is not handled by software at all.
USB Serial (UART) messages
The device outputs debugging information on the USB Serial connection at 115200bps.
ESP32 Bootloader
On powerup or reset, the very first messages will be from the Bootloader built into the ESP system. This is before any Mapper software runs and should look something like this:
ets Jul 29 2019 12:21:46

rst:0x1 (POWERON_RESET),boot:0x13 (SPI_FAST_FLASH_BOOT)
configsip: 0, SPIWP:0xee
clk_drv:0x00,q_drv:0x00,d_drv:0x00,cs0_drv:0x00,hd_drv:0x00,wp_drv:0x00
mode:DIO, clock div:2
load:0x3fff0018,len:4
load:0x3fff001c,len:1044
load:0x40078000,len:10124
load:0x40080400,len:5828
entry 0x400806a8
If you see garbage text, line noise, or nothing at all, double check that both the monitoring port and bitrate (115200,8,N,1) are configured correctly in your terminal interface.
Mapper System Startup
After the bootloader, the first message from this Mapper software will be:
BOOT #1! cause:0 ext1:00000000
indicating that the system experienced a normal boot (instead of a timer wakeup or other sleep event).
Next are some important debugging messages printed at startup, indicating whether the OLED screen, AXP Power Management IC, and GPS were found and initialized. If these are not found or connected quickly, then there could be a hardware failure, soldering error, or other board-level issue preventing the software from working correctly.
You should see AXP192 PMU on the T-Beam, and SSD1306 OLED display if a display is installed. If you see neither of these, the i2c port likely has problems.
If you expected an OLED display, and none was found, then it may be disconnected.
After this are several data messages about voltages and settings, largely uninteresting, until you get to..
Settings and Credentials
On startup, the USB Serial port will print the DevEUI, AppID, and AppKey values, suitable for cut & paste entry into the Helium Console for your Device. For some, this is the easiest way to configure a new device. Upload the software, monitor the first boot, then cut & paste the values from the messages into the Console "New Device" setup.
Saved Preferences
The Mapper will retain certain settings across power cycles.
- Minimum distance
- Stationary Tx Interval (min time)
- Rest Wait (time until slower reporting)
- Rest Tx Interval (slower reporting interval)
- LoRaWAN DR/SF
Network Join
The Mapper will flash the Blue LED at 4Hz and attempt to Join the Helium network by sending a Join Request packet using the configured locale. This is the most common point of failure as it requires both a transmitted Join_Request and a received Join_Accept message. If there is no hotspot nearby, the network Join will not complete and the unit will continue retrying until coverage is available. There are several reasons a Join might fail:
- Out of Range: The nearest Helium hotspot can't hear the device, or the device can't hear the response.
- Wrong RF configuration or Localization: The frequency band and protocol must match the local Helium Network, as configured in
platformio.ini. - The Device keys are not correctly registered in the Helium Console. Check all three.
- The Device was recently added to Console and is still "Pending" or waiting for XOR Filter update to propagate through the blockchain or network. This can take 20 minutes or more.
- Helium network outage. Any failure in the helium network that prevents Join will hang here, as was seen often in November 2021.
- RF or hardware issues. Disconnected antenna, mismatched antenna frequency, etc.
Or, Re-Join
Once the Mapper joins the Helium network, it stores these Network Key credentials for future use. Ideally, the Mapper does not have to send a Join request at the next startup, but fetches them from the non-volatile "Preferences" memory. To successfully continue with these same credentials, the Mapper needs to continue the Frame Count from prior transmissions, or the Helium network will reject Uplink packets as "Late" (for re-using old Frame Count values).
When you see (re-used join) on the screen and serial log, this means no Join Request/Accept packets were sent, and the unit will attempt to use the same credentials.
There are some instances where this is problematic or not correct:
- Frame count lost without saving
- Device keys changed on Console from last use
- Very long time since last Uplink
- Helium Network resets that invalidate Join keys.
At any time, you can select Full Reset in the system menu to discard these keys, reset the device, and Join fresh.
GPS Connection and Issues
The typical GPS operation is to power on, search the sky for satellites, and get a 3D fix in 10 seconds or less. 3 to 5 seconds is common.
You should see a Red LED blinking once per second on the far right side of the T-Beam (away from the OLED). If this Red LED is not blinking, the GPS does not have a fix and no Mapper packets will be sent.
The T-Beam must have an Active GPS antenna connected to operate. The included rectangular antenna is stuck with tape to the battery holder, but any Active GPS Antenna with 3v power and a U.FL connector could be used as well. Many mappers use a larger 25x25mm GPS patch antenna for improved reception, but the included antenna is just fine.
First Power-On
If your device is new, unused for a long time, or shipped from elsewhere in the world, it may take significantly longer for that first GPS fix. I recommend installing a charged battery, powering on, and leaving the unit with a clear view of the sky (outdoors) for 15 min before attempting any diagnostics. In most cases, this will allow it to get a 3D Fix, download the current GPS Almanac data, charge the battery cell, and prepare for optimum startups.
GPS battery cell
The Neo-6M has a dedicated GPS backup battery cell that recharges any time the Mapper is powered on. This helps retain the GPS state for faster time to first fix. If your device is new or unused for a long time, this battery is likely dead and will charge with some use. There's nothing to do but use the Mapper, and you should see fast GPS connections in the future.
GPS Bitrate and configuration
On the Debug/Monitoring UART console, you should also see a message reporting GPS connected. The first time you run this software on hardware that came with Meshtastic or other builds, it will automatically try all common baud rates to find the Neo GPS module. Eventually it will connect, then configure the GPS for the needed NMEA Messages at 115,200 bps, then save the configuration to flash so that subsequent boot is faster. In any case, you should always see GPS connected at startup if you are watching the UART/Monitor serial data.
This means the Mapper is receiving NMEA messages at the expected bitrate, but it may not yet have a 3D position fix from the GPS.
Note that you never need to load or run special "GPS Reset" scripts to change the GPS settings. This build will find and configure the GPS from any known state, including Meshtastic builds.
GPS Debug
First, it is uncommon for GPS modules to be defective on the T-Beam. Try these steps to debug it, and reach out in the #mappers channel for help.
If 15 minutes of clear sky view did not result in a GPS Fix (blinking Red LED), then something is not correct. Ensure you have a good view of the sky, outdoors, with at least some horizon in view. The most common cause of failure is trying to get a first fix indoors, or with a limited view of the sky. "Near a window" doesn't count. That first fix takes time and needs many good and constant signals to download the full data set. Get it out in the open, and be patient.
Check the antenna cable connection to the board. The U.FL connector is fragile, and the routing of the wire through the hole in the PCB can cause tension, or disconnect in shipping. Some boards have been found with a broken U.FL connector, so inspect the solder joints as well.
Ensure the unit has good power, using a charged LiIon cell for power. It needs to stay on for 15 minutes or more without interruption.
If you see a blinking Red LED from the GPS, but the Mapper software does not have a fix, reporting *** NO GPS ***, then there is a software issue between the ESP32 and GPS. You can debug this further by selecting USB GPS from the menu and inspecting the NMEA sentences from the GPS to the UART console. You may also run Ublox tools this way, such as U-Center to study the GPS module behavior.
If USB GPS does not relay any NMEA sentences from the unit, then something is wrong in unusual ways. Reset the board and ensure that "GPS Connected" is shown during boot. It is not common for GPS modules to be defective, so keep trying different things and ask #mappers for ideas.
LED Indicators
The T-Beam has three LEDs. Unfortunately, two of them are underneath the typical OLED screen placement, so might be hard to see or concealed by a case.
- GPS Red LED, lower right on the board. This flashes once each second when the GPS has a position fix. It is controlled by the Neo 6M hardware and outside of software reach, so if this LED is not flashing, there is no useable GPS position.
- AXP Blue LED. This LED is controlled entirely by the AXP PMIC, and configured by software commands as on, off, or flashing. In this build, it indicates:
- ON: A packet is being sent on LoRaWAN
- Flashing at 4 Hz: The first packet has not yet been successfully sent after startup
- Off: Normal operation, nothing going on.
- ESP Red LED. The Red LED is not very bright or easy to see. Mapper lights this LED when a Confirmation request has been sent, and then turns the LED off when the confirmation Ack was received. This is a handy visual at-a-glance indicator that the unit is expecting to receive an Ack from the network. If you see this LED remain lit for an extended time, it means the network might be unreachable.
OLED Screen Display
The T-Beam usually comes as a kit with a 0.96" SSD1306 OLED screen that you must solder to power & i2c pins.
The OLED screen is always on when operating, as it uses only 10mA.
Status Bar
Operating Status is shown in the top two rows, with a running 4-line message log in the region below the line.
The top status line alternates between two displays every few seconds:
#ABCis the last three hex digits of your DevEUI, so you can match it to the correct device in Console. Handy if you have several Mappers that look the same.4.10vis the battery voltage48mAis the charge (or discharge) current to the battery. The TTGO charges the battery cell at around 300mA from USB, when possible.- Satellite HDOP & Count is displayed on the right at all times. (Lower HDOP hints at better GSP accuracy.)
- The GPS Time of Day (UTC) alternates on the display line every 2 seconds.
- A
*** NO GPS ***message will show when no GPS Fix is available.
The second line shows the current operating parameters.. Time Interval (seconds), Distance Interval (meters), and Spreading Factor / Bandwidth used for Uplink.
Message Log
The lower part of the OLED screen shows a scrolling display of four messages.
Most often, it shows the last Uplink packet sent:
- Frame Count is the first number, which you can match to the Uplink packet shown in Helium Console.
- The Trigger that caused this Uplink message:
Tfor Time,Dfor Distance, or>for menu requested "Just Send". - Time since last Uplink (seconds)
- Distance since last Uplink (meters)
Next is a cryptic set of characters showing how the Uplink proceeded, and how many packets were retried.
+is shown for any radio transmission. Each+is one Uplink.?is shown if a Confirmation (Ack) was requested as part of this Uplink!is shown when an Ack is received.
So, an Uplink might look like:
1850 T 120s 1m ?++!
for Frame Count 1850, a time-triggered packet after 2 minutes and only 1 meter away from the last one. Confirmation was requested. The first Uplink didn't get an Ack, so a second Uplink was sent. Then an Ack was received.
How often Acks are requested is configurable, defaulting to one-every-ten.
Uplink Payload
The Payload Port and byte content have been selected to match the format used by CubeCell mappers as well.
A custom Decoder Function translates the payload bytes into a set of JSON values required by the Integrations for both Mapper and Cargo. This turns the Base64 Payload into values for Lat, Long, Altitude, Speed, Battery, and Sats.
This Decoder Function can be pasted directly into the Console custom function. Do not use Decoder functions from other builds or instructions! The Uplink decoding is specific to the software that made the packet, so it has to match. (Note that HDOP is not sent in this data.)
Grafana integration for custom maps
If you want to maintain your own device map, there is an excellent Grafana guide here and additional information and template scripts by @takeabyte (@friends just call me bob) available.
Downlink
This builds adds the option to reconfigure the Mapper remotely via Helium Downlink (network to device). You can change the maximum Time Interval, Distance, and Battery Cut-off voltage remotely.
Format your Downlink Payload.
You can use the console-decoders/downlink_encoder.py Python script to convert your intent into a Base64 Payload.
% python downlink_encoder.py --help
usage: downlink_encoder.py [-h] [--distance DISTANCE] [--time TIME] [--cutoffvolts CUTOFFVOLTS]

Encode a downlink payload for a Helium mapper.

options:
  -h, --help            show this help message and exit
  --distance DISTANCE, -d DISTANCE
                        Map distance interval (meters)
  --time TIME, -t TIME  Minimum time interval (seconds)
  --cutoffvolts CUTOFFVOLTS, -c CUTOFFVOLTS
                        Low Voltage Power Off (volts)
For example, you might want to change the Mapper to 75 meter distance, and 600 second maximum time:
% python downlink_encoder.py -d 75 -t 600
00 4B 02 58 00
AEsCWAA=
That last output AEsCWAA= is the Base64-encoded payload, ready to use.
Queue the Downlink packet for transmission
Paste that payload into the Helium Console under the Downlink panel for that device. Select a specific device, then the "Cloud Down-arrow" icon on the right ("Send a manual downlink to this device") to open the Downlink panel.
Leave FPort set to the default (1), and type as default (Base64). Queue it for transmission using the Cloud down-arrow button, and the packet should appear in the Download Queue.
When the mapper next reports (uplink), it will receive this directive and show the updates on-screen. To rush things along, you can cause an immediate Uplink (& Downlink) by pressing the middle button on the TTGO.
Allowed values
Setting any value to zero will leave the present value unchanged by the downlink.
Maximum Distance interval can be 1 to 65,534 meters. Time interval can be 1 to 65,534 seconds. A special time interval of -1 indicates that you want to remove any override and revert to the time interval in the software build configuration.
Battery voltage cutoff can range from 2.0 to 4.5 volts. If you set a cutoff higher than the present battery voltage, the Mapper will immediately power down. When it reboots (on USB power present), the default battery cutoff will be restored from the software build.
None of the Downlink values persist across power-off & on; the device always reverts to compiled-in values on startup.
History and Credit
This build is a modification of work by many experts, with input from the Helium Discord #mappers community. Thanks to @Kicko, Fizzy, and @tmiklas especially, along with the work done on similar builds for the Heltec CubeCell mappers and Helium Integrations. The helpful text below is quoted from prior forks:
The Fork history here in Github shows the lineage and prior work, including https://github.com/helium/longfi-arduino/tree/master/TTGO-TBeam-Tracker
This code was originally developed for use on The Things Network (TTN) it has been edited/repurposed for use with the Helium Network.
This version is based on a forked repo from github user [kizniche] https://github.com/kizniche/ttgo-tbeam-ttn-tracker. Which in turn is based on the code from xoseperez/ttgo-beam-tracker, with excerpts from dermatthias/Lora-TTNMapper-T-Beam to fix an issue with incorrect GPS data being transmitted to the network. Support was also added for the 915 MHz frequency (North and South America). lewisxhe/TTGO-T-Beam was referenced for enabling use on the newer T-Beam board (Rev1).
This is a LoRaWAN node based on the TTGO T-Beam development platform using the SSD1306 I2C OLED display. It uses a RFM95 by HopeRF and the MCCI LoRaWAN LMIC stack. This sample code is configured to connect to The LoRaWan network using the US 915 MHz frequency by default, but can be changed to EU 868 MHz.
NOTE: There are now 2 versions of the TTGO T-BEAM, the first version (Rev0) and a newer version (Rev1). The GPS module on Rev1 is connected to different pins than Rev0. This code has been successfully tested on REV0, and is in the process of being tested on REV1. See the end of this README for photos of each board.
Setup
-
Install VisualStudio Code (https://code.visualstudio.com/)
-
Add the PlattformIO extension within VS Code (https://platformio.org/install/ide?install=vscode)
-
Check Device Manager if a serial device appear on connecting the T-Beam. If nothing appears a driver for the USB to serial Adapter need to be installed.(https://www.silabs.com/developers/usb-to-uart-bridge-vcp-drivers)
-
Check and edit platformio.ini to use the right bandplan for your region.
-
Within the Helium Console, add a Mapper or Cargo integration.
- step by step details for setting up a Mapper integration can be found here.
- detail for setting up a Cargo integration can be found here.
The specific details for adding a Mapper or Cargo integration use a different edge node device than the one detailed here. When prompted to add a function decoder, be sure to use the Decoder Function above.
Filenames with .ino are a holdover from Arduino IDE. Do not use Arduino IDE to compile this build; use PlatformIO instead.
- Disconnect and turn on the device and once a GPS lock is acquired, the device should start sending data to the Helium network and Helium Mapper or Helium Cargo depending upon which you configured in step 6.
Using the Mapping Data
Now that your device is hopefully connecting to the Helium network refer to the following for more details about interpreting the mapping data.
- For the Helium Mapping effort visit here
- For the Helium Cargo effort visit here. Pay particular attention to the "Info" note found on this page.