|
|
||
|---|---|---|
| drivers | ||
| images | ||
| plot | ||
| .gitignore | ||
| LICENSE | ||
| README.md | ||
| aclock.py | ||
| alevel.py | ||
| arial10.py | ||
| color15.py | ||
| color96.py | ||
| courier20.py | ||
| font6.py | ||
| freesans20.py | ||
| mono_test.py | ||
| nanogui.py | ||
README.md
A lightweight and minimal MicroPython GUI library for display drivers based on
the framebuf class. With the exception of the Nokia 5110, such drivers are
currently for color and monochrome OLED displays. This is coincidental.
These images don't do justice to the OLED displays which are visually
impressive with bright colors and extreme contrast. For some reason they are
quite hard to photograph.
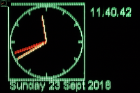 The aclock.py demo.
 Label objects in two fonts.
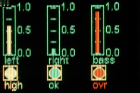
One of the demos running on an Adafruit 1.27 inch OLED. The colors change
dynamically with low values showing green, intermediate yellow and high red.
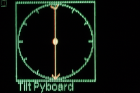
The alevel.py demo. The Pyboard was mounted vertically: the length and angle
of the vector arrow varies as the Pyboard is moved.
There is an optional graph plotting module for basic Cartesian and polar plots, also realtime plotting including time series.
Notes on Adafruit and other OLED displays including wiring details, pin names and hardware issues.
NOTE 20 Sep 2018 Under development. I am now reasonably happy with the API but I can't yet promise no changes. There may, of course, be bugs...
Contents
- Introduction
- Files and Dependencies
2.1 Dependencies
2.2.1 Monochrome use
2.2.2 Color use - The nanogui module
3.1 Initialisation Initial setup and refresh method.
3.2 Label class Dynamic text at any screen location.
3.3 Meter class A vertical panel meter.
3.4 LED class Virtual LED of any color.
3.5 Dial and Pointer classes Clock or compass style display of one or more pointers. - Device drivers Device driver compatibility requirements (these are minimal).
1. Introduction
This library provides a limited set of GUI objects (widgets) for displays whose
display driver is subclassed from the framebuf class. Examples are:
- The official SSD1306 driver.
- The PCD8544/Nokia 5110.
- The Adafruit 0.96 inch color OLED with this driver.
- A driver for Adafruit 1.5 inch OLED and Adafruit 1.27 inch OLED may be found here.
Widgets are intended for the display of data from physical devices such as
sensors. The GUI is display-only: there is no provision for user input. This
is because there are no frmebuf- based display drivers for screens with a
touch overlay. Authors of applications requiring input should consider my touch
GUI's for the official lcd160cr or for SSD1963 based displays.
Widgets are drawn using graphics primitives rather than icons to minimise RAM usage. It also enables them to be effciently rendered at arbitrary scale on devices with restricted processing power.
Owing to RAM requirements and limitations on communication speed, framebuf
based display drivers are intended for physically small displays with limited
numbers of pixels. The widgets are designed for displays as small as 0.96
inches: this involves some compromises. They aim to maximise the information
on screen by offering the option of dynamically changing colors.
Copying the contents of the frame buffer to the display is relatively slow. The time depends on the size of the frame buffer and the interface speed, but the latency may be too high for applications such as games. For example the time to update a 1281288 color ssd1351 display on a Pyboard 1.0 is 41ms.
Drivers based on framebuf must allocate contiguous RAM for the buffer. To
avoid 'out of memory' errors it is best to instantiate the display early,
possibly before importing many other modules. The aclock.py and alevel.py
demos illustrate this.
2. Files and Dependencies
2.1 Files
nanogui.pyThe library.mono_test.pyTests/demos using the official SSD1306 library for a monochrome 128*64 OLED display.color96.pyTests/demos for the Adafruit 0.96 inch color OLED.color15.pySimilar for Adafruit 1.27 inch and 1.5 inch color OLEDs. Edit theheight = 96line as per the comment for the larger display.
Demos for Adafruit 1.27 inch and 1.5 inch color OLEDs. Edit the height = 96
line as per the code comment for the larger display.
aclock.pyAnalog clock demo.alevel.pySpirit level using Pyboard accelerometer.
Sample fonts created by font_to_py.py:
arial10.pycourier20.pyfont6.pyfreesans20.py
2.2 Dependencies
All applicatons require a device driver for the display in use plus any Python font files in use. The following is required by all applications:
- writer.py Provides text rendering.
2.2.1 Monochrome use
OLED displays using the SSD1306 chip require:
- ssd1306_setup.py Contains wiring information.
- The official SSD1306 driver.
Displays based on the PCD8544 chip require:
2.2.2 Color use
Supported displays amd their drivers are listed below:
- Adafruit 0.96 inch color OLED. Driver for SSD1331 controller.
- Adafruit 1.5 and 1.27 inch color OLEDs Driver for SSD1351 controller.
Test script for Adafruit 1.5 and 1.27 inch color OLED displays. It's a good
idea to paste this at the REPL to ensure the display is working before
progressing to the GUI. Remember to change height if using the 1.5 inch
display.
import machine
from ssd1351 import SSD1351 as SSD

pdc = machine.Pin('X1', machine.Pin.OUT_PP, value=0)
pcs = machine.Pin('X2', machine.Pin.OUT_PP, value=1)
prst = machine.Pin('X3', machine.Pin.OUT_PP, value=1)
spi = machine.SPI(1)
ssd = SSD(spi, pcs, pdc, prst, height=96)  # Ensure height is correct (96/128)
ssd.fill(0)
ssd.line(0, 0, 127, 95, ssd.rgb(0, 255, 0))  # Green diagonal corner-to-corner
ssd.rect(0, 0, 15, 15, ssd.rgb(255, 0, 0))  # Red square at top left
ssd.show()
Contents
3. The nanogui module
This supports widgets whose text components are drawn using the Writer
(monochrome) or CWriter (colour) classes. Upside down rendering is not
supported: attempts to specify it will produce unexpected results.
Widgets are drawn at specific locations on screen and are incompatible with the
display of scrolling text: they are therefore not intended for use with the
Writer.printstring method. The coordinates of a widget are those of its top
left corner. If a border is specified, this is drawn outside of the limits of
the widgets with a margin of 2 pixels. If the widget is placed at [row, col]
the top left hand corner of the border is at [row-2, col-2].
When a widget is drawn or updated (typically with its value method) it is not
immediately displayed. To update the display nanogui.refresh is called: this
ensures that the framebuf contents are updated before copying the contents to
the display. This postponement is for performance reasons and to provide the
appearance of a rapid update.
3.1 Initialisation
The GUI is initialised in the following stages. The aim is to allocate the
framebuf before importing other modules. This is intended to reduce the risk
of memory failures when instantiating a large framebuf in an application which
imports multiple modules.
Firstly set the display height and import the driver:
height = 96  # 1.27 inch 96*128 (rows*cols) display. Set to 128 for 1.5 inch
import machine
import gc
from ssd1351 import SSD1351 as SSD  # Import the display driver
Then set up the bus (SPI or I2C) and instantiate the display. At this point the framebuffer is created:
pdc = machine.Pin('X1', machine.Pin.OUT_PP, value=0)
pcs = machine.Pin('X2', machine.Pin.OUT_PP, value=1)
prst = machine.Pin('X3', machine.Pin.OUT_PP, value=1)
spi = machine.SPI(1)
gc.collect()  # Precaution before instantiating framebuf
ssd = SSD(spi, pcs, pdc, prst, height)  # Create a display instance
Finally import nanogui modules and initialise the display. Import any other
modules required by the application. For each font to be used import the
Python font and create a CWriter instance (for monochrome displays a Writer
is used):
from nanogui import Label, Dial, Pointer, refresh  # Whatever you need
refresh(ssd)  # Initialise and clear display.

from writer import CWriter  # Import other modules
import arial10  # Font
GREEN = SSD.rgb(0, 255, 0)  # Define colors
RED = SSD.rgb(255, 0, 0)
BLUE = SSD.rgb(0, 0, 255)
YELLOW = SSD.rgb(255, 255, 0)
BLACK = 0

CWriter.set_textpos(ssd, 0, 0)  # In case previous tests have altered it
 # Instantiate any CWriters to be used (one for each font)
wri = CWriter(ssd, arial10, GREEN, BLACK, verbose=False)
wri.set_clip(True, True, False)
The nanogui.refresh method takes two args:
deviceThe display instance (supports multiple displays).clear=FalseIf setTruethe display will be blanked; it is also blanked when a device is refreshed for the first time.
It should be called after instantiating the display, and again whenever the physical display is to be updated.
Contents
3.2 Label class
This supports applications where text is to be rendered at specific screen locations.
Text can be static or dynamic. In the case of dynamic text the background is cleared to ensure that short strings cleanly replace longer ones.
Labels can be displayed with an optional single pixel border.
Colors are handled flexibly. By default the colors used are those of the
Writer instance, however they can be changed dynamically; this might be used
to warn of overrange or underrange values.
Constructor args:
writerTheWriterinstance (font and screen) to use.rowLocation on screen.coltextIf a string is passed it is displayed: typically used for static text. If an integer is passed it is interpreted as the maximum text length in pixels; typically obtained fromwriter.stringlen('-99.99'). Nothing is dsplayed until.value()is called. Intended for dynamic text fields.invert=FalseDisplay in inverted or normal style.fgcolor=NoneOptionally override theWritercolors.bgcolor=Nonebdcolor=FalseIfFalseno border is displayed. IfNonea border is shown in theWriterforgeround color. If a color is passed, it is used.
The constructor displays the string at the required location.
Methods:
valueRedraws the label. This takes the following args:text=NoneThe text to display. IfNonedisplays last value.invert=FalseIf true, show inverse text.fgcolor=NoneForeground color: ifNonetheWriterdefault is used.bgcolor=NoneBackground color, as per foreground.bdcolor=NoneBorder color. As per above except that ifFalseis passed, no border is displayed. This clears a previously drawn border.
Returns the current text string.
showNo args. (Re)draws the label. Primarily for internal use by GUI.
If populating a label would cause it to extend beyond the screen boundary a warning is printed at the console. The label may appear at an unexpected place. The following is a complete "Hello world" script.
height = 96  # 1.27 inch 96*128 (rows*cols) display. Set to 128 for 1.5 inch
import machine
import gc
from ssd1351 import SSD1351 as SSD  # Import the display driver
pdc = machine.Pin('X1', machine.Pin.OUT_PP, value=0)
pcs = machine.Pin('X2', machine.Pin.OUT_PP, value=1)
prst = machine.Pin('X3', machine.Pin.OUT_PP, value=1)
spi = machine.SPI(1)
gc.collect()  # Precaution before instantiating framebuf
ssd = SSD(spi, pcs, pdc, prst, height)  # Create a display instance
from nanogui import Label, refresh
refresh(ssd)  # Initialise and clear display.
from writer import CWriter  # Import other modules
import freesans20  # Font
GREEN = SSD.rgb(0, 255, 0)  # Define colors
BLACK = 0
CWriter.set_textpos(ssd, 0, 0)  # In case previous tests have altered it
wri = CWriter(ssd, freesans20, GREEN, BLACK, verbose=False)
wri.set_clip(True, True, False)
 # End of boilerplate code. This is our application:
Label(wri, 2, 2, 'Hello world!')
refresh(ssd)
Contents
3.3 Meter class
This provides a vertical linear meter display of values scaled between 0.0 and 1.0.
Constructor positional args:
writerTheWriterinstance (font and screen) to use.rowLocation on screen.col
Keyword only args:height=50Height of meter.width=10Width.fgcolor=NoneForeground color: ifNonetheWriterdefault is used.bgcolor=NoneBackground color, as per foreground.ptcolor=NoneColor of meter pointer or bar. Default is foreground color.bdcolor=FalseIfFalseno border is displayed. IfNonea border is shown in theWriterforgeround color. If a color is passed, it is used.divisions=5No. of gradutions to show.label=NoneA text string will cause aLabelto be drawn below the meter. An integer will create aLabelof that width for later use.style=Meter.LINEThe pointer is a horizontal line.Meter.BARcauses a vertical bar to be displayed.legends=NoneIf a tuple of strings is passed,Labelinstances will be displayed to the right hand side of the meter, starting at the bottom. E.G.('0.0', '0.5', '1.0')value=NoneInitial value. IfNonethe meter will not be drawn until itsvalue()method is called.
Methods:
valueArgs:n=None, color=None.nshould be a float in range 0 to 1.0. Causes the meter to be updated. Out of range values are constrained. IfNoneis passed the meter is not updated.colorUpdates the color of the bar or line if a value is also passed.Nonecauses no change.
Returns the current value.
textUpdates the label if present (otherwise throws aValueError). Args:text=NoneThe text to display. IfNonedisplays last value.invert=FalseIf true, show inverse text.fgcolor=NoneForeground color: ifNonetheWriterdefault is used.bgcolor=NoneBackground color, as per foreground.bdcolor=NoneBorder color. As per above except that ifFalseis passed, no border is displayed. This clears a previously drawn border.
showNo args. (Re)draws the meter. Primarily for internal use by GUI.
Contents
3.4 LED class
This is a virtual LED whose color may be altered dynamically.
Constructor positional args:
writerTheWriterinstance (font and screen) to use.rowLocation on screen.col
Keyword only args:height=12Height of LED.fgcolor=NoneForeground color: ifNonetheWriterdefault is used.bgcolor=NoneBackground color, as per foreground.bdcolor=FalseIfFalseno border is displayed. IfNonea border is shown in theWriterforgeround color. If a color is passed, it is used.label=NoneA text string will cause aLabelto be drawn below the LED. An integer will create aLabelof that width for later use.
Methods:
colorargc=NoneChange the LED color toc. IfcisNonethe LED is turned off (rendered in the background color).textUpdates the label if present (otherwise throws aValueError). Args:text=NoneThe text to display. IfNonedisplays last value.invert=FalseIf true, show inverse text.fgcolor=NoneForeground color: ifNonetheWriterdefault is used.bgcolor=NoneBackground color, as per foreground.bdcolor=NoneBorder color. As per above except that ifFalseis passed, no border is displayed. This clears a previously drawn border.
showNo args. (Re)draws the LED. Primarily for internal use by GUI.
Contents
3.5 Dial and Pointer classes
A dial is a circular analogue clock style display showing a set of pointers. To
use, the Dial is instantiated then one or more Pointer objects are
instantiated and assigned to it. The Pointer.value method enables the Dial
to be updated, with the length, angle and color being dynamically variable.
Pointer values are complex numbers.
Constructor positional args:
writerTheWriterinstance (font and screen) to use.rowLocation on screen.col
Keyword only args:height=50Height and width of dial.fgcolor=NoneForeground color: ifNonetheWriterdefault is used.bgcolor=NoneBackground color, as per foreground.bdcolor=FalseIfFalseno border is displayed. IfNonea border is shown in theWriterforgeround color. If a color is passed, it is used.ticks=4No. of gradutions to show.label=NoneA text string will cause aLabelto be drawn below the meter. An integer will create aLabelof that width for later use.style=Dial.CLOCKPointers are drawn from the centre of the circle as per the hands of a clock.Dial.COMPASScauses pointers to be drawn as arrows centred on the control's centre. Arrow tail chevrons are suppressed for very short pointers.pip=NoneDraws a central dot. A color may be passed, otherwise the foreground color will be used. IfFalseis passed, no pip will be drawn. The pip is suppressed if the shortest pointer would be hard to see.
When a Pointer is instantiated it is assigned to the Dial by the Pointer
constructor.
The Pointer class:
Constructor arg:
dialTheDialinstance on which it is to be dsplayed.
Methods:
valueArgs:v=NoneThe value is a complex number. If its magnitude exceeds unity it is reduced (preserving phase) to constrain it to the boundary of the unit circle.color=NoneBy default the pointer is rendered in the foreground color of the parentDial. Otherwise the passed color is used.
textUpdates the label if present (otherwise throws aValueError). Args:text=NoneThe text to display. IfNonedisplays last value.invert=FalseIf true, show inverse text.fgcolor=NoneForeground color: ifNonetheWriterdefault is used.bgcolor=NoneBackground color, as per foreground.bdcolor=NoneBorder color. As per above except that ifFalseis passed, no border is displayed. This clears a previously drawn border.
showNo args. (Re)draws the control. Primarily for internal use by GUI.
Typical usage (ssd is the device and wri is the current Writer):
def clock(ssd, wri):
    # Border in Writer foreground color:
    dial = Dial(wri, 5, 5, ticks = 12, bdcolor=None)
    hrs = Pointer(dial)
    mins = Pointer(dial)
    hrs.value(0 + 0.7j, RED)
    mins.value(0 + 0.9j, YELLOW)
    dm = cmath.exp(-1j * cmath.pi / 30)  # Rotate by 1 minute
    dh = cmath.exp(-1j * cmath.pi / 1800)  # Rotate hours by 1 minute
    # Twiddle the hands: see clock.py for an actual clock
    for _ in range(80):
        utime.sleep_ms(200)
        mins.value(mins.value() * dm, RED)
        hrs.value(hrs.value() * dh, YELLOW)
        refresh(ssd)
4. Device drivers
For a driver to support nanogui it must be subclassed from framebuf and
provide height and width bound variables defining the display size in
pixels. This is all that is required for monochrome drivers.
For color drivers, to conserve RAM it is suggested that 8-bit color is used
for the framebuf. If the hardware does not support this, conversion to the
supported color space needs to be done "on the fly" as per the SSD1351 driver.
Since this is likely to be slow, consider using native, viper or assembler.
Color drivers should have a static method converting rgb(255, 255, 255) to a form acceptable to the driver. For 8-bit rrrgggbb this can be:
    @staticmethod
    def rgb(r, g, b):
        return (r & 0xe0) | ((g >> 3) & 0x1c) | (b >> 6)
This should be amended if the hardware uses a different 8-bit format.
The Writer (monochrome) or CWriter (color) classes and the nanogui module
should then work automatically.
If a display uses I2C note that owing to this issue soft I2C may be required, depending on the detailed specification of the chip.