|
|
||
|---|---|---|
| drivers | ||
| gui | ||
| images | ||
| .gitignore | ||
| ADAFRUIT.md | ||
| ASYNC.md | ||
| FPLOT.md | ||
| LICENSE | ||
| README.md | ||
| color_setup.py | ||
| esp32_setup.py | ||
| ssd1306_setup.py | ||
README.md
A lightweight and minimal MicroPython GUI library for display drivers based on
the framebuf class. Various display technologies are supported, primarily
small color OLED's. The GUI is cross-platform.
These images don't do justice to the OLED displays which are visually
impressive with bright colors and extreme contrast. For some reason they are
quite hard to photograph.
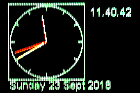 The aclock.py demo.
 Label objects in two fonts.

One of the demos running on an Adafruit 1.27 inch OLED. The colors change
dynamically with low values showing green, intermediate yellow and high red.
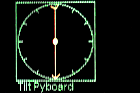
The alevel.py demo. The Pyboard was mounted vertically: the length and angle
of the vector arrow varies as the Pyboard is moved.
There is an optional graph plotting module for basic Cartesian and polar plots, also realtime plotting including time series.
 A sample image from the plot module.
Notes on Adafruit and other OLED displays including wiring details, pin names and hardware issues.
Contents
- Introduction
1.1 Update
1.2 Description
1.3 Quick start - Files and Dependencies
2.1 Dependencies
2.2.1 Monochrome use
2.2.2 Color use - The nanogui module
3.1 Initialisation Initial setup and refresh method.
3.2 Label class Dynamic text at any screen location.
3.3 Meter class A vertical panel meter.
3.4 LED class Virtual LED of any color.
3.5 Dial and Pointer classes Clock or compass style display of one or more pointers.
3.6 Scale class Linear display with wide dynamic range. - Device drivers Device driver compatibility requirements (these are minimal).
1. Introduction
This library provides a limited set of GUI objects (widgets) for displays whose
display driver is subclassed from the framebuf class. The GUI is display-only
and lacks provision for user input. This is because no framebuf based display
drivers exist for screens with a touch overlay. This is probably because touch
overlays require too many pixels and are best suited to displays with internal
frame buffers.
The GUI is cross-platform. By default it is configured for a Pyboard (1.x or D). This doc explains how to configure for other platforms by adapting a single small file. The GUI supports multiple displays attached to a single target, but bear in mind the RAM requirements for multiple frame buffers. It is tested on the ESP32 reference board without SPIRAM. Running on ESP8266 is probably not possible owing to its restricted RAM.
Authors of applications requiring touch should consider my touch GUI's for the following displays. These have internal buffers:
1.1 Update
This library has been refactored as a Python package. The aim is to reduce RAM
usage: widgets are imported on demand rather than unconditionally. This enabled
the addition of new widgets with zero impact on existsing applications. Another
aim was to simplify installation with dependencies such as writer included in
the tree. Finally hardware configuration is contained in a single file: details
only need to be edited in one place to run all demo scripts.
Existing users should re-install from scratch. In existing applications, import statements will need to be adapted as per the demos. The GUI API is otherwise unchanged.
1.2 Description
Compatible and tested display drivers include:
- The official SSD1306 driver.
- The PCD8544/Nokia 5110.
- The Adafruit 0.96 inch color OLED with this driver.
- A driver for Adafruit 1.5 inch OLED and Adafruit 1.27 inch OLED may be found here.
- A driver for Sharp ultra low power consumption monochrome displays such as 2.7 inch 400x240 pixels is here.
Widgets are intended for the display of data from physical devices such as sensors. They are drawn using graphics primitives rather than icons to minimise RAM usage. It also enables them to be effciently rendered at arbitrary scale on devices with restricted processing power. The approach also enables widgets to maximise information in ways that are difficult with icons, in particular using dynamic color changes in conjunction with moving elements.
Owing to RAM requirements and limitations on communication speed, framebuf
based display drivers are intended for physically small displays with limited
numbers of pixels. The widgets are designed for displays as small as 0.96
inches: this involves some compromises.
Copying the contents of the frame buffer to the display is relatively slow. The time depends on the size of the frame buffer and the interface speed, but the latency may be too high for applications such as games. For example the time to update a 128x128x8 color ssd1351 display on a Pyboard 1.0 is 41ms.
Drivers based on framebuf must allocate contiguous RAM for the buffer. To
avoid 'out of memory' errors it is best to instantiate the display before
importing other modules. The demos illustrate this.
1.3 Quick start
A GUI description can seem daunting because of the number of class config options. Defaults can usually be accepted and meaningful applications can be minimal. Installation can seem difficult. To counter this, this session using rshell installed and ran a demo showing analog and digital clocks.
Clone the repo to your PC, wire up a Pyboard (1.x or D) to an Adafruit 1.27"
OLED as per color_setup.py, move to the root directory of the repo and run
rshell.
> cp -r drivers /sd
> cp -r gui /sd
> cp color_setup.py /sd
> repl ~ import gui.demos.aclock
Note also that the gui.demos.aclock.py demo comprises 38 lines of actual
code. This stuff is easier than you might think.
2. Files and Dependencies
Firmware should be V1.13 or later.
Installation comprises copying the gui and drivers directories, with their
contents, plus a hardware configuration file, to the target. The directory
structure on the target must match that in the repo.
Filesystem space may be conserved by copying only the required driver from
drivers, but the directory path to that file must be retained. For example,
for SSD1351 displays only the following is actually required:
drivers/ssd1351/ssd1351.py
2.1 Files
2.1.1 Core files
The root directory contains setup files for monochrome and color displays. The relevant file will need to be edited to match the display in use, the MicroPython target and the electrical connections between display and target.
color_setup.pyColor displays. As written supports an SSD1351 display connected to a Pyboard.ssd1306_setup.pySetup file for monochrome displays using the official driver. Supports hard or soft SPI or I2C connections, as does the test scriptmono_test.py. On non Pyboard targets this will require adaptation to match the hardware connections.esp32_setup.pyAfter editing to match the display and wiring, this should be copied to the target as/pyboard/color_setup.py.
The gui/core directory contains the GUI core and its principal dependencies:
nanogui.pyThe library.writer.pyModule for rendering Python fonts.fplot.pyThe graph plotting module.colors.pyColor constants.framebuf_utils.mpyAccelerator for theCWriterclass. This optional file is compiled for STM hardware and will be ignored on other ports unless recompiled. Instructions and code for compiling for other architectures may be found here.
2.1.2 Demo scripts
The gui/demos directory contains test/demo scripts.
mono_test.pyTests/demos using the official SSD1306 library for a monochrome 128*64 OLED display.color96.pyTests/demos for the Adafruit 0.96 inch color OLED.color15.pySimilar for Adafruit 1.27 inch and 1.5 inch color OLEDs. Edit theheight = 96line as per the comment for the larger display.
Demos for Adafruit 1.27 inch and 1.5 inch color OLEDs. Edit the height = 96
line as per the code comment for the larger display.
aclock.pyAnalog clock demo. Cross platform.alevel.pySpirit level using Pyboard accelerometer.fpt.pyPlot demo. Cross platform.scale.pyA demo of the newScalewidget. Cross platform.asnano_sync.pyTwo Pyboard specific demos using the GUI withuasyncio.asnano.pyCould readily be adapted for other targets.
Compatibility with uasyncio and the last two demos are discussed
here.
Demo scripts for Sharp displays are in drivers/sharp. Check source code for
wiring details. See the README. They may be run as
follows:
import drivers.sharp.sharptest
# or
import drivers.sharp.clocktest
2.1.3 Fonts
Python font files are in the gui/fonts directory. The easiest way to conserve
RAM is to freeze them which is highly recommended. In doing so the directory
structure must be maintained. Python fonts may be created using
font_to_py.py. The
-x option for horizontal mapping must be specified. Supplied examples are:
arial10.pyVariable pitch Arial in various sizes.arial35.pyarial_50.pycourier20.pyFixed pitch font.font6.pyfont10.pyfreesans20.py
2.2 Dependencies
The source tree now includes all dependencies. These are listed to enable users to check for newer versions.
- writer.py Provides text rendering.
Optional feature:
- An STM32 implementation of this optimisation.
2.2.1 Monochrome use
The official driver for OLED displays using the SSD1306 chip is provided, but the source is here:
Displays based on the Nokia 5110 (PCD8544 chip) require this driver. It is not in this repo but may be found here:
2.2.2 Color use
Drivers for Adafruit 0.96", 1.27" and 1.5" OLEDS and the Sharp display are
included in the source tree. Each driver has its own small README.md. The
default driver for the larger OLEDs is Pyboard specific, but there are cross
platform alternatives in the directory.
If using the Adafruit 1.5 or 1.27 inch color OLED displays it is suggested that
after installing the GUI the following script is pasted at the REPL. This will
verify the hardware. Please change height to 128 if using the 1.5 inch
display. Note the commented-out cross platform alternative.
from machine import Pin, SPI
from drivers.ssd1351.ssd1351 import SSD1351 as SSD  # Pyboard-specific driver
height = 96   # Ensure height is correct (96/128)
pdc = Pin('Y1', Pin.OUT_PP, value=0)
pcs = Pin('Y2', Pin.OUT_PP, value=1)
prst = Pin('Y3', Pin.OUT_PP, value=1)
spi = SPI(2)
ssd = SSD(spi, pcs, pdc, prst, height=height)
ssd.fill(0)
ssd.line(0, 0, 127, height - 1, ssd.rgb(0, 255, 0))  # Green diagonal corner-to-corner
ssd.rect(0, 0, 15, 15, ssd.rgb(255, 0, 0))  # Red square at top left
ssd.show()
On ESP32 the following may be used:
from machine import Pin, SPI
from drivers.ssd1351.ssd1351_generic import SSD1351 as SSD  # Note generic driver
height = 128  # Ensure height is correct (96/128)
pdc = Pin(25, Pin.OUT, value=0)
pcs = Pin(26, Pin.OUT, value=1)
prst = Pin(27, Pin.OUT, value=1)
spi = SPI(1, 10_000_000, sck=Pin(14), mosi=Pin(13), miso=Pin(12))
ssd = SSD(spi, pcs, pdc, prst, height=height)
ssd.fill(0)
ssd.line(0, 0, 127, height - 1, ssd.rgb(0, 255, 0))  # Green diagonal corner-to-corner
ssd.rect(0, 0, 15, 15, ssd.rgb(255, 0, 0))  # Red square at top left
ssd.show()
Contents
3. The nanogui module
The GUI supports widgets whose text components are drawn using the Writer
(monochrome) or CWriter (colour) classes. Upside down rendering is not
supported: attempts to specify it will produce unexpected results.
Widgets are drawn at specific locations on screen and are incompatible with the
display of scrolling text: they are therefore not intended for use with the
Writer.printstring method. The coordinates of a widget are those of its top
left corner. If a border is specified, this is drawn outside of the limits of
the widgets with a margin of 2 pixels. If the widget is placed at [row, col]
the top left hand corner of the border is at [row-2, col-2].
When a widget is drawn or updated (typically with its value method) it is not
immediately displayed. To update the display nanogui.refresh is called: this
enables multiple updates to the framebuf contents before once copying the
buffer to the display. Postponement is for performance and provides a visually
rapid update.
3.1 Initialisation
The GUI is initialised in the following stages. The aim is to allocate the
framebuf before importing other modules. This is intended to reduce the risk
of memory failures when instantiating a large framebuf in an application which
imports multiple modules. Note that the hardware dependent code is located in
color_setup.py: it is illustrated here to explain the process.
Firstly set the display height and import the driver:
height = 96  # 1.27 inch 96*128 (rows*cols) display. Set to 128 for 1.5 inch
import machine
import gc
from drivers.ssd1351.ssd1351 import SSD1351 as SSD  # Import the display driver
Then set up the bus (SPI or I2C) and instantiate the display. At this point the framebuffer is created:
pdc = machine.Pin('X1', machine.Pin.OUT_PP, value=0)
pcs = machine.Pin('X2', machine.Pin.OUT_PP, value=1)
prst = machine.Pin('X3', machine.Pin.OUT_PP, value=1)
spi = machine.SPI(1)
gc.collect()  # Precaution before instantiating framebuf
ssd = SSD(spi, pcs, pdc, prst, height)  # Create a display instance
Finally import nanogui modules and initialise the display. Import any other
modules required by the application. For each font to be used import the
Python font and create a CWriter instance (for monochrome displays a Writer
is used):
from gui.core.nanogui import refresh
from gui.widgets.label import Label  # Import any widgets you plan to use
from gui.widgets.dial import Dial, Pointer

refresh(ssd)  # Initialise and clear display.

from gui.core.writer import CWriter  # Import other modules
import gui.fonts.arial10  # Font
from gui.core.colors import *  # Define colors

CWriter.set_textpos(ssd, 0, 0)  # In case previous tests have altered it
 # Instantiate any CWriters to be used (one for each font)
wri = CWriter(ssd, arial10, GREEN, BLACK, verbose=False)  # Colors are defaults
wri.set_clip(True, True, False)
The nanogui.refresh method takes two args:
deviceThe display instance (supports multiple displays).clear=FalseIf setTruethe display will be blanked; it is also blanked when a device is refreshed for the first time.
It should be called after instantiating the display, and again whenever the physical display is to be updated.
Contents
3.2 Label class
This supports applications where text is to be rendered at specific screen locations.
Text can be static or dynamic. In the case of dynamic text the background is cleared to ensure that short strings cleanly replace longer ones.
Labels can be displayed with an optional single pixel border.
Colors are handled flexibly. By default the colors used are those of the
Writer instance, however they can be changed dynamically; this might be used
to warn of overrange or underrange values.
Constructor args:
writerTheWriterinstance (font and screen) to use.rowLocation on screen.coltextIf a string is passed it is displayed: typically used for static text. If an integer is passed it is interpreted as the maximum text length in pixels; typically obtained fromwriter.stringlen('-99.99'). Nothing is dsplayed until.value()is called. Intended for dynamic text fields.invert=FalseDisplay in inverted or normal style.fgcolor=NoneOptionally override theWritercolors.bgcolor=Nonebdcolor=FalseIfFalseno border is displayed. IfNonea border is shown in theWriterforgeround color. If a color is passed, it is used.
The constructor displays the string at the required location.
Methods:
valueRedraws the label. This takes the following args:text=NoneThe text to display. IfNonedisplays last value.invert=FalseIf true, show inverse text.fgcolor=NoneForeground color: ifNonetheWriterdefault is used.bgcolor=NoneBackground color, as per foreground.bdcolor=NoneBorder color. As per above except that ifFalseis passed, no border is displayed. This clears a previously drawn border.
Returns the current text string.
showNo args. (Re)draws the label. Primarily for internal use by GUI.
If populating a label would cause it to extend beyond the screen boundary a warning is printed at the console. The label may appear at an unexpected place. The following is a complete "Hello world" script.
height = 96  # 1.27 inch 96*128 (rows*cols) display. Set to 128 for 1.5 inch
import machine
import gc
from drivers.ssd1351.ssd1351 import SSD1351 as SSD
pdc = machine.Pin('Y1', machine.Pin.OUT_PP, value=0)
pcs = machine.Pin('Y2', machine.Pin.OUT_PP, value=1)
prst = machine.Pin('Y3', machine.Pin.OUT_PP, value=1)
spi = machine.SPI(2)
gc.collect()  # Precaution before instantiating framebuf
ssd = SSD(spi, pcs, pdc, prst, height)  # Create a display instance
from gui.core.nanogui import refresh
from gui.widgets.label import Label
refresh(ssd)  # Initialise and clear display.
from gui.core.writer import CWriter  # Import other modules
import gui.fonts.freesans20 as freesans20 # Font
GREEN = SSD.rgb(0, 255, 0)  # Define colors
BLACK = 0
CWriter.set_textpos(ssd, 0, 0)  # In case previous tests have altered it
wri = CWriter(ssd, freesans20, GREEN, BLACK, verbose=False)
wri.set_clip(True, True, False)
 # End of boilerplate code. This is our application:
Label(wri, 2, 2, 'Hello world!')
refresh(ssd)
Contents
3.3 Meter class
This provides a vertical linear meter display of values scaled between 0.0 and 1.0.
Constructor positional args:
writerTheWriterinstance (font and screen) to use.rowLocation on screen.col
Keyword only args:height=50Height of meter.width=10Width.fgcolor=NoneForeground color: ifNonetheWriterdefault is used.bgcolor=NoneBackground color, as per foreground.ptcolor=NoneColor of meter pointer or bar. Default is foreground color.bdcolor=FalseIfFalseno border is displayed. IfNonea border is shown in theWriterforgeround color. If a color is passed, it is used.divisions=5No. of graduations to show.label=NoneA text string will cause aLabelto be drawn below the meter. An integer will create aLabelof that width for later use.style=Meter.LINEThe pointer is a horizontal line.Meter.BARcauses a vertical bar to be displayed.legends=NoneIf a tuple of strings is passed,Labelinstances will be displayed to the right hand side of the meter, starting at the bottom. E.G.('0.0', '0.5', '1.0')value=NoneInitial value. IfNonethe meter will not be drawn until itsvalue()method is called.
Methods:
valueArgs:n=None, color=None.nshould be a float in range 0 to 1.0. Causes the meter to be updated. Out of range values are constrained. IfNoneis passed the meter is not updated.colorUpdates the color of the bar or line if a value is also passed.Nonecauses no change.
Returns the current value.
textUpdates the label if present (otherwise throws aValueError). Args:text=NoneThe text to display. IfNonedisplays last value.invert=FalseIf true, show inverse text.fgcolor=NoneForeground color: ifNonetheWriterdefault is used.bgcolor=NoneBackground color, as per foreground.bdcolor=NoneBorder color. As per above except that ifFalseis passed, no border is displayed. This clears a previously drawn border.
showNo args. (Re)draws the meter. Primarily for internal use by GUI.
Contents
3.4 LED class
This is a virtual LED whose color may be altered dynamically.
Constructor positional args:
writerTheWriterinstance (font and screen) to use.rowLocation on screen.col
Keyword only args:height=12Height of LED.fgcolor=NoneForeground color: ifNonetheWriterdefault is used.bgcolor=NoneBackground color, as per foreground.bdcolor=FalseIfFalseno border is displayed. IfNonea border is shown in theWriterforgeround color. If a color is passed, it is used.label=NoneA text string will cause aLabelto be drawn below the LED. An integer will create aLabelof that width for later use.
Methods:
colorargc=NoneChange the LED color toc. IfcisNonethe LED is turned off (rendered in the background color).textUpdates the label if present (otherwise throws aValueError). Args:text=NoneThe text to display. IfNonedisplays last value.invert=FalseIf true, show inverse text.fgcolor=NoneForeground color: ifNonetheWriterdefault is used.bgcolor=NoneBackground color, as per foreground.bdcolor=NoneBorder color. As per above except that ifFalseis passed, no border is displayed. This clears a previously drawn border.
showNo args. (Re)draws the LED. Primarily for internal use by GUI.
Contents
3.5 Dial and Pointer classes
A dial is a circular analogue clock style display showing a set of pointers. To
use, the Dial is instantiated then one or more Pointer objects are
instantiated and assigned to it. The Pointer.value method enables the Dial
to be updated, with the length, angle and color being dynamically variable.
Pointer values are complex numbers.
Constructor positional args:
writerTheWriterinstance (font and screen) to use.rowLocation on screen.col
Keyword only args:height=50Height and width of dial.fgcolor=NoneForeground color: ifNonetheWriterdefault is used.bgcolor=NoneBackground color, as per foreground.bdcolor=FalseIfFalseno border is displayed. IfNonea border is shown in theWriterforgeround color. If a color is passed, it is used.ticks=4No. of gradutions to show.label=NoneA text string will cause aLabelto be drawn below the meter. An integer will create aLabelof that width for later use.style=Dial.CLOCKPointers are drawn from the centre of the circle as per the hands of a clock.Dial.COMPASScauses pointers to be drawn as arrows centred on the control's centre. Arrow tail chevrons are suppressed for very short pointers.pip=NoneDraws a central dot. A color may be passed, otherwise the foreground color will be used. IfFalseis passed, no pip will be drawn. The pip is suppressed if the shortest pointer would be hard to see.
When a Pointer is instantiated it is assigned to the Dial by the Pointer
constructor.
The Pointer class:
Constructor arg:
dialTheDialinstance on which it is to be dsplayed.
Methods:
valueArgs:v=NoneThe value is a complex number. If its magnitude exceeds unity it is reduced (preserving phase) to constrain it to the boundary of the unit circle.color=NoneBy default the pointer is rendered in the foreground color of the parentDial. Otherwise the passed color is used.
textUpdates the label if present (otherwise throws aValueError). Args:text=NoneThe text to display. IfNonedisplays last value.invert=FalseIf true, show inverse text.fgcolor=NoneForeground color: ifNonetheWriterdefault is used.bgcolor=NoneBackground color, as per foreground.bdcolor=NoneBorder color. As per above except that ifFalseis passed, no border is displayed. This clears a previously drawn border.
showNo args. (Re)draws the control. Primarily for internal use by GUI.
Typical usage (ssd is the device and wri is the current Writer):
def clock(ssd, wri):
    # Border in Writer foreground color:
    dial = Dial(wri, 5, 5, ticks = 12, bdcolor=None)
    hrs = Pointer(dial)
    mins = Pointer(dial)
    hrs.value(0 + 0.7j, RED)
    mins.value(0 + 0.9j, YELLOW)
    dm = cmath.exp(-1j * cmath.pi / 30)  # Rotate by 1 minute
    dh = cmath.exp(-1j * cmath.pi / 1800)  # Rotate hours by 1 minute
    # Twiddle the hands: see clock.py for an actual clock
    for _ in range(80):
        utime.sleep_ms(200)
        mins.value(mins.value() * dm, RED)
        hrs.value(hrs.value() * dh, YELLOW)
        refresh(ssd)
Contents
3.6 Scale class
This displays floating point data having a wide dynamic range. It is modelled on old radios where a large scale scrolls past a small window having a fixed pointer. This enables a scale with (say) 200 graduations (ticks) to readily be visible on a small display, with sufficient resolution to enable the user to interpolate between ticks. Default settings enable estimation of a value to within +-0.1%.
Legends for the scale are created dynamically as it scrolls past the window.
The user may control this by means of a callback. The example lscale.py
illustrates a variable with range 88.0 to 108.0, the callback ensuring that the
display legends match the user variable. A further callback enables the scale's
color to change over its length or in response to other circumstances.
The scale displays floats in range -1.0 <= V <= 1.0.
Constructor positional args:
writerTheWriterinstance (font and screen) to use.rowLocation on screen.col
Keyword only arguments (all optional):
ticks=200Number of "tick" divisions on scale. Must be divisible by 2.legendcb=NoneCallback for populating scale legends (see below).tickcb=NoneCallback for setting tick colors (see below).height=0Pass 0 for a minimum height based on the font height.width=200border=2Border width in pixels.fgcolor=NoneForeground color. Defaults to system color.bgcolor=NoneBackground color defaults to system background.pointercolor=NoneColor of pointer. Defaults to.fgcolor.fontcolor=NoneColor of legends. Defaultfgcolor.
Method:
value=NoneSet or get the current value. Always returns the current value. A passedfloatis constrained to the range -1.0 <= V <= 1.0 and becomes theScale's current value. TheScaleis updated. PassingNoneenables reading the current value.
Callback legendcb
The display window contains 20 ticks comprising two divisions; by default a
division covers a range of 0.1. A division has a legend at the start and end
whose text is defined by the legendcb callback. If no user callback is
supplied, legends will be of the form 0.3, 0.4 etc. User code may override
these to cope with cases where a user variable is mapped onto the control's
range. The callback takes a single float arg which is the value of the tick
(in range -1.0 <= v <= 1.0). It must return a text string. An example from the
lscale.py demo shows FM radio frequencies:
def legendcb(f):
    return '{:2.0f}'.format(88 + ((f + 1) / 2) * (108 - 88))
The above arithmetic aims to show the logic. It can be simplified.
Callback tickcb
This callback enables the tick color to be changed dynamically. For example a
scale might change from green to orange, then to red as it nears the extremes.
The callback takes two args, being the value of the tick (in range
-1.0 <= v <= 1.0) and the default color. It must return a color. This example
is taken from the lscale.py demo:
def tickcb(f, c):
    if f > 0.8:
        return RED
    if f < -0.8:
        return BLUE
    return c
increasing the ticks value
This increases the precision of the display.
It does this by lengthening the scale while keeping the window the same size,
with 20 ticks displayed. If the scale becomes 10x longer, the value diference
between consecutive large ticks and legends is divided by 10. This means that
the tickcb callback must return a string having an additional significant
digit. If this is not done, consecutive legends will have the same value.
4. Device drivers
Device drivers capable of supporting nanogui can be extremely simple: see the
drivers/sharp/sharp.py for a minimal example.
For a driver to support nanogui it must be subclassed from
framebuf.FrameBuffer and provide height and width bound variables being
the display size in pixels. This, and a show method, are all that is required
for monochrome drivers.
Refresh must be handled by a show method taking no arguments; when called,
the contents of the buffer underlying the FrameBuffer must be copied to the
hardware.
For color drivers, to conserve RAM it is suggested that 8-bit color is used
for the framebuf. If the hardware does not support this, conversion to the
supported color space needs to be done "on the fly" as per the SSD1351 driver.
Since this is likely to be slow, consider using native, viper or assembler.
Color drivers should have a static method converting rgb(255, 255, 255) to a form acceptable to the driver. For 8-bit rrrgggbb this can be:
    @staticmethod
    def rgb(r, g, b):
        return (r & 0xe0) | ((g >> 3) & 0x1c) | (b >> 6)
This should be amended if the hardware uses a different 8-bit format.
The Writer (monochrome) or CWriter (color) classes and the nanogui module
should then work automatically.
Drivers for displays using I2C may need to use I2C.writevto depending on the chip requirements.