|
|
||
|---|---|---|
| .. | ||
| code | ||
| README.md | ||
README.md
webUI
webUI is a HabBoy GUI in a web browser:
- connects to
data_serverfor payload telemetry - displays any nuber HabDec interfaces
- displays OSM map with payload and HabBoy location
- displays google map with navigation route
- displays graphs and gauges with telemetry using highcharts.js
- Displays Habitat SSDV
Installation
webUI should be server with any web server, ie. apache.
Opening index.html directly from disk might not work due to CORS restrictions.
For testing, you can start simple python server:
cd webUI/code
python -m http.server 80
Then open browser and go to http://localhost
For example, if you use apache:
ln -s ~/habboy/webUI/code /var/www/html/habboy
Web UI is then available under URL http://habboy/habboy
User Interface
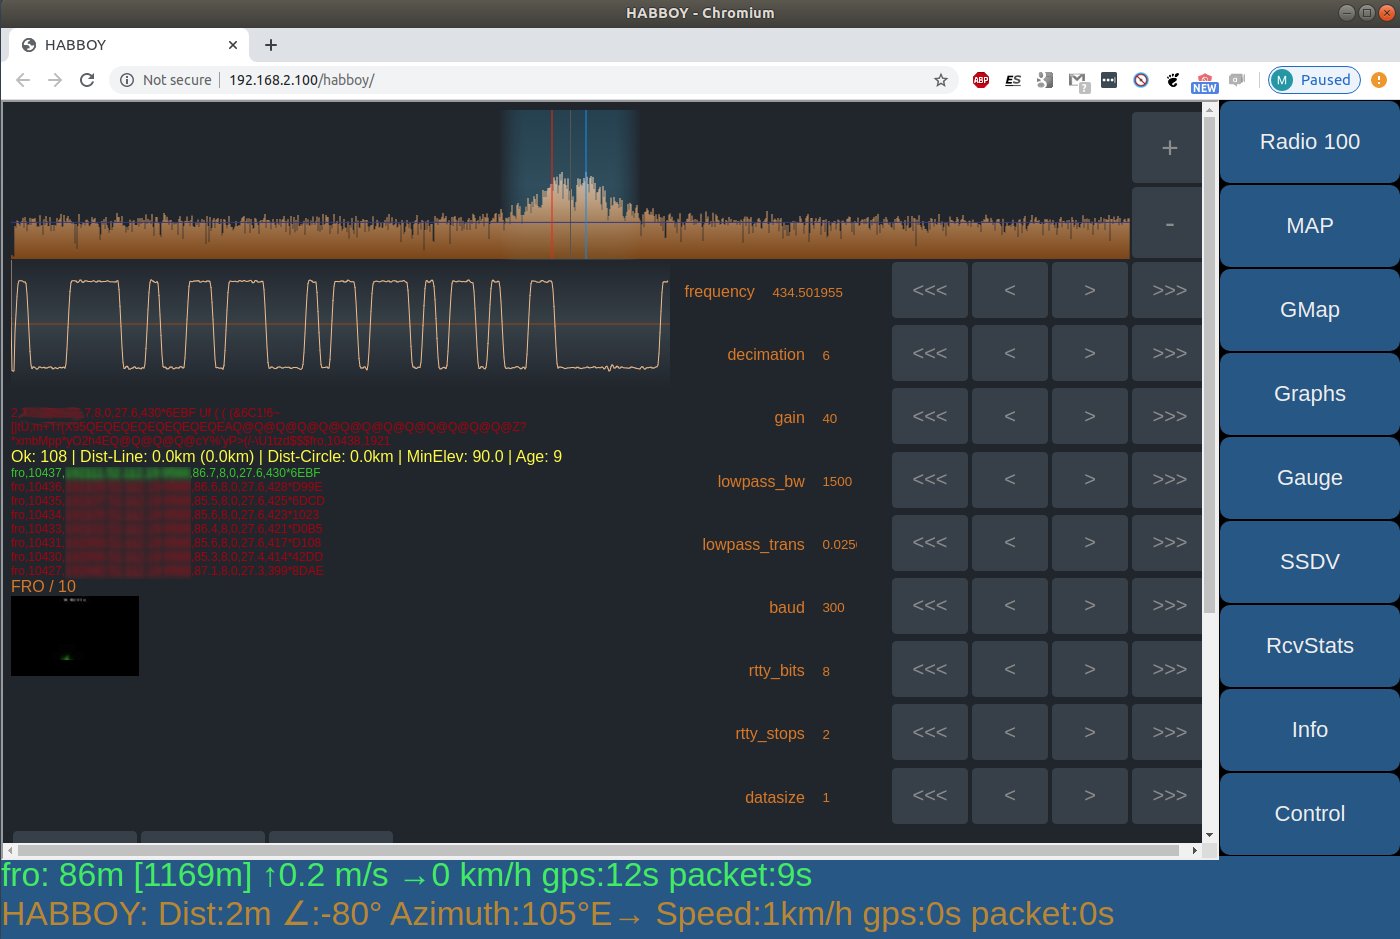
User Interface is divided in two parts. At the bottom is status bar.
Rest of the UI area is many tabs(Habdec, maps, etc.) that can be switched with buttons at right side of screen.
Status Bar
status bar is located at the bottom of the screen.
First line displays payload information:
- callsign
- altitude [max altitude]
- ascent rate m/s
- horizontal speed km/h
- GPS fix age (time since last GPS fix)
- last payload sentence age
Color of the payload line has meaning:
- green - 0-60 seconds age
- orange - 60-120 seconds age
- red - more than 120 seconds age
Second line displays information about HabBoy device:
- distance to payload
- payload elevation
- azimuth to payload
- HabBoy vehuicle speed km/h
- GPS fix age
- GPS packet age
Tabs
Right side of screen is a column of buttons. Each button is a tab.
Custom tabs can be added by editing HABBOY.js file.
Tab - HabDec
HabBoy can display multiple HabDec interfaces, one per radio/connection.
Each instance will have it's own TAB named Radio XXX, where XXX is last octed of HabDec IP address.
To install HabDec into HabBoy, create symlink (or copy):
cd ./habboy_sw/webUI
ln -s ~/habdec/code/webClient ./habdec_gui
To add new habBoy TAB, open URL:
http://habboy:8888/habboy/api/v1/habdec/add/192.168.1.100:5555
Where 192.168.1.100:5555 is addr:port oh running habdec websocketServer.
Tab - Map
Tab Map is OpenStreetMap vetor tiles map with location of payload, HabBoy device and predicted land spot.
To work correctly you must:
- install cusf and wind data as described in data_server
- prepare and install vector tiles as described here
Tab - Google Maps
To enable, edit webUI\code\js\HB_google_map.js file and fill your google API key in GMAPS_API_KEY variable.
You can uncomment HG_GoogleMap_NavigationUpdate() function call to enable google navigation. This needs more work however and is a mere experiment now.
Tab - Control
Various HabBoy settings.
Nav
Copy payload lat,lon to clipboard
Chase Car
Upload HabBoy GPS position to Habitat (as chasecar)
Payloads...
Select payload to track. These are payloads saved in data_server DB.
Device -> habdec_start / habdec_stop
start/stop HabDec daemon
Device -> spy_start / spy_stop
start/stop SpyServer daemon
Device -> restart
restart all daemons (habboy and habdec)
Device -> reboot
reboot computer
Device -> halt
stop computer
Directory Structure
Below is an example dir structure of /var/www/html
~  www tree -d -l -L 4 .
.
└── html
    ├── habboy -> /home/pi/share/dev/habboy/habboy_sw/webUI/code
    │   ├── css
    │   ├── habdec_gui -> /home/pi/share/dev/habdec/habdec/code/webClient
    │   │   ├── css
    │   │   └── js
    │   ├── img
    │   └── js
    │       └── highcharts
    ├── osm
    │   ├── font -> /home/pi/share/data/osm/font/klokantech/font
    │   │   ├── Klokantech Noto Sans Bold
    │   │   ├── ...
    │   │   └── Roboto Thin-Italic
    │   └── tiles -> /home/pi/share/data/osm/tiles
    │       ├── admin
    │       ├── aeroway
    │       ├── buildings
    │       ├── labels
    │       ├── landuse
    │       ├── roads
    │       └── water
    └── ssdv
        └── gallery