10 KiB
Using Google Sheets
This guide explains how to set up Google Sheets to process URLs automatically and then store the archiving status back into the Google sheet. It is broadly split into 3 steps:
- Setting up your Google Sheet
- Setting up a service account so Auto Archiver can access the sheet
- Setting the Auto Archiver settings
1. Setting up a Google Service Account
Once your Google Sheet is set up, you need to create what's called a 'service account' that will allow the Auto Archiver to access it.
To do this, you can either:
- a) follow the steps in this guide all the way up until step 8. You should have downloaded a file called
service_account.jsonand should save it in thesecrets/folder - b) run the following script to automatically generate the file:
https://raw.githubusercontent.com/bellingcat/auto-archiver/refs/heads/main/scripts/generate_google_services.sh | bash -s --
This uses gcloud to create a new project, a new user and downloads the service account automatically for you. The service account file will have the name service_account-XXXXXXX.json where XXXXXXX is a random 16 letter/digit string for the project created.
To save the generated file to a different folder, pass an argument as follows:
```{code} bash
https://raw.githubusercontent.com/bellingcat/auto-archiver/refs/heads/main/scripts/generate_google_services.sh | bash -s -- /path/to/secrets
Once you've downloaded the file, you can save it to secrets/service_account.json (the default name), or to another file and then change the location in the settings (see step 4).
Also make sure to note down the email address for this service account. You'll need that for step 3.
The email address created in this step can be found either by opening the `service_account.json` file, or if you used b) the `generate_google_services.sh` script, then the script will have printed it out for you.

The email address will look something like `user@project-name.iam.gserviceaccount.com`
2. Setting up your Google Sheet
We recommend copying this template Google Sheet as a starting point for your project, as this matches all the columns required.
But if you like, you can also create your own custom sheet. The only columns required are 'link', 'archive status', and 'archive location'. 'link' is the column with the URLs that you want the Auto Archiver to archive, the other two record the archival status and result.
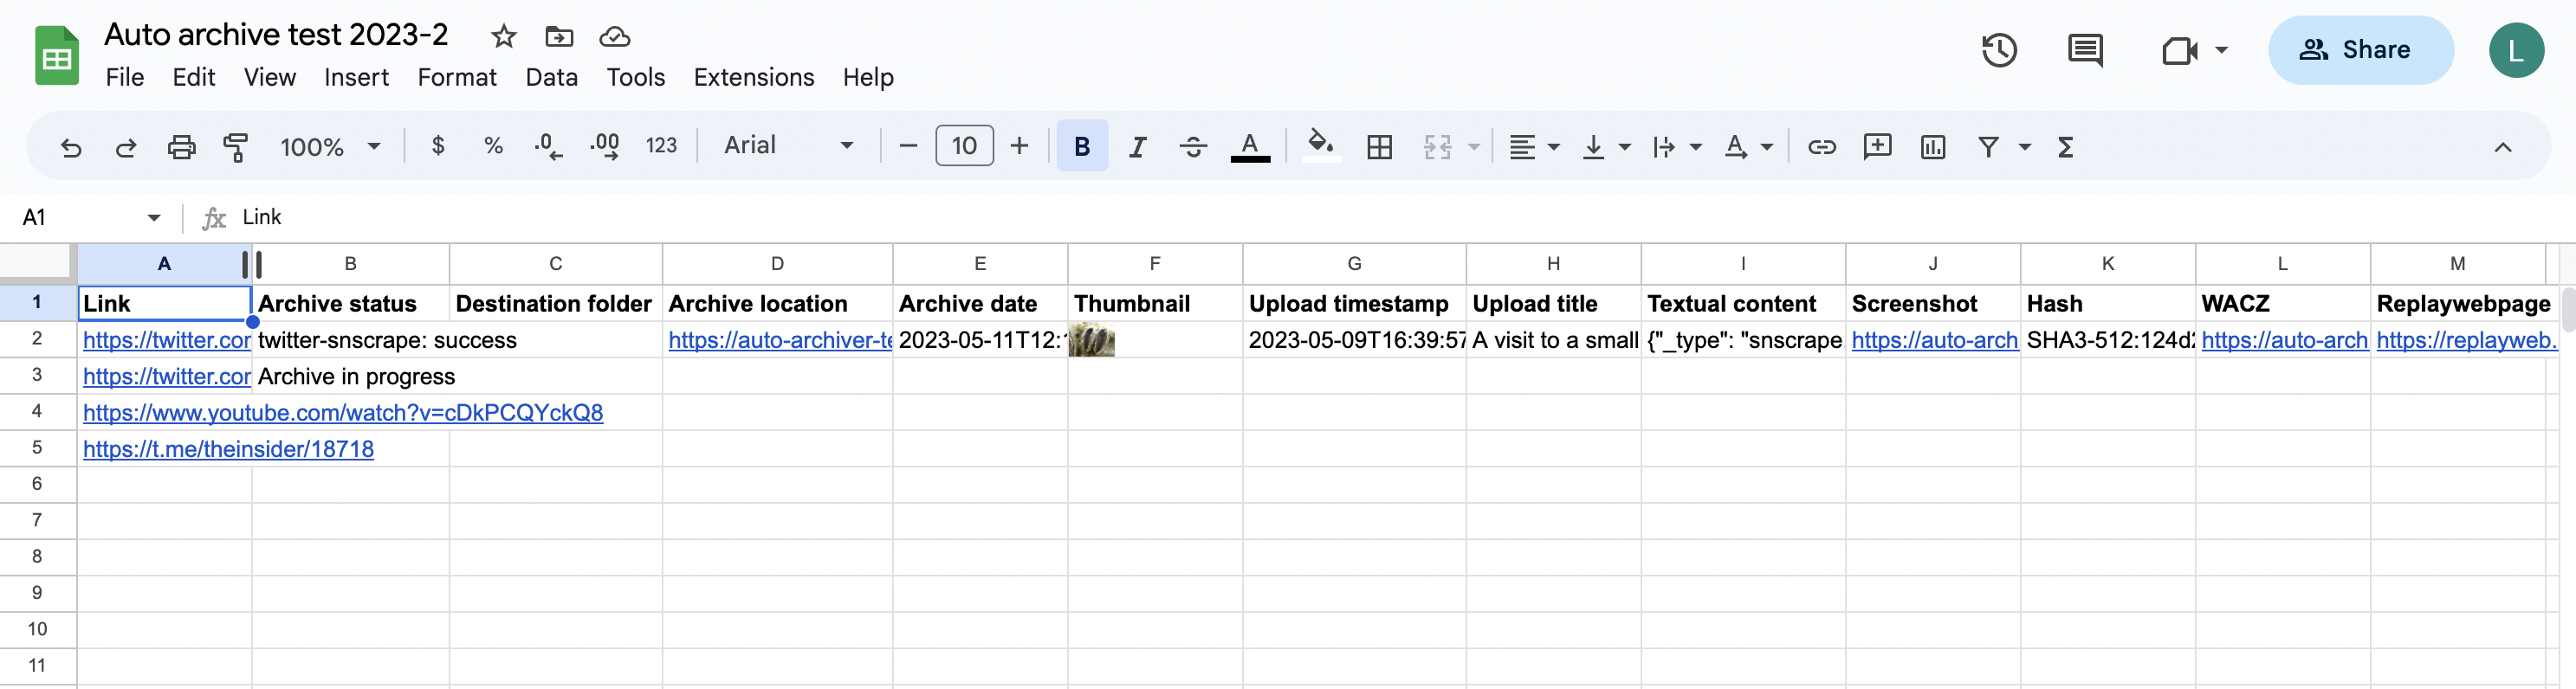
Here's an overview of all the columns, and what a complete sheet would look like.
Inputs:
These are processed by the Gsheet Feeder and passed to the Auto Archiver.
- Link (required): the URL of the post that is to be archived
- Destination folder: custom folder for archived file (regardless of storage)
Outputs:
These are updated by the Gsheet DB module during the archiving process. Note the required columns are only required if you are using the Gsheet DB module as well as the feeder.
- Archive status (required): Status of archive operation
- Archive location: URL of archived post
- Archive date: Date archived
- Thumbnail: Embeds a thumbnail for the post in the spreadsheet
- Timestamp: Timestamp of original post
- Title: Post title
- Text: Post text
- Screenshot: Link to screenshot of post
- Hash: Hash of archived HTML file (which contains hashes of post media) - for checksums/verification
- Perceptual Hash: Perceptual hashes of found images - these can be used for de-duplication of content
- WACZ: Link to a WACZ web archive of post
- ReplayWebpage: Link to a ReplayWebpage viewer of the WACZ archive
For example, this is a spreadsheet configured with all of the columns for the auto archiver and a few URLs to archive. In this example the Ghseet Feeder and Gsheet DB are being used, and the archive is in progress. (Note that the column names are not case sensitive.)

We'll change the name of the 'Destination Folder' column in the Step 4a.
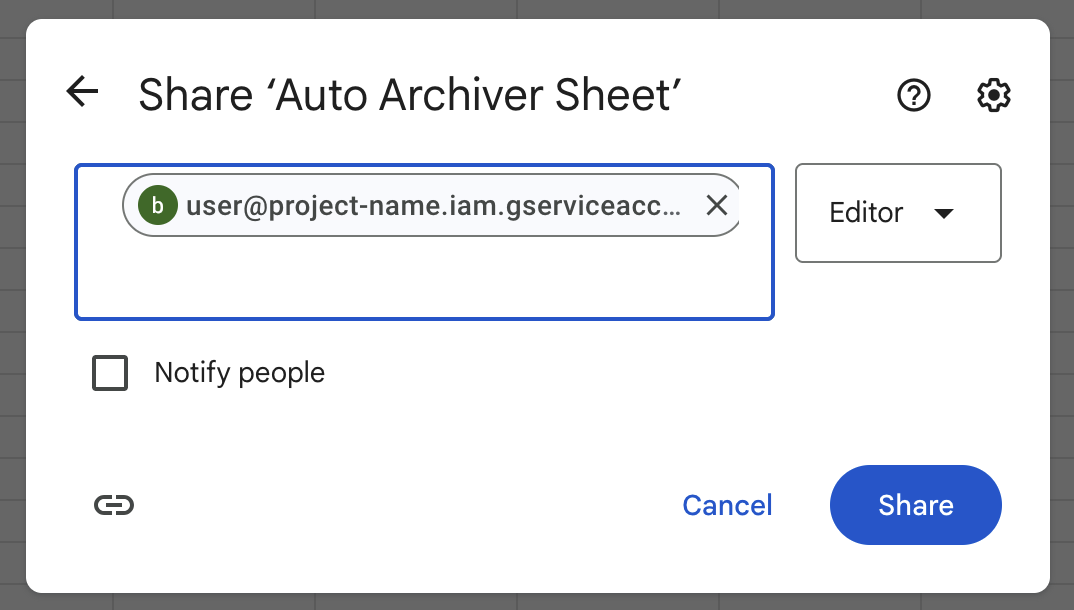
3. Share your Google Sheet with your Service Account email address
Remember that email address you copied in Step 1? Now that you've set up your Google sheet, click 'Share' in the top right hand corner and enter the email address. Make sure to give the account Editor access. Here's how that looks:
4. Setting up the configuration file
The final step is to set your configuration. First, make sure you have gsheet_feeder_db set in the steps.feeders section of your config. If you wish to store the results of the archiving process back in your Google sheet, make sure to also put gsheet_feeder_db setting in the steps.databases section. Here's how this might look:
steps:
    feeders:
    - gsheet_feeder_db
    ...
    databases:
    - gsheet_feeder_db # optional, if you also want to store the results in the Google sheet and tract the status of active archivals.
    ...
Next, set up the gsheet_feeder_db configuration settings in the 'Configurations' part of the config orchestration.yaml file. Open up the file, and set the gsheet_feeder_db.sheet setting or the gsheet_feeder_db.sheet_id setting. The sheet should be the name of your sheet, as it shows in the top left of the sheet.
For example, the sheet here is called 'Public Auto Archiver template'.
If you saved your service_account.json file to anywhere other than the default location (secrets/service_account.json), then also make sure to change that now:
Here's how this might look:
...
gsheet_feeder_db:
    sheet: 'My Awesome Sheet'
    service_account: secrets/service_account-XXXXX.json # or leave as secrets/service_account.json
    ...
You can also pass these settings directly on the command line without having to edit the file, here'a an example of how to do that (using docker):
docker run -it --rm -v $PWD/secrets:/app/secrets -v $PWD/local_archive:/app/local_archive bellingcat/auto-archiver:dockerize --gsheet_feeder_db.sheet "My Awesome Sheet 2".
Here, the sheet name has been overridden/specified in the command line invocation.
4a. (Optional) Changing the column names
In step 1, we said we would change the name of the 'Destination Folder'. Perhaps you don't like this name, or already have a sheet with a different name. In our example here, we want to name this column 'Save Folder'. To do this, we need to edit the ghseet_feeder_db.column setting in the configuration file.
For more information on this setting, see the Gsheet Feeder Database docs. We will first copy the default settings from the Gsheet Feeder docs for the 'column' settings, and then edit the 'Destination Folder' section to rename it 'Save Folder'. Our final configuration section looks like:
...
gsheet_feeder_db:
    sheet: 'My Awesome Sheet'
    header: 1
    service_account: secrets/service_account.json
    columns:
      url: link
      status: archive status
      folder: save folder # <-- note how this value has been changed
      archive: archive location
      date: archive date
      thumbnail: thumbnail
      timestamp: upload timestamp
      title: upload title
      text: text content
      screenshot: screenshot
      hash: hash
      pdq_hash: perceptual hashes
      wacz: wacz
      replaywebpage: replaywebpage
4. Running the Auto Archiver
Feeding the URLs to the Auto Archiver
The URLs to be archived should be added to the Google Sheet, and optionally a folder value. Leave all the other configured columns empty (but you may add additional columns for your own use, as long as they don't conflict with the column names mapped in the configuration file). The Auto Archiver will archive any URLs which have an empty 'status' column
Viewing the Results after archiving
With the ghseet_feeder_db installed, once you start running the Auto Archiver, it will update the "Archive status" column.
The status will be set to "Archive in progress" once the archival starts. If the archival is stopped during a run, either manually or because an error is raised the status value should be cleared.
The links are downloaded and archived, and the spreadsheet is updated to the following:

Note that the first row is skipped, as it is assumed to be a header row (--gsheet_feeder_db.header=1 and you can change it if you use more rows above). Rows with an empty URL column, or a non-empty archive column are also skipped. All sheets in the document will be checked.
The "archive location" link contains the path of the archived file, in local storage, S3, or in Google Drive.

Troubleshooting
Hanging Archival in progress status
Occasionally system crashes or other unexpected events can cause the Auto Archiver to exit without cleaning up the status value. If you are sure that all archival processes have stopped but you still see "Archive in progress" in the status column, you can manually clear the status column to allow the Auto Archiver to retry that archival on the next run.
Nothing archived status
Sometimes this means the tool is genuinely unable to extract the content at this point in time, but sometimes it can be resolved with different configurations. Try:
- Turning on additional 'extractor' types in the configuration file (this can appear as 'no archiver' in the status column).
- Changing credentials or refreshing session files for extractors which require them
- Check if the extractors can accept any additional configurations such as adding a cookie file.