|
|
||
|---|---|---|
| .tx | ||
| source | ||
| .gitignore | ||
| .travis.yml | ||
| Makefile | ||
| README.md | ||
| requirements.txt | ||
README.md
OpenDroneMap Docs
Contribute to OpenDroneMap's documentation! Anyone is welcome to share their knowledge and improve our documentation. 🎉 And it's pretty simple too!
"But I don't know if I can contribute"
Even if you think your contribution might not be valuable, it might be for other users! If you discovered something remotely useful to you, it probably is very useful to others! :)
Tips, tricks, hacks, datasets, lessons learned, best practices, every bit helps. We want to know! Share it.
How To Make Your First Contribution
If you don't have a GitHub account, register first. It's free and GitHub is awesome.
Once you have an account there are two ways to contribute. One is quick for small changes, the second takes a bit longer to setup but makes writing long parts of documentation much quicker.
The Quick Method
Simply browse to https://github.com/OpenDroneMap/docs/tree/publish/source and press one of the files. Each file corresponds to a page of the documentation. Press the "Edit" icon.

Make your changes, then select "Create a new branch for this commit and start a pull request". Complete the form that appears and wait for your changes to be approved! That's it!
The Pro Method
For quick changes the method above is quick and fast. But if you want to write docs like a pro, in your own text editor of choice, follow these steps.
Depending on your operating system, you should follow these steps to create a local copy of the documentation. This way you can modify and check the results before sending them for review.
Step 1. Make a Copy (fork) This Repository
Press the "Fork" button at the top of this page.

Step 2. Install Git and Python 3
Linux:
sudo apt-get install -y git python3 python3-pip
MacOS
We recommend to use Brew for installing Python3.
brew install python3
Git comes preinstalled on MacOS.
Windows
Download Git from https://git-scm.com/download/win and Python 3 from https://www.python.org/downloads/windows/
Step 3. Make A Local Copy of The Documentation
Open a Terminal (or a command prompt). In Windows you open a command prompt by pressing the Window Key and typing "Command Prompt" then Enter.
Then run (replacing "yourusername" with your GitHub username):
git clone https://github.com/yourusername/docs
If it's your first time using git, also run:
git config --global user.name "Your Name"
git config --global user.email "your@email.com"
With your information. So that we can credit the contributions to you.
Step 3. Get The Documentation Running
From the same Terminal (or command prompt) run the following:
cd docs/
pip install virtualenv
virtualenv -p python3 venv
source venv/bin/activate
pip install -r requirements.txt
Then if there are no errors, run:
make livehtml
Note that if WebODM is running you should temporarely stop it while you edit the documentation.
Step 4. Start Editing
You can now open a web browser to http://localhost:8000 and see the documentation!
You can use a text editor to edit the .rst files in the "source" folder (for example, Visual Studio Code).
As soon as you make a change to one of the files, your web browser will reload the documentation with the new changes!
Step 5. Publish Your Changes
Open a Terminal (or command prompt) and type:
cd docs/
git commit -a -m "A description of my changes"
git push origin publish
You will be prompted for your GitHub credentials.
Step 6. Open a Pull Request
Open https://github.com/OpenDroneMap/docs and you'll see a box asking you to open a pull request. Open a pull request by filling in a description of your changes and you're set! Somebody will review your changes and your contribution will be live on https://docs.opendronemap.org once approved.
Translations
Contributing translations
Transifex has a getting started guide for translators that will walk you through the steps to setup an account.
The ODM documentation Transifex project can be found at: https://www.transifex.com/americanredcross/opendronemap_docs/
Managing the translation process
This project uses Transifex and the transifex-client tool to help people contribute translations. The transifex-client tool is included in the requirements.txt file and should be installed on your system during setup when you run pip install -r requirements.txt.
You need to configure your account. For this, you need to create an API Token for your user to access this service through the command line. This can be done under your Transifex User’s Settings. Set it up to use the token:
tx init --token $TOKEN --no-interactive
If there are changes in the English *.rst source files, you can update the .pot files:
sphinx-build -b gettext source source/locale/en/pot
If there are new English .rst source files, you can map them by updating the ./.tx/config file.
To then update the English source on Transifex:
tx push --source
To fetch translations from Transifex:
tx pull --all
Alternatively, you can pull only a specific language. For example:
tx pull -l sw
To add a new language, do it through the Transifex interface and then add a new line to the Makefile deploy command.
The Travis CI build failed... 😞
Don't panic! Unfortunately, Transifex doesn't protect the reST notation that Sphinx uses for things like formatting and links. It's possible that during translation, some of the syntax was broken.
Start up your Python virtual environment if it's not already with source venv/bin/activate and then try a build of the language that you're trying to update, for example:
sphinx-build -b html -D language='sw' source "_build/html/sw/" -nW
The -nW (nitpicky) flag is important. You should see an output in your console such as:
Warning, treated as error:
/path/to/my/project/OpenDroneMap/docs/source/multispectral.rst:25:<translated>:1:Inline interpreted text or phrase reference start-string without end-string.
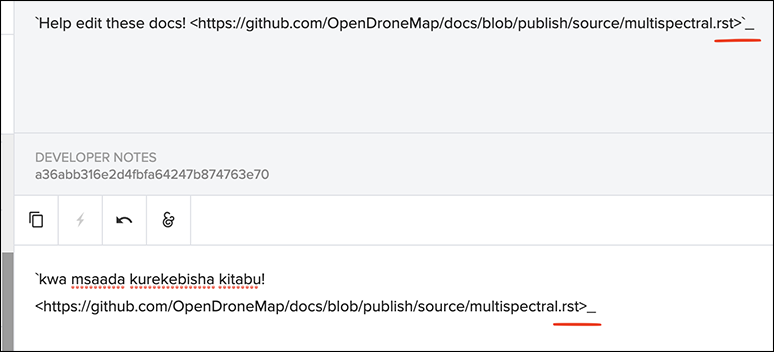
Look at the source file and line that is mentioned. In this case the file is source/multispectral.rst and the line is the number after the colon after the filename (25). Looking at the file we see that line 25 is the last line and the "Help edit these docs!" link.
Go to Transifex, go to the resource, and go to the string. The warning/error message should help you understand what went wrong. In this case the link syntax wasn't matched correctly. Fix and save the translation.
Pull the language down (e.g. tx pull -l sw) and then try the build again. Unfortunately, if there is more than one error, you'll have to fix them one at a time.
Questions?
Reach out to https://community.opendronemap.org, we'll help you get up and running with your first contribution if you get stuck!
Repository Notes
Travis-CI docs for Building a Python Project and GitHub Pages Deployment. Personal access token with 'public_repo - Access public repositories' permissions created and used it in travis encrypt GH_TOKEN=my_github_token --add env.matrix as described in the Travis-CI docs.