|
…
|
||
|---|---|---|
| .. | ||
| main | ||
| CMakeLists.txt | ||
| README.md | ||
| partitions_example.csv | ||
| pytest_simple_sniffer.py | ||
| sdkconfig.ci.mem | ||
| sdkconfig.defaults | ||
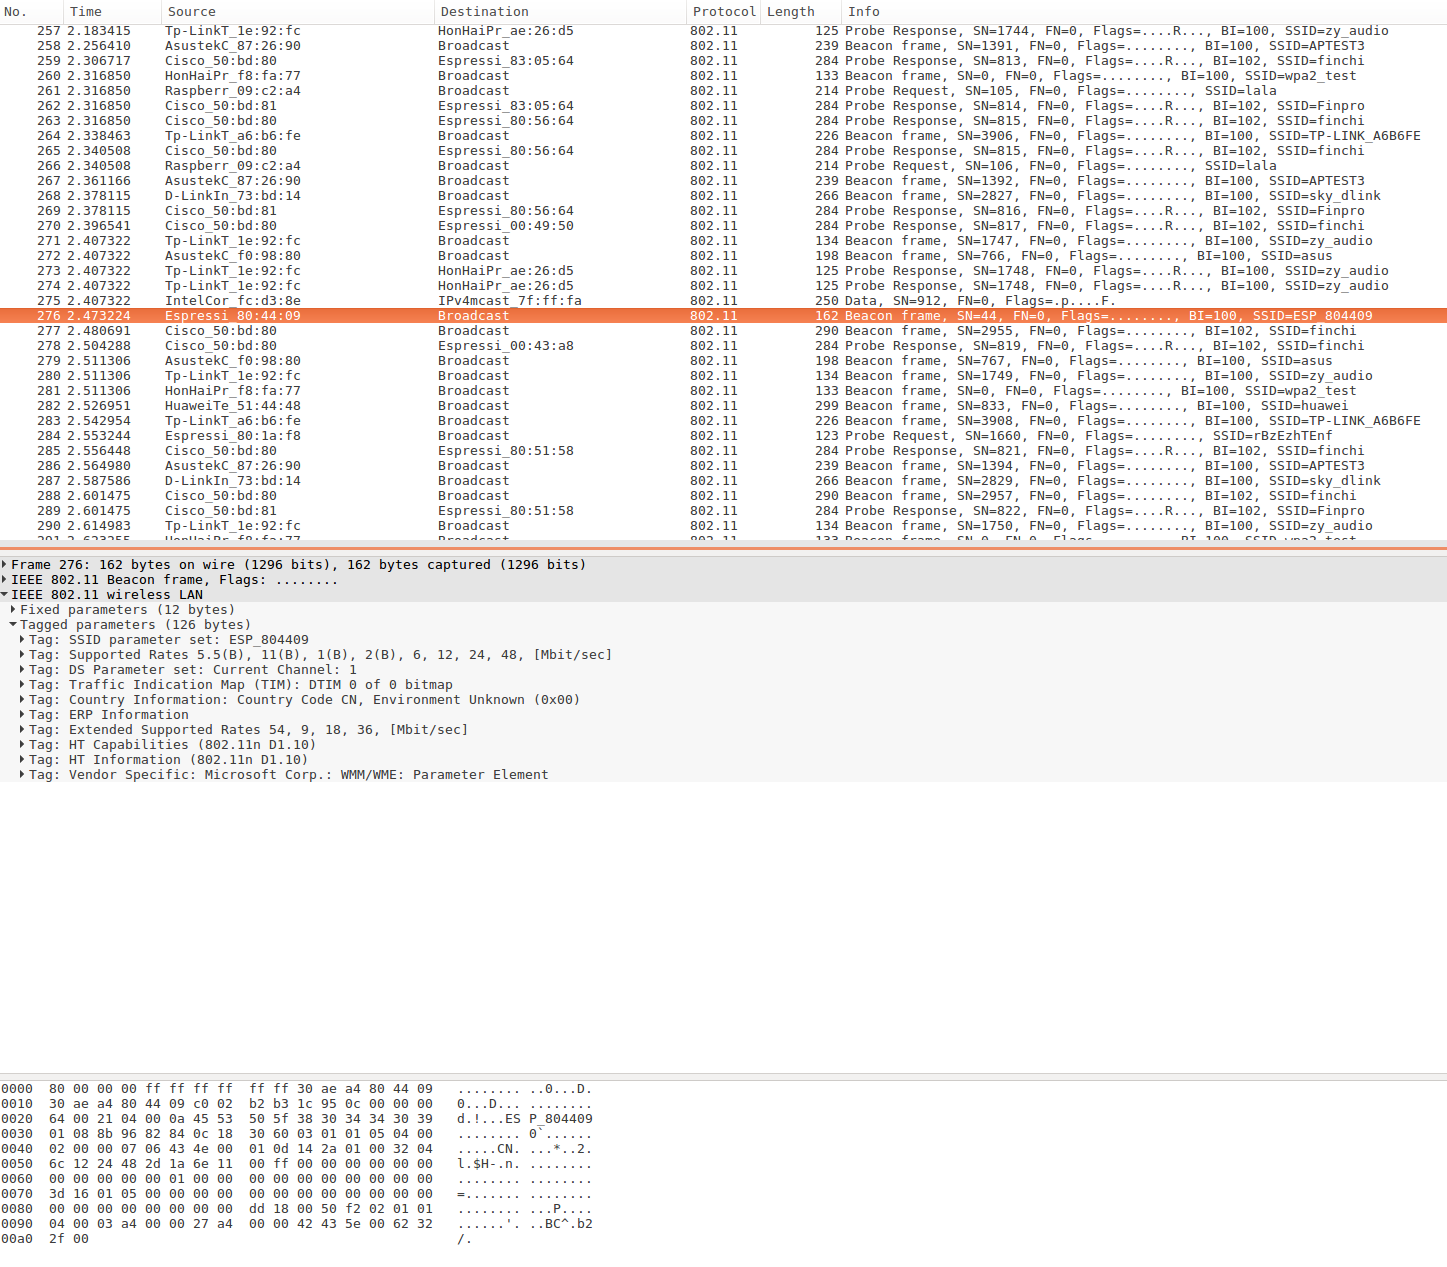
| sniffer-esp32-pcap.png | ||
README.md
| Supported Targets | ESP32 | ESP32-C2 | ESP32-C3 | ESP32-C6 | ESP32-S2 | ESP32-S3 |
|---|
Simple Sniffer Example
(See the README.md file in the upper level 'examples' directory for more information about examples.)
Overview
This example demonstrates basic usage of WiFi and Ethernet sniffer mode by saving packets into SD card with pcap format. There is also an option to send pcap file to host via JTAG interface.
For more information about pcap, please go to wikipedia.
This example is based on console component. For more information about console, please refer to console guide.
How to use example
Hardware Required
To run this example with WiFi interface, you should have one ESP32 dev board integrated with a SD card slot (e.g. ESP-WROVER-KIT) or just connect ESP32-DevKitC to a SD card breakout board. To run this example with Ethernet interface option, you should have one ESP32 dev board with physical layer Ethernet support (e.g. ESP32-Ethernet-Kit) or connect SPI-Ethernet module (e.g. DM9051) to your dev board. If you want to send packets to host, make sure to connect ESP32 to some kind of JTAG adapter.
Ethernet Pin Assignment
See common pin assignments for Ethernet from ethernet examples folder.
Configure the project
Open the project configuration menu (idf.py menuconfig). Then go into Example Configuration in top menu.
- Check
Store command history in flashif you want to save command history into flash (recommend). - Select where to save the pcap file in
Select destination to store pcap filemenu item.SD Cardmeans saving packets (pcap format) into the SD card you plug in. The default SD card work mode is set to SDMMC for target ESP32 and ESP32S3, but SPI is the only choice for other targets.Memorymeans saving packets in memory and can parse packets in place.JTAG (App Trace)means sending packets (pcap format) to host via JTAG interface. This feature depends on app trace component, Component config -> Application Level Tracing -> Data Destination -> JTAG should be enabled to chooseJTAG (App Trace)as destination.
- Set the mount point in your filesystem in
SD card mount point in the filesystemmenu item. This configuration only takes effect when you choose to save packets into SD card. - Set max name length of pcap file in
Max name length of pcap filemenu item. - Set the length of sniffer work queue in
Length of sniffer work queuemenu item. - Set the stack size of the sniffer task in
Stack size of sniffer taskmenu item. - Set the priority of the sniffer task in
Length of sniffer work queuemenu item.
To configure Ethernet device(s), go to Example Ethernet Configuration in top menu.
- For more information related to Ethernet configurations see common configuration of Ethernet from ethernet examples folder.
Build and Flash
idf.py -p PORT flash monitor
(Replace PORT with name of the serial port.)
(To exit the serial monitor, type Ctrl-].)
See the Getting Started Guide for full steps to configure and use ESP-IDF to build projects.
sniffer Command Usage
sniffer [-i <wlan|eth0|eth1|...>] [-F <mgmt|data|ctrl|misc|mpdu|ampdu|fcsfail>]... [-c ] [--stop] [-n ] Capture specific packet and store in pcap format -i, --interface=<wlan|eth0|eth1|...> which interface to capture packet -F, --filter=<mgmt|data|ctrl|misc|mpdu|ampdu|fcsfail> filter parameters -c, --channel= communication channel to use --stop stop running sniffer -n, --number= the number of the packets to be captured
The sniffer command support some important options as follow:
-i: Specify the interface to sniff packets, currently only supportwlanandeth0-c: Specify the channel to sniff packet atwlaninterface-F: Specify the filter condition atwlaninterface, currently only support following filter conditions, you can select any number of them- mgmt: Management packets
- data: Data packets
- ctrl: Control packets
- misc: Other packets
- mpdu: MPDU packets
- ampdu: AMPDU packets
-n: Specify the number of packages to capture in this sniffer job. The sniffer job will stop automatically without usingsniffer --stopcommand.--stop: Stop sniffer job
pcap Command Usage When the Destination is SD Card
pcap -f [--open] [--close] [--summary] Save and parse pcap file -f, --file= name of the file storing the packets in pcap format --open open .pcap file --close close .pcap file --summary option to parse and show the summary of .pcap file
The pcap command support some important options as follow:
-f: Specify the name of file which will store the packets or show summary, default value issniffer, and the resulting file name will be like “snifferX.pcap”, here ‘X’ shows the file’s order.--open: Option to open a '.pcap' file--close: Option to close the '.pcap' file--summary: Show the summary of '.pcap' file
pcap Command Usage When the Destination is Memory
pcap -f [--open] [--close] [--summary] Save and parse pcap file -f, --file= name of the file storing the packets in pcap format --open open .pcap file --close close .pcap file --summary option to parse and show the summary of .pcap file
The pcap command support some important options as follow:
-f: Specify the file name to storage packet or show summary--open: Option to open a '.pcap' file--close: Option to close the '.pcap' file--summary: Show the summary of '.pcap' file (needs to be called prior file closing)
pcap Command Usage When the Destination is JTAG
pcap command is not used when destination is JTAG. The pcap session is started automatically with the Sniffer start.
Example Output
Steps for using SD Card to storage packages and watch summary
Mount SD Card
 =======================================================
 |         Steps to sniff network packets              |
 |                                                     |
 |  1. Enter 'help' to check all commands usage        |
 |  2. Enter 'mount <device>' to mount filesystem      |
 |  3. Enter 'pcap' to create pcap file                |
 |  4. Enter 'sniffer' to start capture packets        |
 |  5. Enter 'unmount <device>' to unmount filesystem  |
 |                                                     |
 =======================================================


Type 'help' to get the list of commands.
Use UP/DOWN arrows to navigate through command history.
Press TAB when typing command name to auto-complete.
sniffer> mount sd
I (12653) example: Initializing SD card
I (12653) example: Using SDMMC peripheral
I (12663) gpio: GPIO[13]| InputEn: 0| OutputEn: 1| OpenDrain: 0| Pullup: 0| Pulldown: 0| Intr:0
Name: SC64G
Type: SDHC/SDXC
Speed: 20 MHz
Size: 60906MB
Create .pcap file
sniffer> pcap --open -f simple-sniffer
I (41383) cmd_pcap: open file successfully
Start Sniffer (with 10 packages)
sniffer> sniffer -i wlan -c 2 -n 10
I (58153) cmd_sniffer: 10 packages will be captured
I (58163) phy_init: phy_version 4670,719f9f6,Feb 18 2021,17:07:07
I (58263) wifi:ic_enable_sniffer
I (58263) cmd_sniffer: start WiFi promiscuous ok
I (58303) wifi:ic_disable_sniffer
I (58303) wifi:flush txq
I (58303) wifi:stop sw txq
I (58303) wifi:lmac stop hw txq
I (58303) cmd_sniffer: stop promiscuous ok
Close .pcap file
sniffer> pcap --close -f simple-sniffer
I (80453) cmd_pcap: .pcap file close done
Parse '.pcap' file and watch at bash with '--summary' option
sniffer> pcap --summary -f simple-sniffer
I (112833) cmd_pcap: /sdcard/simple-sniffer.pcap is to be parsed
------------------------------------------------------------------------
Pcap packet Head:
------------------------------------------------------------------------
Magic Number: a1b2c3d4
Major Version: 2
Minor Version: 4
SnapLen: 262144
LinkType: 105
------------------------------------------------------------------------
Packet 0:
Timestamp (Seconds): 0
Timestamp (Microseconds): 3670
Capture Length: 303
Packet Length: 303
Packet Type:  0
Packet Subtype:  5
Destination:  0  0  0  0 a1  0
Source:  2 84 56  e  0  0
------------------------------------------------------------------------
Packet 1:
Timestamp (Seconds): 0
Timestamp (Microseconds): 3670
Capture Length: 294
Packet Length: 294
Packet Type:  0
Packet Subtype:  5
Destination:  0  0  0  0 a1  0
Source:  2 84 56  e  0  0
------------------------------------------------------------------------
Packet 2:

...

------------------------------------------------------------------------
Pcap packet Number: 10
------------------------------------------------------------------------
Unmount SD Card
sniffer> unmount sd
I (183873) example: Card unmounted
Steps for using memory to storage packages and watch summary
Open a memory for pcap
sniffer> pcap --open -f simple-sniffer
I (11816) cmd_pcap: open file successfully
Sniff 10 packages
sniffer> sniffer -i wlan -c 2 -n 10
I (71086) cmd_sniffer: 10 packages will be captured
I (71096) phy_init: phy_version 4670,719f9f6,Feb 18 2021,17:07:07
I (71186) wifi:ic_enable_sniffer
I (71186) cmd_sniffer: start WiFi promiscuous ok
I (71246) wifi:ic_disable_sniffer
I (71246) wifi:flush txq
I (71256) wifi:stop sw txq
I (71256) wifi:lmac stop hw txq
I (71256) cmd_sniffer: stop promiscuous ok
Watch the summary of the package captured above
sniffer> pcap --summary -f simple-sniffer
I (93396) cmd_pcap: Memory is to be parsed
------------------------------------------------------------------------
Pcap packet Head:
------------------------------------------------------------------------
Magic Number: a1b2c3d4
Major Version: 2
Minor Version: 4
SnapLen: 262144
LinkType: 105
------------------------------------------------------------------------
Packet 0:
Timestamp (Seconds): 0
Timestamp (Microseconds): 5481
Capture Length: 266
Packet Length: 266
Packet Type:  0
Packet Subtype:  2
Destination:  0  0  0  0 a1  0
Source:  2 8a 69 15  0  0
------------------------------------------------------------------------
Packet 1:
Timestamp (Seconds): 0
Timestamp (Microseconds): 24405
Capture Length: 175
Packet Length: 175
Packet Type:  0
Packet Subtype:  f
Destination:  0  0  0  0 a1  0
Source:  2 84 55 5f  0  0
------------------------------------------------------------------------
Packet 2:

...

------------------------------------------------------------------------
Pcap packet Number: 10
------------------------------------------------------------------------
Close pcap file in memory
sniffer> pcap --close -f simple-sniffer
I (130566) cmd_pcap: free memory successfully
I (130566) cmd_pcap: .pcap file close done
Steps for sending packets to host via JTAG interface
- Select
JTAG (App Trace)as the destination of pcap files in project configuration. - Build & Flash with
idf.py -p PORT flash - Connect JTAG, run OpenOCD (for more information about how-to please refer to JTAG Debugging).
- Telnet to localhost with 4444 port:
telnet localhost 4444. - In the telnet session, run command like
esp32 apptrace start file://sniffer-esp32.pcap 1 -1 20(more information about this command, please refer to apptrace command). - Run the example, start sniffer with
sniffercommand. - Stop sniffer by entering command
sniffer --stopin the example console. - Stop tracing by entering command
esp32 apptrace stopin the telnet session.
Open PCap File in Wireshark
Troubleshooting
- Make sure you have pluged in your SD card and mount it into filesystem before doing sniffer work or you will get error message like “Create file /sdcard/sniffer0.pcap failed”.
- To protect the SD card, we recommand you to execute command
unmount sdbefore you plug out your SD card. - Make sure to run
esp32 apptracecommand before or immediately after a new sniffer task started when you try this example with JTAG. Otherwise the console will issue warning messagewaiting for apptrace establishedevery 1 second. If the apptrace communication doesn't be established within 10 seconds (can be altered by macroSNIFFER_APPTRACE_RETRY), this sniffer command will failed with an error messagewaiting for apptrace established timeout.
(For any technical queries, please open an issue on GitHub. We will get back to you as soon as possible.)