* support new API function * support esp-zboss-lib>=0.1.2, support esp-zigbee-lib>=0.2.0 |
||
|---|---|---|
| .. | ||
| main | ||
| CMakeLists.txt | ||
| README.md | ||
| partitions.csv | ||
| sdkconfig.defaults | ||
README.md
| Supported Targets | ESP32 | ESP32-C3 | ESP32-S2 | ESP32-S3 |
|---|
Gateway Example
This example demonstrates how to build a Zigbee Gateway device. It runs on a Wi-Fi SoC such as ESP32, ESP32-C3 and ESP32-S3, with an 802.15.4 SoC like ESP32-H2 running esp_zigbee_rcp to provide 802.15.4 radio.
Hardware Required
- One development board with ESP32 or ESP32-S3 SoC acting as Zigbee gateway (loaded with esp_zigbee_gateway example)
- A USB cable for power supply and programming
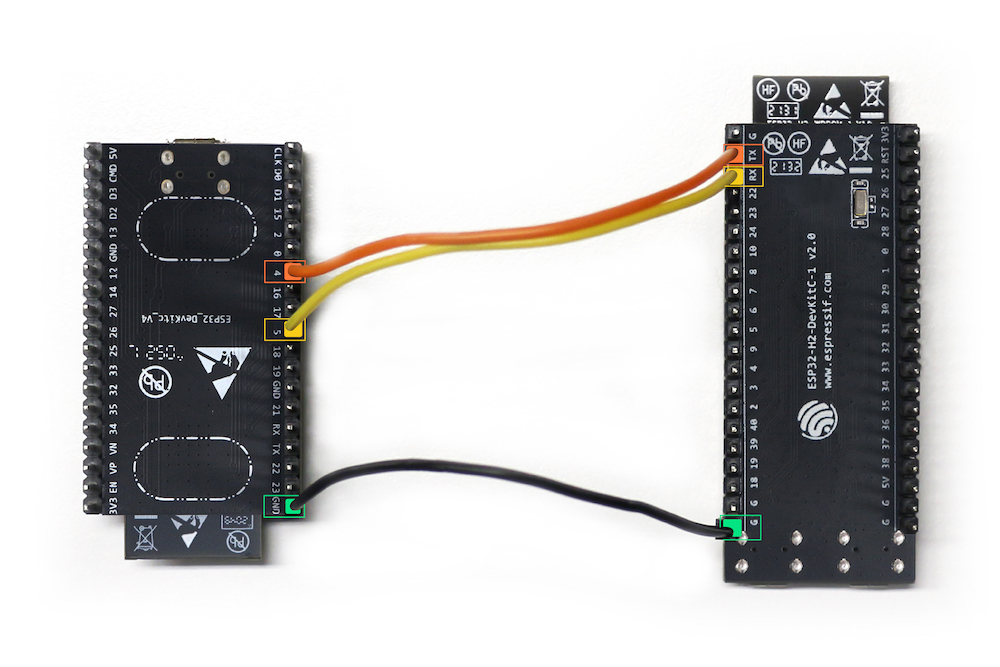
- Three jumper wires for UART (TX, RX and GND)
- Gateway doesn't function alone. Choose ESP32-H2 as Zigbee rcp (see esp_zigbee_rcp example)
- Flash Zigbee rcp on the ESP32-H2 DevKitC first before connecting to Zigbee gateway
- Connect the two SoCs via UART, below is an example setup with ESP32-DevKitC and ESP32-H2-DevKitC:

| ESP32 pin | ESP32-H2 pin |
|---|---|
| GND | G |
| GPIO4 (RX) | TX |
| GPIO5 (TX) | RX |
- TX, RX pin can be also configured by user in esp_zigbee_gateway.h
Configure the project
Before project configuration and build, make sure to set the correct chip target using idf.py set-target esp32 or idf.py set-target esp32s3
Erase the NVRAM
Before flash it to the board, it is recommended to erase NVRAM if user doesn't want to keep the previous examples or other projects stored info using idf.py -p PORT erase-flash
Build and Flash
Build the project, flash it to the board, and start the monitor tool to view the serial output by running idf.py -p PORT flash monitor
(To exit the serial monitor, type Ctrl-].)
Example Output
As you run the example, you will see the following log:
esp_zigbee_gateway:
I (660) ESP_ZB_GATEWAY: status: -1
I (670) ESP_ZB_GATEWAY: Zigbee stack initialized
I (680) ESP_ZB_GATEWAY: Zigbee rcp device booted
I (1280) ESP_ZB_GATEWAY: Start network formation
I (3060) ESP_ZB_GATEWAY: Formed network successfully (ieee extended address: f9:54:2d:01:a0:03:f7:84, PAN ID: 0x8651)
I (4060) ESP_ZB_GATEWAY: status: 0
I (4400) ESP_ZB_GATEWAY: Network steering started
Gateway Functions
- After Zigbee gateway starts up, it will read MAC ieee address and Zigbee stack version number from the Zigbee rcp and start working together with Zigbee rcp via UART communication to form a Zigbee network
- More Gateway functionalities supporting Wi-Fi interaction will come later
Troubleshooting
For any technical queries, please open an issue on GitHub. We will get back to you soon