|
|
||
|---|---|---|
| 3D_Model_Input | ||
| 3D_Model_Output | ||
| Batch_Json_files | ||
| NFT_Output | ||
| src | ||
| .gitignore | ||
| Cozy_Robot_Example.blend | ||
| LICENSE | ||
| README.md | ||
README.md

Blend_My_NFTs
Description
Blend_My_NFTs is an open source, free to use Blender add on that enables you to automatically generate thousands of 3D Models, Animations, and Images. This add on's primary purpose is to aid in the creation of large generative 3D NFT collections.
For support, help, and questions, please join our Discord where our wonderful community can help you: https://discord.gg/UpZt5Un57t
This add on was origninal developed to create the NFT project This Cozy Place which is now availabe to mint on our website: https://thiscozystudio.com/
The video above illustrates the first 10 Cozy Place NFTs generated with Blend_My_NFts.
Features
- Generate thousands of NFT 3D Models, Animations, and Images in Blender using 3D art.
- Support for Windows, Linux, and Mac OS.
- Weight and Raritize your NFT collection by setting weighted values.
- Creates Meta Data templates for each NFT making uploading to IPFS and Blockchains easy.
Official Links:
Website: https://thiscozystudio.com/
Discord: https://discord.gg/UpZt5Un57t
Youtube: https://www.youtube.com/channel/UCARiKfuoSghM6DeieqWylYQ
Twitter: https://twitter.com/CozyPlaceNFT
Instagram: https://www.instagram.com/this_cozy_place/
Reddit: https://www.reddit.com/r/ThisCozyPlace/
Case Studies
This document has a list of projects that use Blend_My_NFTs to help facilitate them in the creation of their collection: https://docs.google.com/document/d/e/2PACX-1vSHZS4GRu8xXDYpVPEaxyBeTzms9yrJEC9IoAcP38_U8x0C1kVrbtNZgh0zUmkzBoZQVwNvBf3ldRij/pub
Other languages
Blend_My_NFTs Tutorial Guide
Blend_My_NFTs, this readme tutorial material, the youtube tutorials, the live stream Q/As, and tutorials are all provided for free by me for anyone to access/use any way they like. I only ask in return that you credit this software if you use Blend_My_NFTs to launch an NFT collection and kindly share what I have built here. A direct link to the Blend_My_NFTs Github page on your collection website (or equivelant) would sefice. I ask you of this only to share this tool and what it can do as I feel there are many out there that would benefit from it, my only goal is to help those that need it. It brings warmth to my heart that so many people use what I have built. Thank you.
The software in its current state is not farily user friendly but with a really basic understanding of programing you can opporate it with ease. You can learn the programing skills needed in ten minutes! :)
Blend_My_NFTs works with Blender 3.0.0 on Windows 10 or macOS Big Sur 11.6.
Youtube Tutorial Series
Link to the newest Blend_My_NFTs tutorial video: https://www.youtube.com/watch?v=0T_PWVUIH5M
Note - Though this video series may be helpful, it might not be up to date with the current Blend_My_NFTs release. This document has more detailes and may have newer information. If you have no experience with the Blender API I recomend watch this tutorial on running python scripts in Blender: https://www.youtube.com/watch?v=cyt0O7saU4Q
Important Terminology
Before we can continue there are terms that are used to describe the process of this software to make it a bit easier to understand. Refer to this section if you come accross an unfamiliar term.
For the following terms, lets say you are creating an NFT collection where the image is of a person wearing a hat:
Attribute A part of an NFT that can be changed. The hat on a man is an Attribute, there are many types of hats, but the hat itself I will refer to it as an attribute.
Variants These are the types of hats; red hat, blue hat, green hat, cat hat, etc. These can be swapped into the hat Attribute with one another to create different NFTs.
DNA DNA is a sequence of numbers that determins what Variant from every Attribute in an NFT collection to include in a single NFT image. This program generates a uniqe DNA sequence for every possible combination of Variants in Attributes.
Batch A Batch is a randomly selected subset of NFT DNA. It is a smaller portion of the total number of NFTs you want to generate. This makes the work load of rendering thousands of images easier to manage. It also gives you the option to render on multiple computers and ensures each computer renders seperate images with no overlap.
Installation and Getting Started
This youtube tutorial goes over the basic setup discussed in this section: https://www.youtube.com/watch?v=dUajXAZzSPc (This video is out of date but goes over how to run scripts in Blender which is important to running Blend_My_NFTs)
Follow these steps to setup Blend_My_NFTs:
- At the top of this page click the green "Code" button
- Click "Download Zip" - This will download the Blend_My_NFTs folder to your Downloads folder in zip format
- In your download folder, move Blend_My_NFTs-main.zip to your desktop or another easily accessable location
- Unzip the file:
- How to unzip a file on Mac: https://support.apple.com/en-ca/guide/mac-help/mchlp2528/mac
- How to unzip a file on Windows: https://support.microsoft.com/en-us/windows/zip-and-unzip-files-f6dde0a7-0fec-8294-e1d3-703ed85e7ebc
- Move the Blend_My_NFTs-main folder is located on your Desktop for easy access (recomended)
How to set up your .Blend file
The following section covers how to set up your .Blend file and config.py file
In order for Blend_My_NFTs to read your .blend file, you need to structure your scene in a specific way. Please follow all naming and collection conventions exactly, otherwise the scripts will not run properly.
Important Note
Your .blend file must be moved to the Blend_My_NFTs folder. When you run the script, the .blend file must be in the directory of the Blend_My_NFTs folder. The Blender text editor has some weird quirks that make finding the right directory a bit tricky. If you are interested, I suggest reading about it in the Blender API above. This is the only work around I could find for now.
Rules for .blend structure:
-
All Objects, collections, light sources, cameras, or anything else you want to stay constant for each NFT insert it into a collection named "Script_Ignore" exactly. This collection should be located directly beneath the 'Scene Collection' in your .blend file. Every thing in this Script_Ignore collection will be ignored by the collection (Attribute) fetcher. The state of the render and viewport camera of any objects/collections in Script_Ignore will remain unchanged during the scripts operation. The script will not turn the cameras of anything located in Script_Ignore on or off, so however you set them, will be how it renders.
-
Every Attribute of your NFT must be represented by a collection directly beneath the 'Scene Collection' in your .blend file. DO NOT USE NUMBERS OR UNDERSCORES IN THE NAME OF THESE COLLECTIONS, this will mess with the scripts. Only use capital letters and lowercase letters, no numbers(0-9) or the underscore symbol( _ ).
-
For each Variant of each Attribute create a collection containing everything that makes up that Variant. This Variant collection must be placed within the Attribute collection and named with the following format: VariantName_(variant number begining at 1)_0 (e.g. Cube_1_0, Cube_2_0, etc.). The VariantName CANNOT CONTAIN NUMBERS OR UNDERSCORES. Like above, this will mess with the scripts.
Here is an example of proper scene and collection formating with the above conventions:
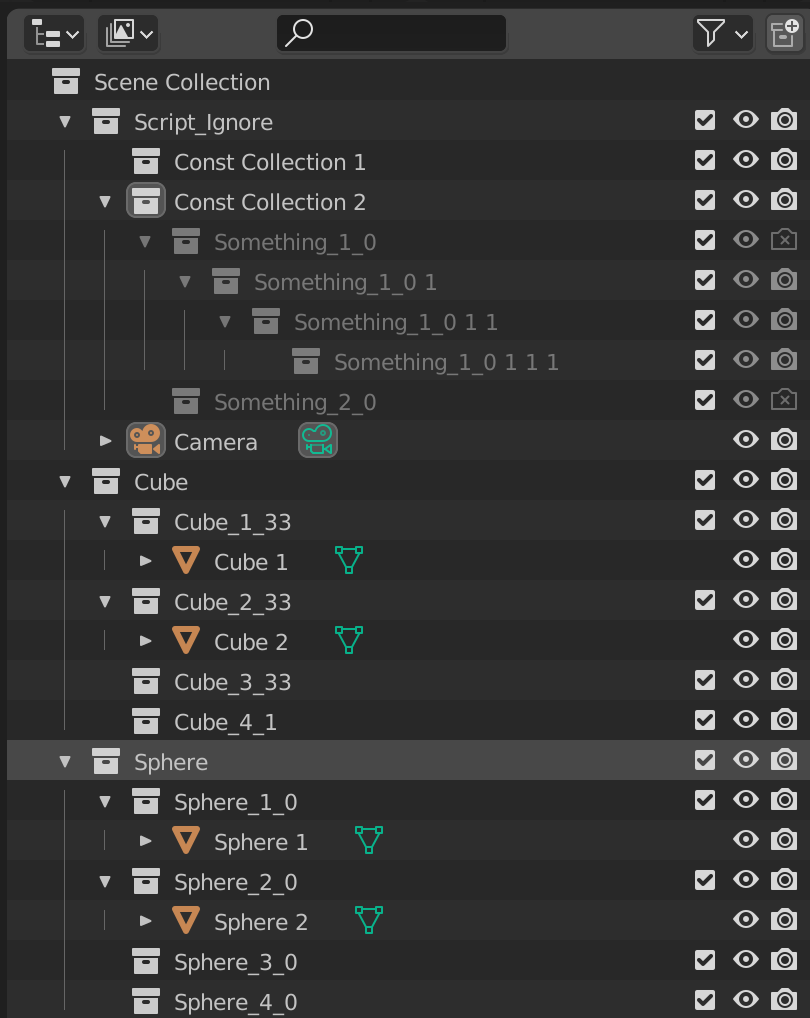
In this example Camera and Const Collection 1 is in Script_Ignore and will be displayed in every NFT generated. The collection Cube represents an attribute, and the collections Cube_1_33, Cube_2_33, Cube_3_33, and Cube_4_1 are the variants of that attribute. Notice that each variant of Cube has an incrementing number representing the order of the variants. The numbers 33, 33, 33, and 1 represent the percentage chance that variant will get chosen if enableRarity is set to True.
Customizing the config.py file
After installation, open the Blend_My_NFTs folder. You will need to change variables in the config.py file with a text editor or IDE; I recomend Visual Studio Code, but Blender has a bilt in Text Editor for ease of use. config.py is where you can customize aspects of your NFT collection and how it is generated.
Description of customisable variables to generate images:
nftName - A string representing name of the file exported by Blend_My_NFTs (REQUIRED)
imageFileFormat - A string representing the image file format that Blend_My_NFTs will export generated images as: (REQUIRED)
 Type the exact name provided below in the '' for the imageFileFormat:

'JPEG' - Exports the .jpeg format

'PNG' - Exports the .png format

Visit https://docs.blender.org/api/current/bpy.types.Image.html#bpy.types.Image.file_format for a complete list of file formats supported by Blender. Enter the     file extension exactly as specified in the Blender API documentation.
animationFileFormat - A string representing the animations file format that Blend_My_NFTs will export generated animations as: (REQUIRED)
Type the exact name provided below in the '' above:

AVI_JPEG - Exports the .avi jpeg format

AVI_RAW - Exports the .avi raw format

FFMPEG - Exports the .ffmpeg format

Visit https://docs.blender.org/api/current/bpy.types.Image.html#bpy.types.Image.file_format for a complete list of file formats supported by Blender. (These       are the Blender only supported animation formats).
modelFileFormat - A string representing the 3D Models file format that Blend_My_NFTs will export generated 3D Modles as: (REQUIRED)
Type the exact name provided below in the '' above:

fbx - The .FBX file format

glb - The .glb file format

obj - The .obj file format *Exports both a .obj and a .mtl files for the same generated object

x3d - The .x3d file format

Visit https://docs.blender.org/api/current/bpy.ops.export_scene.html?highlight=export_scene#module-bpy.ops.export_scene
for a complete list of object formats supported by Blender.
save_path_mac - A string representing the save path for Blend_My_NFTs if you are using MacOS: (REQUIRED - if using MacOS)
Example Mac: /Users/Path/to/Blend_My_NFTs
save_path_windows - A string representing the save path for Blend_My_NFTs if you are using Windows: (REQUIRED - if using Windows)
Example Windows: C:\Users\Path\to\Blend_My_NFTs
save_path_linux - A string representing the save path for Blend_My_NFTs if you are using Linux OS (REQUIRED - if using Linux)
Example Linux: /home/Path/to/Blend_My_NFTs
maxNFTs - A positive integer representeing the number of NFTs to generate. (REQUIRED)
nftsPerBatch - A positive integer representing the number of NFTs per batch. (REQUIRED)
renderBatch - A positive integer representing the batch number to render if renderImage is set to True. (REQUIRED)
enableRarity - A boolean value, when set to True, rarity percentage will be taken into account when generating NFT DNA and exporting to NFTRecord.json
enableExporter - A Boolean value, when set to True, will export Images and or 3D models when main.py is run in Blender. (Turned on after NFTRecord.json and appropriate batches are generated with main.py)
enableImages - A boolean value, when set to True with enableExporter = True will export images.
enableAnimations - A boolean value, when set to True with enableExporter = True will export animations.
enableModelsBlender - A boolean value, when set to True with enableExporter = True will export 3D models.
- Note that
enableImages,enableModelsBlender, andenableAnimationscan run at the same time. Both 3D Models, Animations, and Images will be exported. (One of the above is REQUIRED to generate NFT files)
refactorBatchOrder - A boolean value, when set to True will combine NFT Batch# folders into a folder called Complete_Collection when main.py is run in Blender. Running main.py with this variable set to True will aslo generate meta data formats if the desired formats below are also set to True.
cardanoMetaData - A boolean value, when set to True will generate a folder containing Cardano meta data json files for each NFT file. Generates when main.py is run with refactorBatchOrder is set to True.
solanaMetaData - A boolean value, when set to True will generate a folder containing Solana meta data json files for each NFT file. Generates when main.py is run with refactorBatchOrder is set to True.
erc721MetaData - A boolean value, when set to True will generate a folder containing ERC721 (Ethereum) meta data json files for each NFT file. Generates when main.py is run with refactorBatchOrder is set to True.
turnNumsOff - A boolean value, when set to True will remove numbers and underscores in the names of Variants when NFT meta data is generated. Works after refactorBatchOrder is ran in main.py.
metaDataDescription - A string value, sets the Description variable in the BMNFTs meta data file format. Can be used in a modifed version of metaData.py to fill in Description varaibles in other meta data formats.
enableGeneration - A boolean value, when set to True, applies and takes into account colour or material variants in the NFT DNA. (Optional)
generationType - A string value, takes color or material as input. Determines if extra variatns are generated with colours or material textures. (Optional)
rgbaColorList# - A list containing tuples representing the RGBA colour values assigned to a given object in colorList. (Optional)
materialList# - A list containing strings representing the names of materials in blender: (Optional)
These materials must be in your Current Files' Materials. Make sure that you've set your materials as "fake user". The collections below are Current Files' Materials. You can put as many or as little materials values in these lists as you would like. You can create any number of materialLists and assign them to any number of collections that you would like. Each set of materialLists assigned to an object by collection name in the materialList will act like an attribute and create a unique variant of that item.
colorList - A dictionary which the keys are the names of variants, and the items are the rgbaColorList# or materialList#: (Optional)
The rgbaColorList# deterimnes the colours that the variants will change to. This creates new variants with those RGBA colour values.
enableResetViewport - A boolean value, when set to True, resets the veiwport of all cameras not in Script_Ignore. (Optional)
enable3DModels - A boolean value, when set to True, will generate all possible combinations of 3D models when working with an external repository of 3D models in 3D_Model_Input.
runPreview - A boolean value, when set to True, will run a shell of all main modules to generate NFT files. Will print useful numbers and values in the console to help you create your NFT collection.
maxNFTsTest - A positive integer representing the number of NFTs to create during the test. This number aids in the estimation of complete collection creation; the higher this number, the more accurate the estimation.
checkDups - A boolean value, when set to True, will print the number of duplicate NFTs found in the NFTRecord.json file. This file is provided for transparency, it is impossible for duplicates to be made with the current code in the DNA_Generator.py
checkRarity - A boolean value, when set to True, will print the true rarity data in the Blender System Console, this data will be saved to a RarityData.json file in the Blend_My_NFTs folder. This file is provided for transparency. The accuracy of the rarity values you set in your .blend file as outlined in the below are dependent on the maxNFTs, and the maximum number of combinations of your NFT collection.
Running main.py - Generating NFTRecord and Batches
Before you can render iamges you need to generate a list of NFT DNA then split it up into batches to render more easily. These will take the form of the NFTRecord.json file, and a list of Batch#.json files.
NFTRecord.json - This file contains a list of all NFT DNA, this list is limited by nftMax in config.py.
Batch#.json - These files contain peices of NFTRecord.json selected at random and sent to a batch containing nftsPerBatch number of DNA.
Before running main.py, ensure these variables are set properly or else the script will not work:
nftNamesave_path_macorsave_path_windowsmaxNFTsnftsPerBatchenableExporter = False
Steps to generate NFTRecord and Batches:
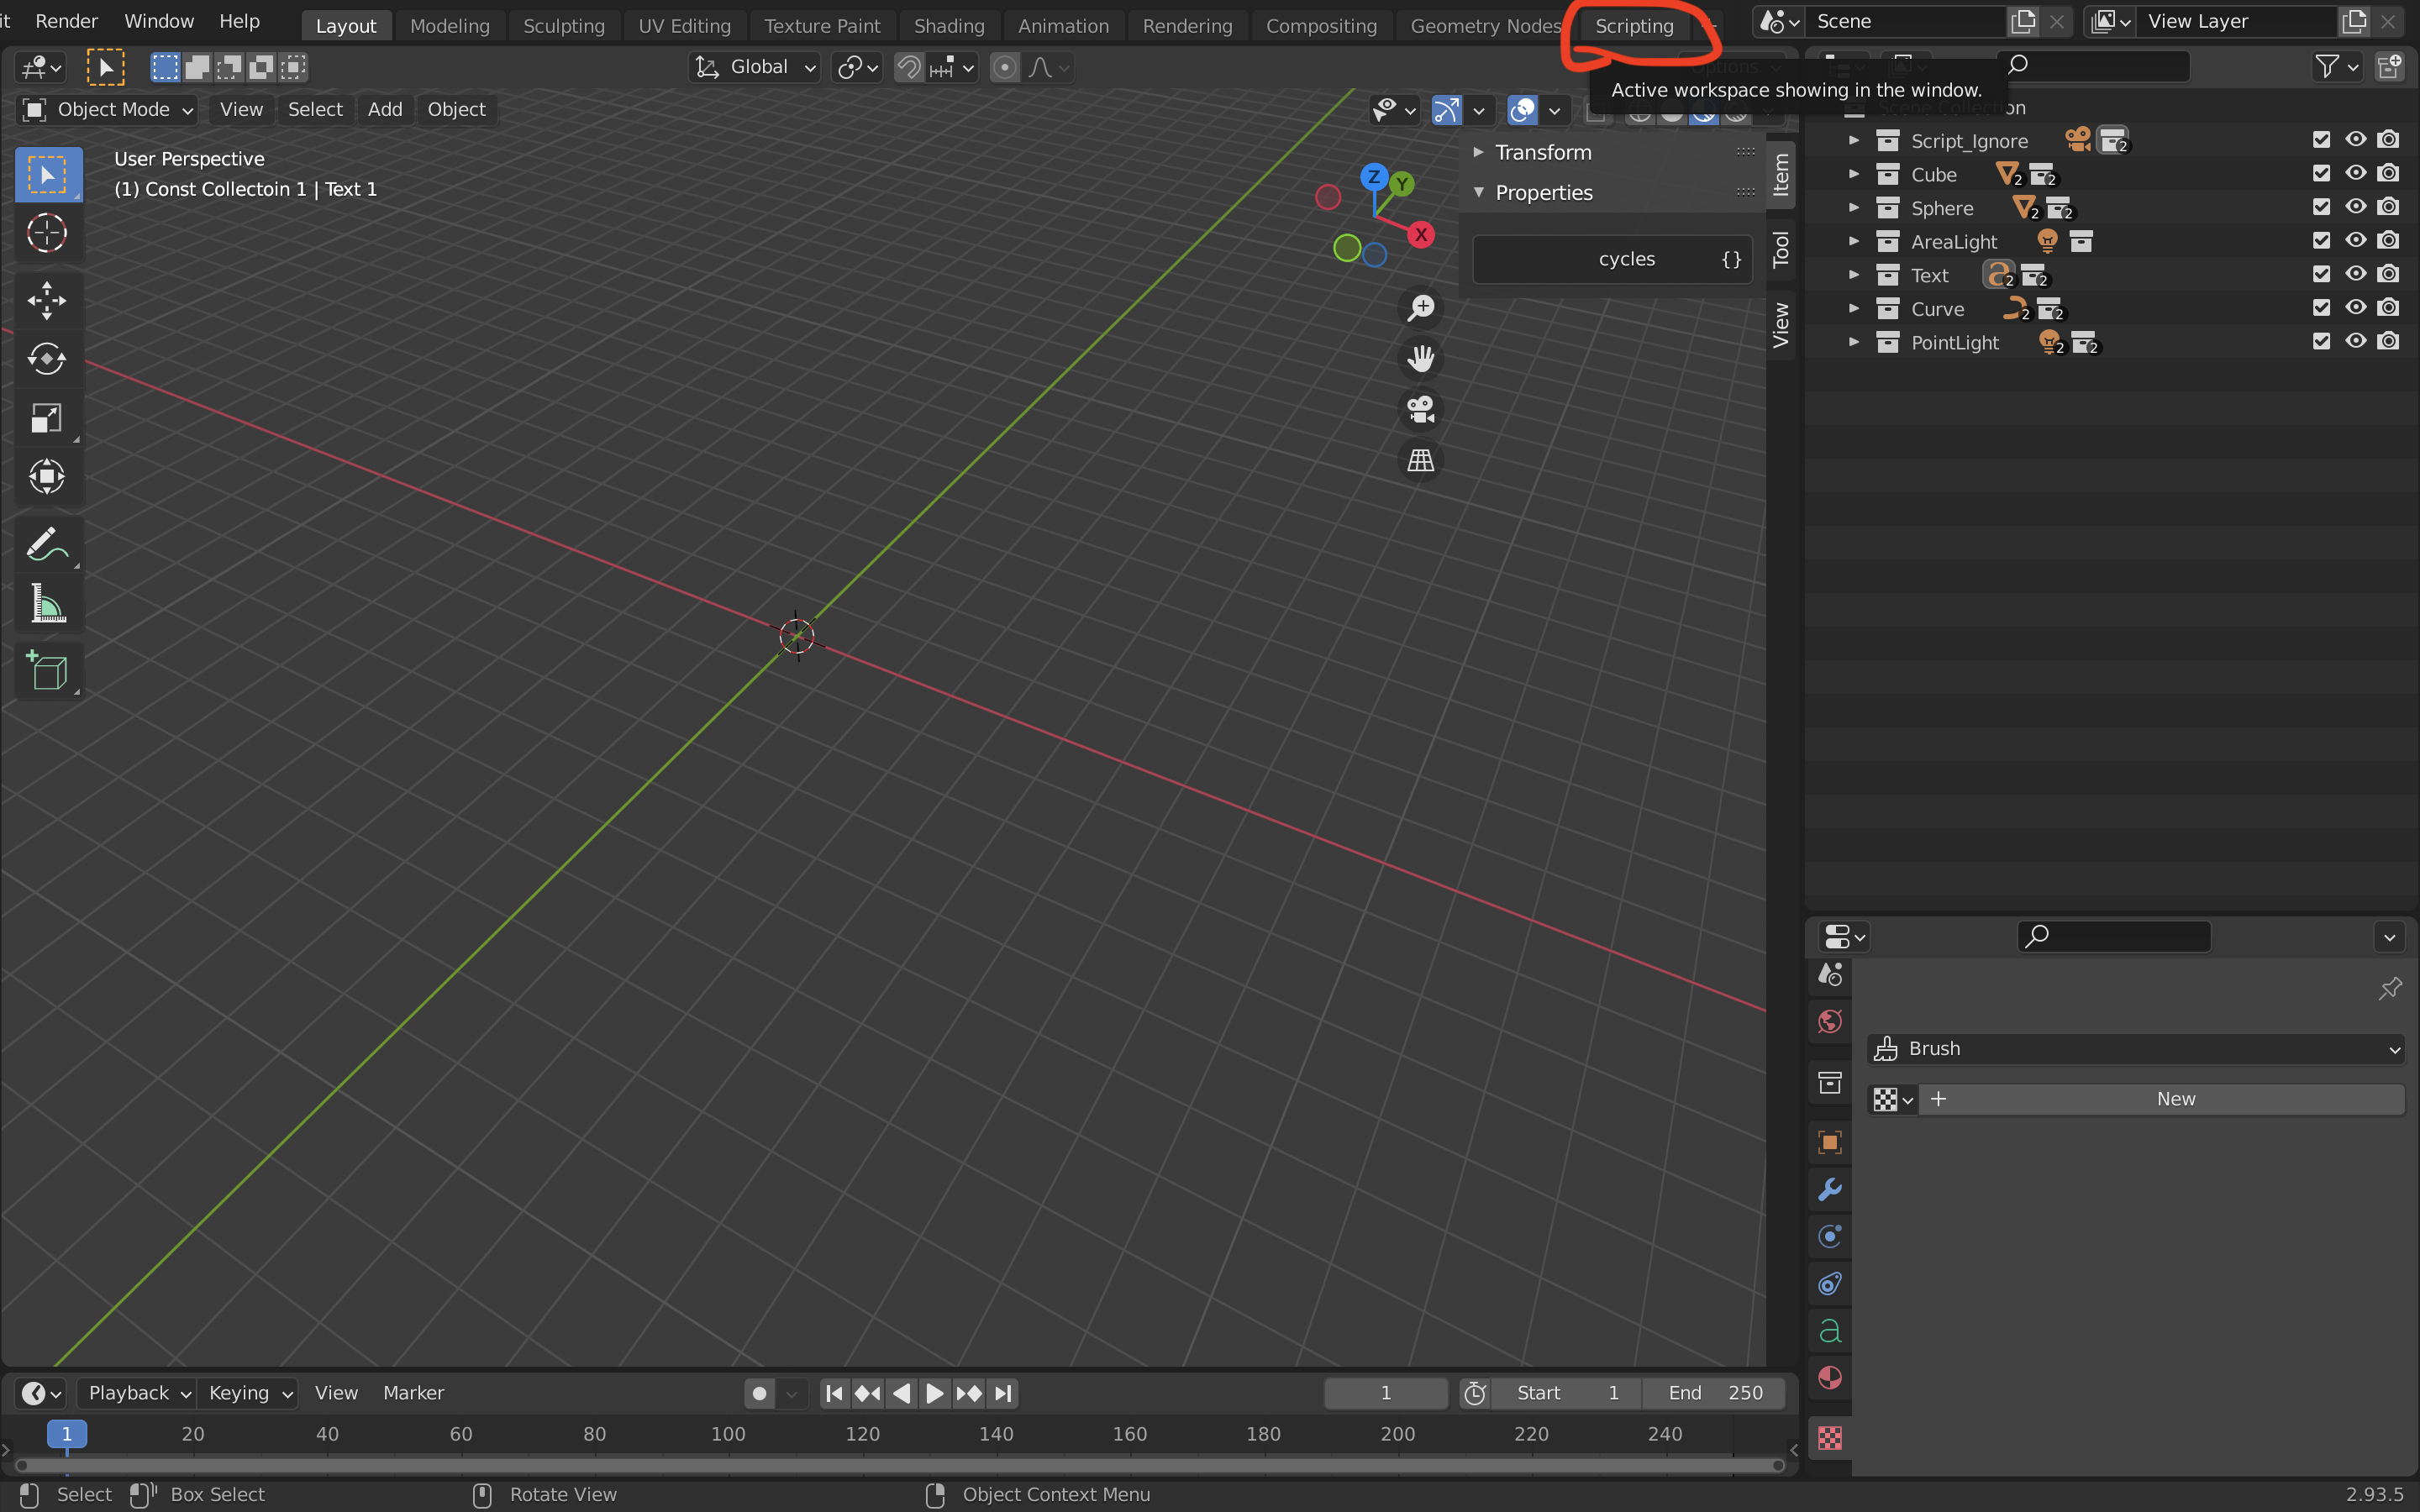
- In your .blend file open the
Scripting Tabin the menu of Blender:
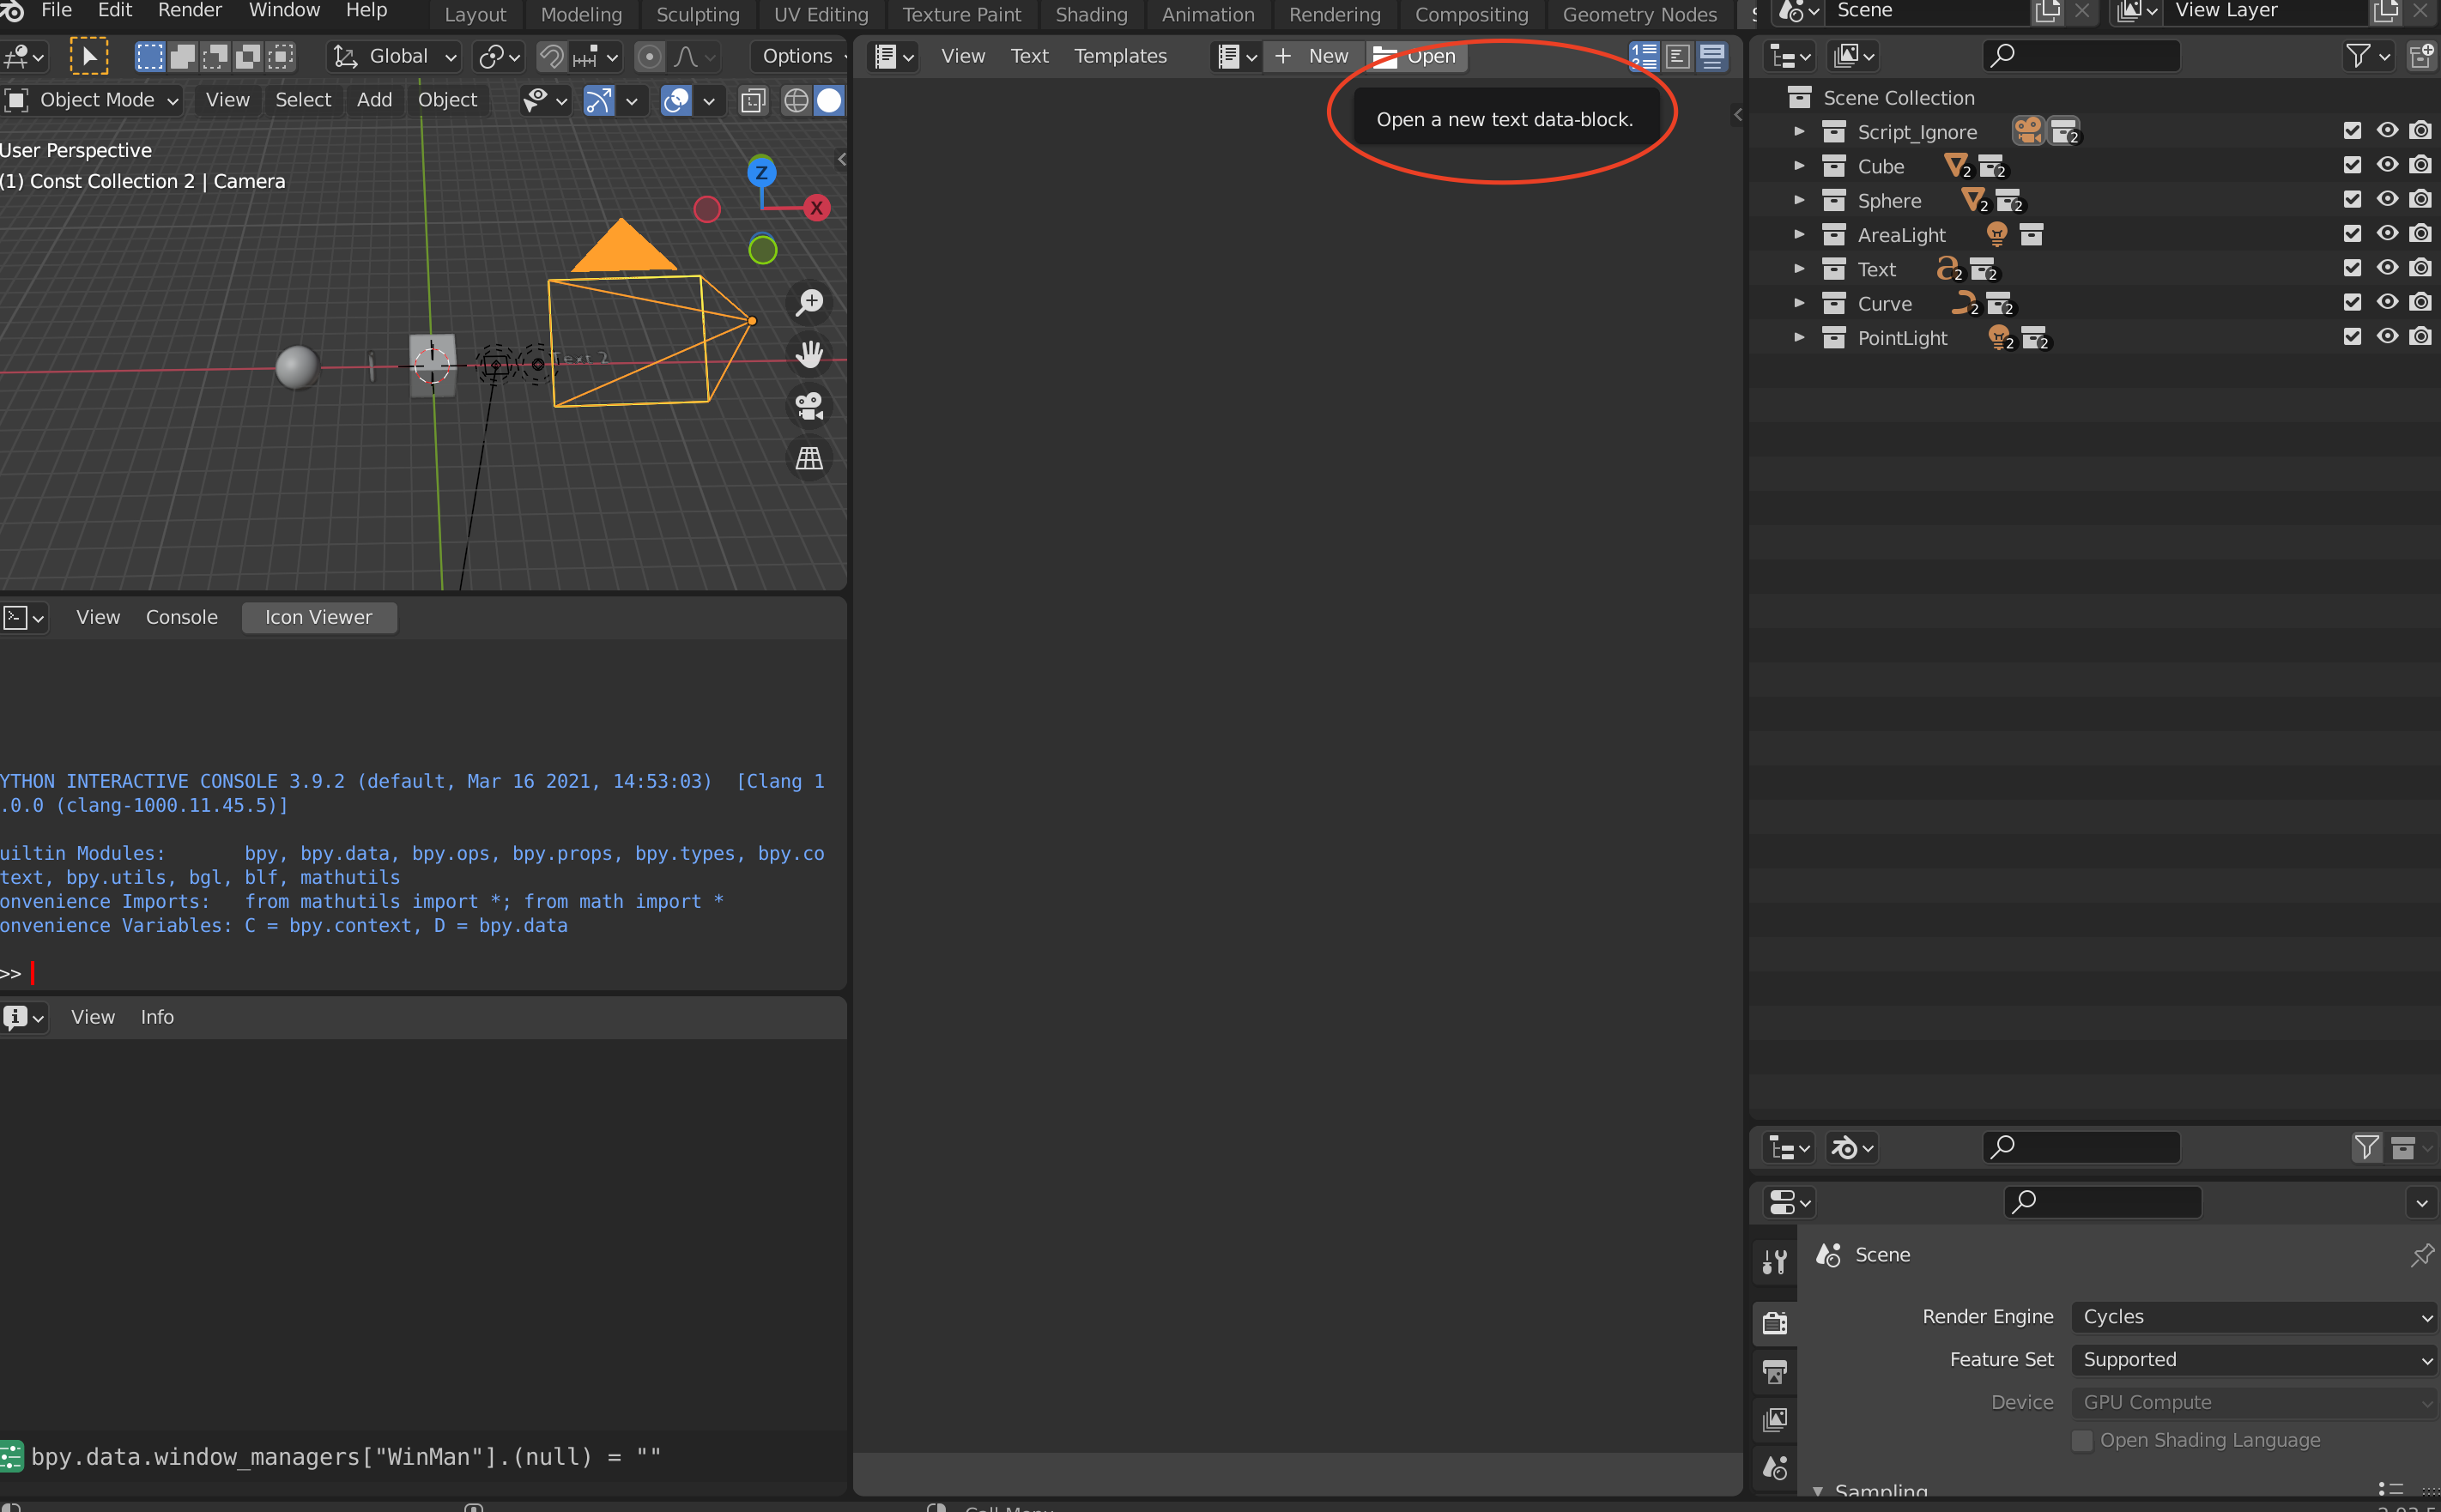
- Click the "Open" button in the Blender Text Editor:
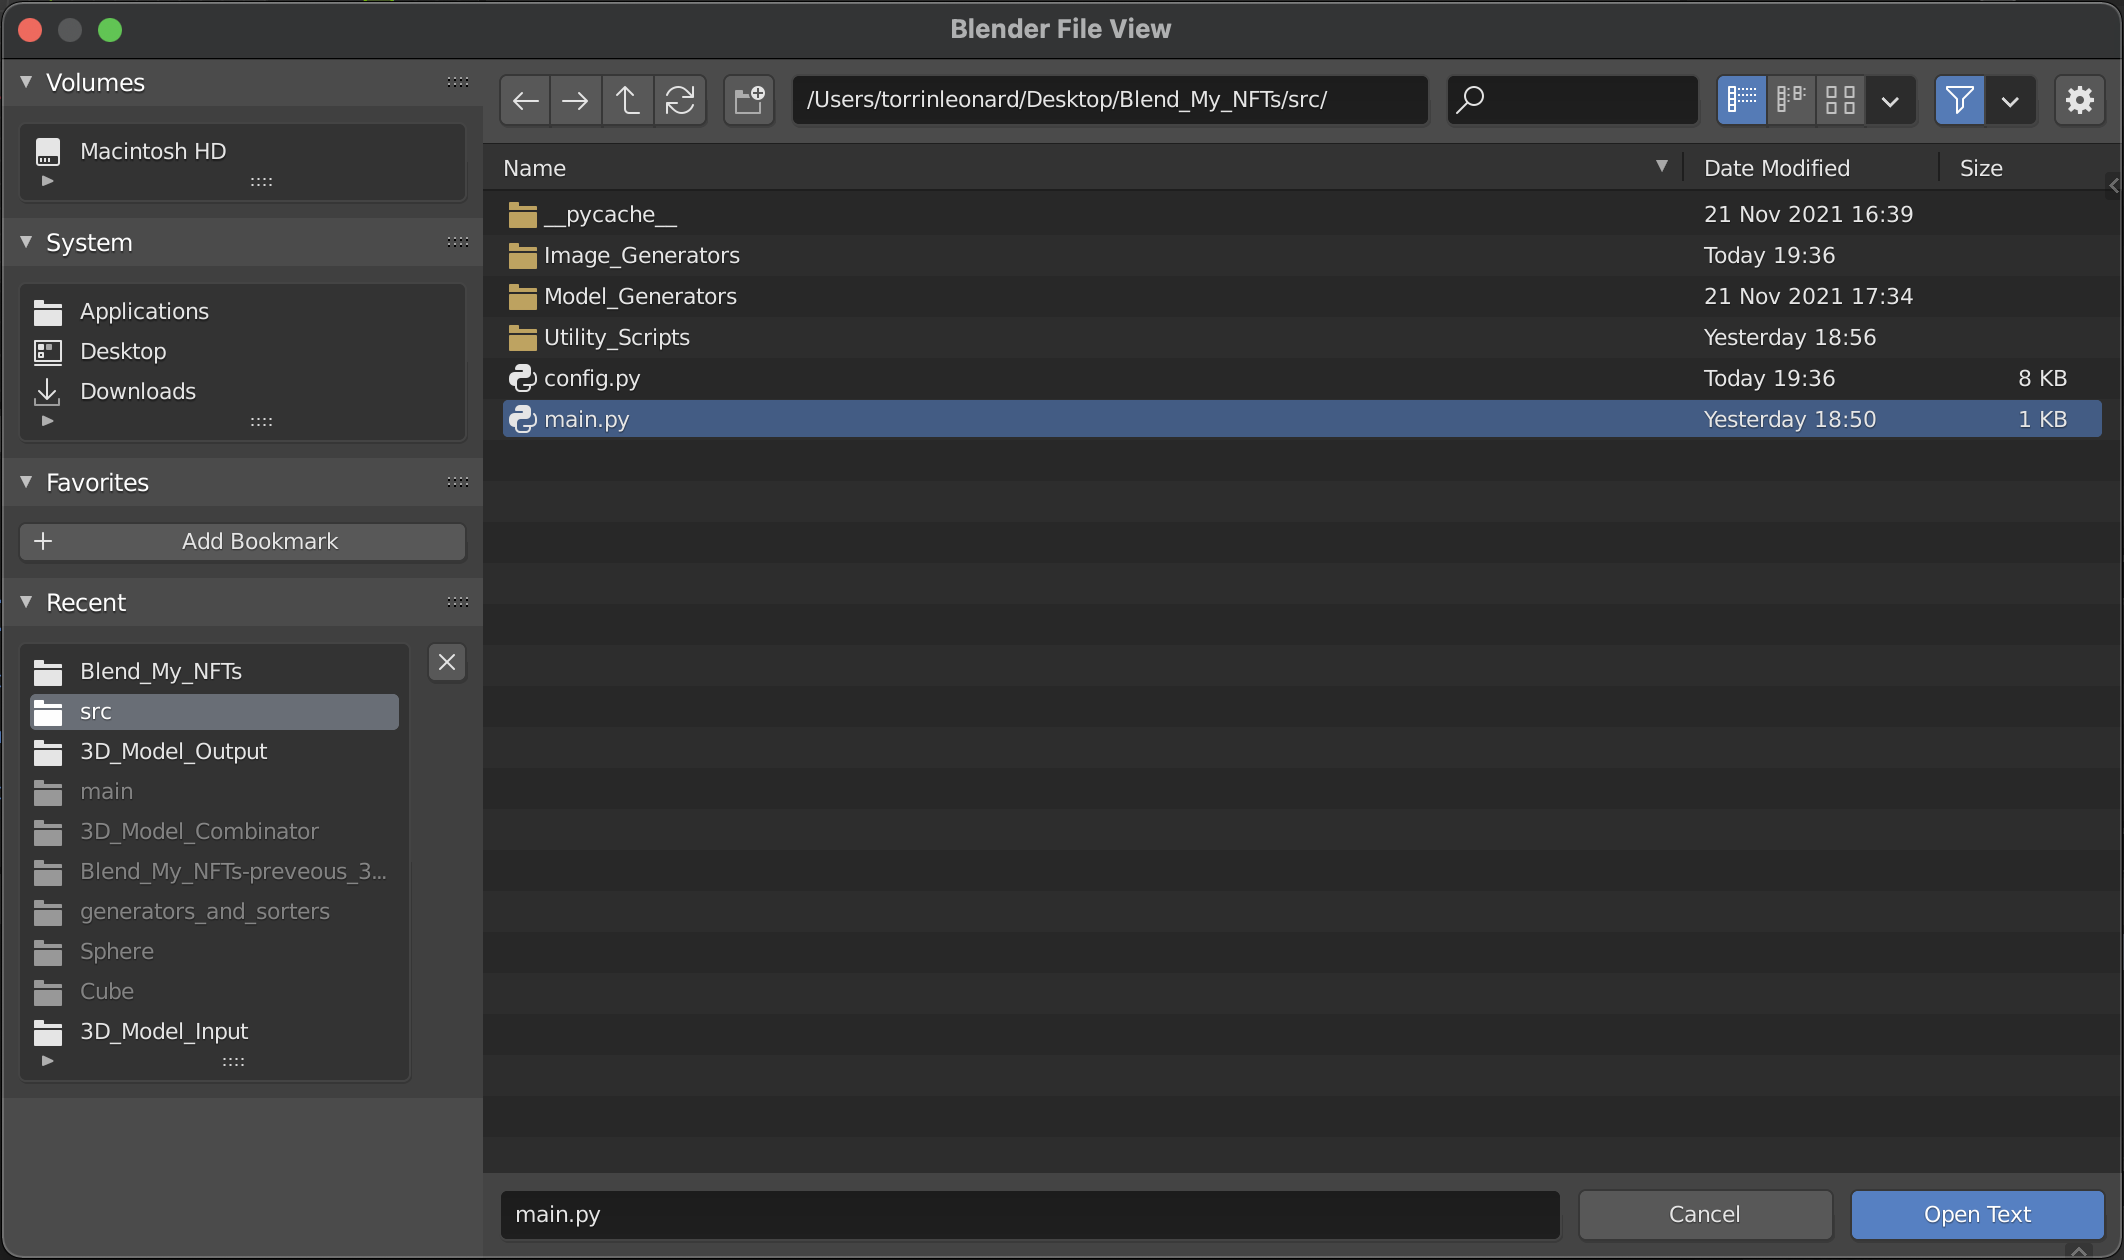
- With the Blender File View open, navigate to the Blend_My_NFTs folder, navigate to the
srcfolder, then open main.py.
- To run main.py click the run button shown circled below:
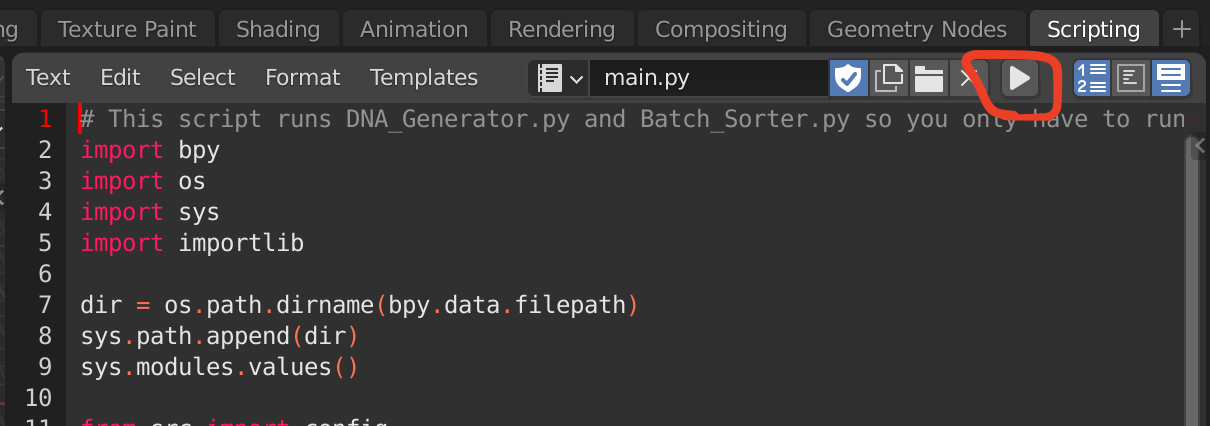
If you correctly formated your .blend file, you will now have two file types; an NFTRecord.json, and a number of Batch#.json files located in the Batch_Json_files folder.
Running main.py - Generating Image Batches
For this section, ensure you have generated NFTRecord.json and Batch#.json files before taking the following steps
Steps to Generate Images:
- Ensure all manditory variables have been filed in (all found in config.py):
nftNamesave_path_macorsave_path_windowsmaxNFTsnftsPerBatchrenderBatch
-
Run main.py in Blender with
enableExporterset toFalsein config.py. This will generate the NFTRecord.json and Batch#.json files. -
Set
renderBatchto the batch number you wish to render in config.py. -
Set
enableExportertoTruein config.py. -
Set
enableImagestoTruein config.py. -
Run main.py in the Blender Scripting Tab. This will now generate Images.
Reapeat the steps above for each Batch to generate the complete NFT collection.
Summery: The order to run main.py to Generate Image Batches
Run the scripts in the following order:
- main.py - With
renderImageset toFalsein the config.py: Generates the data for your NFT collection. - main.py - With
renderImageset toTruein the config.py: Renders images in a batch specified byrenderBatch.
Running main.py - Generating Animation Batches
Steps to Generate Animations:
- Ensure all manditory variables have been filed in (all found in config.py):
nftNamesave_path_macorsave_path_windowsmaxNFTsnftsPerBatchrenderBatch
-
Run main.py in Blender with
enableExporterset toFalse. This will generate the NFTRecord.json and Batch#.json files. -
Set
animationFileFormatto the animation file format you wish to export in config.py. -
Set
enableAnimationstoTruein config.py. -
Set
enableExportertoTruein config.py. -
Run main.py in the Blender Scripting Tab. This will now generate Animations.
Reapeat the steps above for each Batch to generate the complete NFT collection.
Summery: The order to run main.py to Generate Animation Batches
Run the scripts in the following order:
- main.py - With
enableExporterset toFalsein config.py: Generates the data for your NFT collection. - main.py - With
enableExporterandenableAnimationsset toTruein config.py: Renders and compiles animations.
Running main.py - Generating 3D Model Batches from a .blend file
Youtube tutorial for generating 3D models: https://www.youtube.com/watch?v=rRs0lN5huDk&t=1s
Steps to Generate 3D models:
- Ensure all manditory variables have been filed in (all found in config.py):
nftNamesave_path_macorsave_path_windowsmaxNFTsnftsPerBatchrenderBatch
-
Run main.py in Blender with
enableExporterset toFalse. This will generate the NFTRecord.json and Batch#.json files. -
Set
modelFileFormatto the 3D Model file format you wish to export in config.py. -
Set
enableModelsBlendertoTruein config.py. -
Set
enableExportertoTruein config.py. -
Run main.py in the Blender Scripting Tab. This will now generate 3D Models.
Summary: The order to run main.py to Generate 3D Model Batches:
run the scripts in the following order:
- main.py - With
enableExporterset toFalsein config.py: Generates the data for your NFT collection. - main.py - With
enableExporterandenableModelsBlenderset toTruein config.py: Exports 3D models.
Generating 3D Models with external 3D Models
This youtube tutorial goes over the basic setup discussed in this section: https://www.youtube.com/watch?v=NonORFpVhLw (This video is out of date but may be of use)
The following section covers generating and exporting 3D models with Blend_My_NFTs with a repository of external 3D models in a folder structure. The 3D model generator combines 3D models together and exports all possible combinations of those 3D models to a folder.
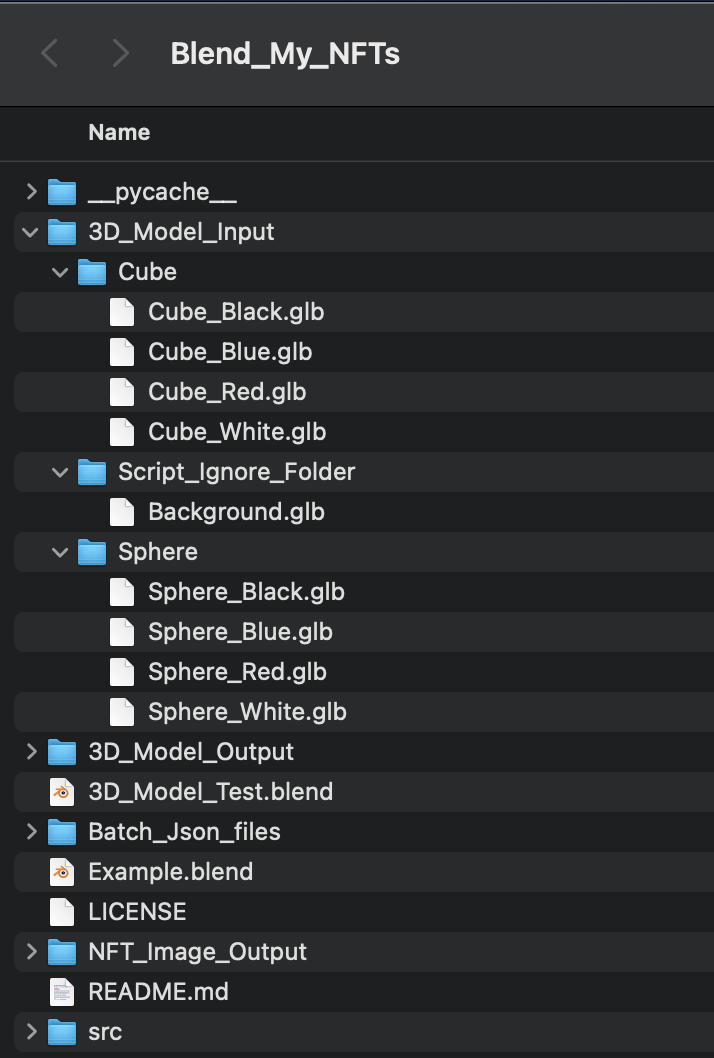
How to set up your 3D model folders
Similarly to the Image Generator, there is a specific way to format 3d model repositors external to Blender.
- In the following photo we have a folder structure. In this example,
SphereandCubeare our attributes. Any object file in theScript_Ignore_Folderwill be added to all NFT 3D models generated, and such is an appropriate place to put constant scene elements you wish to appear in every NFT you generate.

- After you have formated the repository of 3D models to the above convention, copy and past it into the 3D_Model_Input folder located in Blend_My_NFTs:
- Next open config.py and change the variable
use3DModels = Falsetouse3DModels = True

-
In Blender open a new blend file and delete everything from the scene.
-
Save the .blend file to the Blend_My_NFTs folder and reload the .blend file from the new directory.
-
Run main.py in the Blender Scripting Tab
The generated 3D models will appear in the folder 3D_Model_Output
How to use Rarity
Rarity is a percentage value and accepts fractions like 0.001%, but they must be specified with decimals in the naming (fraction like 1/2 or 3/5 are not permitted in the naming structure). For ease of use the percentages should add up to 100%:
33% + 33% + 33% + 1% = 100%

Variant 1 = 33% chance
Variant 2 = 33% chance
Variant 3 = 33% chance
Variant 4 = 1% chance
If you have 20 variants with 50 set as the rarity percentage for each, Blend_My_NFTs will add up the percentages then treat the sum as 100%:
50% + 50% + 50% + 50% + 50%....
= 1,000%

Out of 100%:

(50/1,000)*100 = 5% chance of 1 variant
Rarity is dependent on both the number of NFTs you generate, as well as the maximum number of possible combinations of the attributes in your .blend file.
This means the following two scenarios, say, at a fixed number of 10,000 NFTs to generate;
-
Your .blend file has 1,000,000,000 possible combinations (trust me that's a small number, our collection for This Cozy Place has over 11 Trillion possible combinations). Generating 10,000 will be more representative of the rarity numbers you set as the script will simply have more combinations to choose from.
-
Your .blend file has 10,000 possible combinations. This means that all possible combinations of your NFT will be generated, meaning that no rarity can be taken into account since the only way to reach your required 10,000 NFTs to generate is by including NFTs that
This is the result for following reasons:
-
The rarity is determined sudo randomly by, but is weighted based on each variants rarity percentage.
-
The script prioritises the number of NFTs to generate (that you set in config.py with the maxNFTs variable) over rarity percentage
This behaviour is a fundamental mathematical result, not an issue with the code. I've researched various ways at creating and enforcing rarity, this is the only way I have found that works. If you have found a better method, feel free to make a pull request and I'd be happy to review and merge it to the main Github repo for BMNFTs.
.blend file examples:
- With Rarity percentage (50% 50% split)
  Hat <-- Attribute
  |-Green Hat_1_50
  |-Red Hat_2_50
- Since it's 50/50 it can also be expressed like this:
  Hat <-- Attribute
  |-Green Hat_1_0
  |-Red Hat_2_0
Leaving the rarity number as 0 will randomly select 1 of the variants you set in your .blend file. Note that this only works if every variant's rarity is set to 0. For an attribute its rarity or random, not both. You can have different attributes, where some are using rarity and others are randomly selected, but you cannot mix these with variants.
Example of more complex rarity structures:
  Hat <-- Attribute
  |-Green Hat_1_24.75
  |-Red Hat_2_24.75
  |-Blue Hat_2_24.75
  |-Orange Hat_2_24.57
  |-Purple Hat_2_0.5
  |-Yellow Hat_2_0.5
In the example above, Green, Red, Blue, and Orange hats all have an equal chance of getting selected. However Purple and Yellow hats will only appear on average 0.5% of the time. We recommend rounding to about 5 decimal places for simplicity, as numbers of more accuracy aren't really needed for NFT collections 10,000 or smaller.
The code for that determines rarity can be found in src/Main_Generators/Rarity_Sorter.py. The most important line in that file is 70, that is what generates the randomly weighted DNA. After that it is checked by line
Helpful Links
This Blender add on heaviliy relies on the Blender API and its documentation which you can find here: https://docs.blender.org/api/current/index.html
If you have no experience with the Blender API I recomend watch this tutorial on running python scripts in Blender: https://www.youtube.com/watch?v=cyt0O7saU4Q
There is also helpful documentation in the Blender API about running scripts here: https://docs.blender.org/api/current/info_quickstart.html#running-scripts
Note - You might want to install the Icon Viewer add-on for Blender: https://docs.blender.org/manual/en/latest/addons/development/icon_viewer.html
Disclaimers
Blend_My_NFTs works with Windows 10 or macOS BigSure 11.6 on Blender 3.0.0. These are the operating systems I have tested the scripts on, I do not garuntee they will work on other operating systems. I do not garuntee this software will work with your setup. There are many variables and factors that go into running the software provided, it differs from system to system, and from blend file to blend file.
I encourage you to do some trouble shooting, read the Blender API documentation, read this tutorial, review the scripts, and do your own research before reaching out for help on our discord. If you are really stuck and are out of options I am available on our disord channel above for consulting. However! I am not a toutor. Although I enjoy teaching people, I simply do not have the time to work, build this project, teach people Blender/Python, and live my life. So please respect my time, I'd love to help!
To be honest I have no idea how to use Blender. I know some basic things, but I know the API and Python a lot better. This is my first Blender/Python project, so you may be wondering "how is he making a NFT collection with Blender??" Well I'm not, I write the code for the Blend_My_NFTs, and my team has three other members; Devlin and Caelin, who create the scenes and models in Blender, and the third is Quinn who is the lead web developer for our site.
If building an NFT collection in blender is something you really want to do and you have experience with Blender, I suggest you get familiar with some basic Python functionality and then how to run scripts in the Belnder Text Editor (an indepth knowledge is not required). However, if you don't use Blender but have a coding background, I would suggest watching some basic tutorials just to get a feel for the software (an indepth knowledge is not required).
This tutorial page is not finished! This page will be updated as I commit/merge new changes to the main branch. (Last updated Nov 10th, 2021)
I garuntee this will eventually be an add on to Blender and not just a script you run through the script editor. (I mostly just put this in here for personal motivation, please don't pester me about the date lol)
Nothing in this repository or its documentation is financial advice. If you create an NFT project or collection with Blend_My_NFTs, you do so at your own personal and financial risk. We are only providing a means of acomplishing a goal, not investment or financial information about that goal. Do your own research and come to your own conclusions before spending money on NFTs or any asset for that matter. We are not liable for any finacial losses you may encure while using this software. Any discussion about finances and cryptocurrencies in this repository or its documentation are done with the intent to educate and provide examples to help our users understand concepts relating to Blend_My_NFTs and This Cozy Place.
The creators of This Cozy Studio will never, under any cricumstance, ask for your crypto wallet(s) secret phrase or private keys. If you come across anyone who is impersonating the founding members of This Cozy Place, please report it immediately to the admins on our discord channel and we will take appropriate action and warn our community of the behaviour. If this takes place outside of our community boundries then report the user to the appropriate authorities.
This software is provided for free and is open source. We are not liable for any felones you may commit using this software, and we staunchly appose the malicious use of this software that in any way breaks any applicable law in your loction of residence.