
![]()

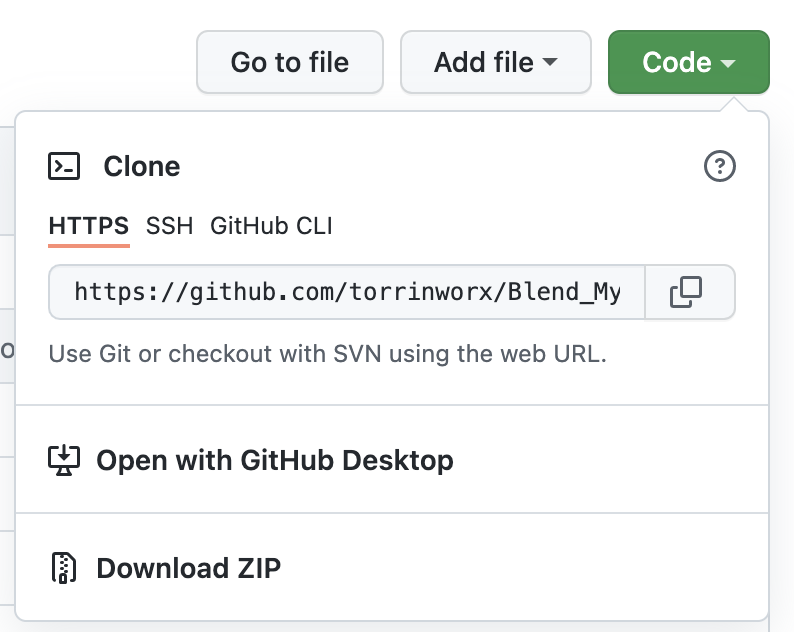
 2. From the drop down click `Download ZIP`. This will download Blend_My_NFTs-main.zip to your Downloads folder:
 3. Move the Blend_My_NFTs-main.zip file to your desktop:

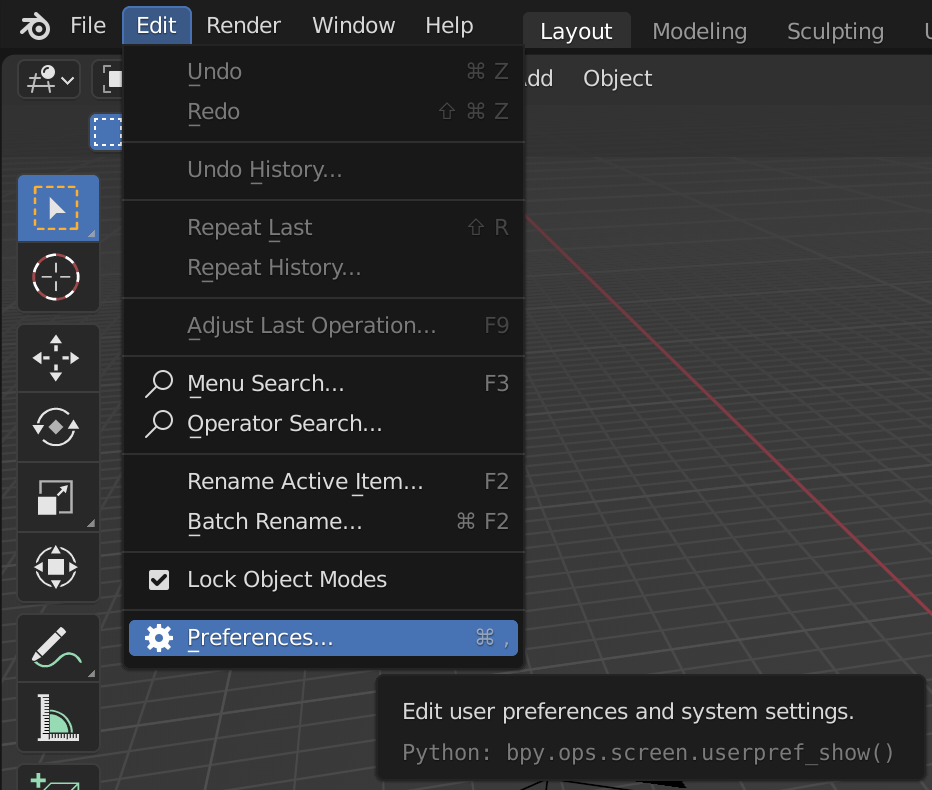
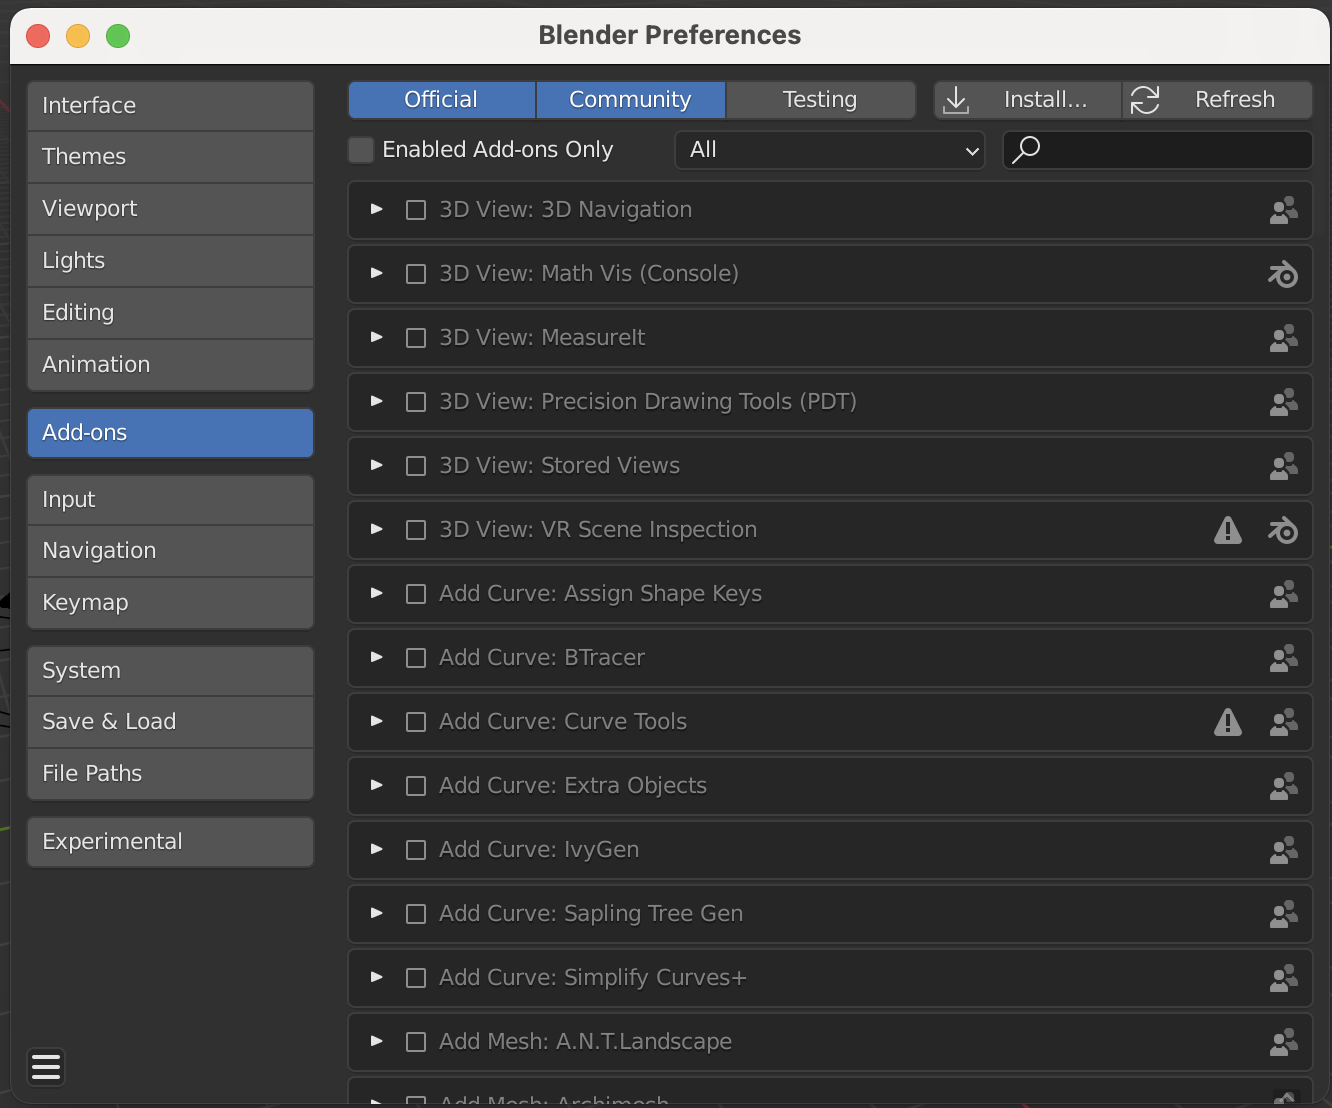
4. Open Blender and navigate to `Edit` -> `Preferences` -> `Add-ons`:
3. Move the Blend_My_NFTs-main.zip file to your desktop:

4. Open Blender and navigate to `Edit` -> `Preferences` -> `Add-ons`:
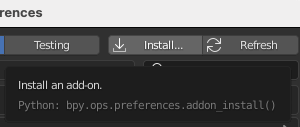
 5. Click the `Install` button:
6. In the `Blender File View` window, navigate to the Blend_My_NFTs-main.zip file downloaded in step 1., select it, then click `Install Add-on`:

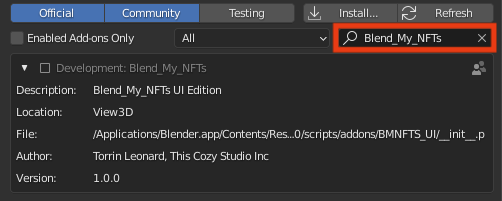
7. Navigate back to the `Add-ons` window in step 4., and search for Blend_My_NFTs:
8. Click the `Checkbox` to enable the Blend_My_NFTs add-on:

Now that Blend_My_NFTs is installed in your instance of Blender you can find the main panel in the `3D View` tab in `Layout`, once you are there tap `N` on your keyboard to open the side panel:

# Important Terminology
Before you can continue further, there are terms used in this documenation to describe the process of this software. This makes it easier to understand how you need to organize your .blend file to generate NFTs. Refer to this section if you come accross an unfamiliar term.
Let's say you are creating an NFT collection, the artwork is a .png of a person wearing a hat:
1. ``Attribute`` - A part of the .png that can be changed. The idea of a `Hat` on a man is an Attribute, there are many types of Hats, but the `Hat` itself I will refer to it as an Attribute.
2. ``Variants`` - These are the types of Hats; Red Hat, Blue Hat, Green Hat, Cat Hat, etc. These can be swapped into the `Hat` Attribute to create unique .png NFTs.
3. ``DNA`` - A sequence of numbers that determins what ``Variant`` from every ``Attribute`` to include in a single NFT .png. Blend_My_NFTs creates and stores a uniqe DNA sequence for each NFT you create. These numbers are stored in the ``NFTRecord``.
4. ``NFTRecord`` - The "Ledger" of all ``DNA`` for your NFT collection. This will be generated after you create all the Attribtues and Variants that make up your NFT collection in Blender.
5. ``Batch`` - A randomly selected subset of ``DNA``, taken from the ``NFTRecord``. Blend_My_NFTs can split the ``NFTRecord`` into multiple Batches; This allows you to render or create NFTs on multiple computers, or at seperate instances in time.
# Blender File Organization and Structure
**Important** - Every object, model, texture, camera, light etc. must be in the same .blend file! If you have mulitiple .blend files, Blend_My_NFTs is unable to open and process them. It's recommended to keep your file's total size 5gb, so if you have multiple files created already, reduce the size and then merge them to a master file.
Organizing your NFTs Attributes and Varariants in Blender is essential to generate files with Blend_My_NFTs. Follow the organizational rules below when making your NFT .blend file:
1. Your .blend file scene must contain a `Script_Ignore` collection. Make sure the name is exactly `Script_Ignore`, include the underscore and capitalization.
- Any objects (Lights, Cameras, Background images, etc.) that stay constant throughout every NFT file are to be placed in this `Script_Ignore` collection. `Script_Ignore` may contain sub collections and all naming conventions are not required withing this collection.
2. Every Attribute is represented by a collection placed directly in the Scene collection. The name of these attribute collections **can not** contain numbers or the underscore (`_`) symbol. The name can contain spaces
3. Every Variant of each Attribute is represented by a collection. These collections are to be placed in the corresponding Attribute colleciton. The naming convention of these Variant collections is as follows:
- <`Name of Variant`>`_`<`Order Number`>`_`<`Rarity Percentage`>
- `Name of Variant` ==> Any string/number/symbol combination, must not include the underscore (`_`) symbol. Can contain spaces.
- `Order Number` ==> An incrementing number. Must increment for each Variant added to a given Attribute starting at `1`, numbers cannot repeat and must be unique for each Variant. Can only be in a single number format, do not use 001 or 0001 formats.
- `Rarity Percentage` ==> A percentage that determins the chance that the given variant will be selected. Must be a number, can contain decimals, cannot contain the percentage (`%`) symbol. See `Notes on Rarity and Weighted Variants` section for more details.
- Each Variant collection can contain everything that makes up an individual Variant; it can contain objects, lights, meshes, planes, and every other object type.
## Example of Proper BMNFTs Compatable Blender Scene
5. Click the `Install` button:

6. In the `Blender File View` window, navigate to the Blend_My_NFTs-main.zip file downloaded in step 1., select it, then click `Install Add-on`:

7. Navigate back to the `Add-ons` window in step 4., and search for Blend_My_NFTs:

8. Click the `Checkbox` to enable the Blend_My_NFTs add-on:

Now that Blend_My_NFTs is installed in your instance of Blender you can find the main panel in the `3D View` tab in `Layout`, once you are there tap `N` on your keyboard to open the side panel:

# Important Terminology
Before you can continue further, there are terms used in this documenation to describe the process of this software. This makes it easier to understand how you need to organize your .blend file to generate NFTs. Refer to this section if you come accross an unfamiliar term.
Let's say you are creating an NFT collection, the artwork is a .png of a person wearing a hat:
1. ``Attribute`` - A part of the .png that can be changed. The idea of a `Hat` on a man is an Attribute, there are many types of Hats, but the `Hat` itself I will refer to it as an Attribute.
2. ``Variants`` - These are the types of Hats; Red Hat, Blue Hat, Green Hat, Cat Hat, etc. These can be swapped into the `Hat` Attribute to create unique .png NFTs.
3. ``DNA`` - A sequence of numbers that determins what ``Variant`` from every ``Attribute`` to include in a single NFT .png. Blend_My_NFTs creates and stores a uniqe DNA sequence for each NFT you create. These numbers are stored in the ``NFTRecord``.
4. ``NFTRecord`` - The "Ledger" of all ``DNA`` for your NFT collection. This will be generated after you create all the Attribtues and Variants that make up your NFT collection in Blender.
5. ``Batch`` - A randomly selected subset of ``DNA``, taken from the ``NFTRecord``. Blend_My_NFTs can split the ``NFTRecord`` into multiple Batches; This allows you to render or create NFTs on multiple computers, or at seperate instances in time.
# Blender File Organization and Structure
**Important** - Every object, model, texture, camera, light etc. must be in the same .blend file! If you have mulitiple .blend files, Blend_My_NFTs is unable to open and process them. It's recommended to keep your file's total size 5gb, so if you have multiple files created already, reduce the size and then merge them to a master file.
Organizing your NFTs Attributes and Varariants in Blender is essential to generate files with Blend_My_NFTs. Follow the organizational rules below when making your NFT .blend file:
1. Your .blend file scene must contain a `Script_Ignore` collection. Make sure the name is exactly `Script_Ignore`, include the underscore and capitalization.
- Any objects (Lights, Cameras, Background images, etc.) that stay constant throughout every NFT file are to be placed in this `Script_Ignore` collection. `Script_Ignore` may contain sub collections and all naming conventions are not required withing this collection.
2. Every Attribute is represented by a collection placed directly in the Scene collection. The name of these attribute collections **can not** contain numbers or the underscore (`_`) symbol. The name can contain spaces
3. Every Variant of each Attribute is represented by a collection. These collections are to be placed in the corresponding Attribute colleciton. The naming convention of these Variant collections is as follows:
- <`Name of Variant`>`_`<`Order Number`>`_`<`Rarity Percentage`>
- `Name of Variant` ==> Any string/number/symbol combination, must not include the underscore (`_`) symbol. Can contain spaces.
- `Order Number` ==> An incrementing number. Must increment for each Variant added to a given Attribute starting at `1`, numbers cannot repeat and must be unique for each Variant. Can only be in a single number format, do not use 001 or 0001 formats.
- `Rarity Percentage` ==> A percentage that determins the chance that the given variant will be selected. Must be a number, can contain decimals, cannot contain the percentage (`%`) symbol. See `Notes on Rarity and Weighted Variants` section for more details.
- Each Variant collection can contain everything that makes up an individual Variant; it can contain objects, lights, meshes, planes, and every other object type.
## Example of Proper BMNFTs Compatable Blender Scene
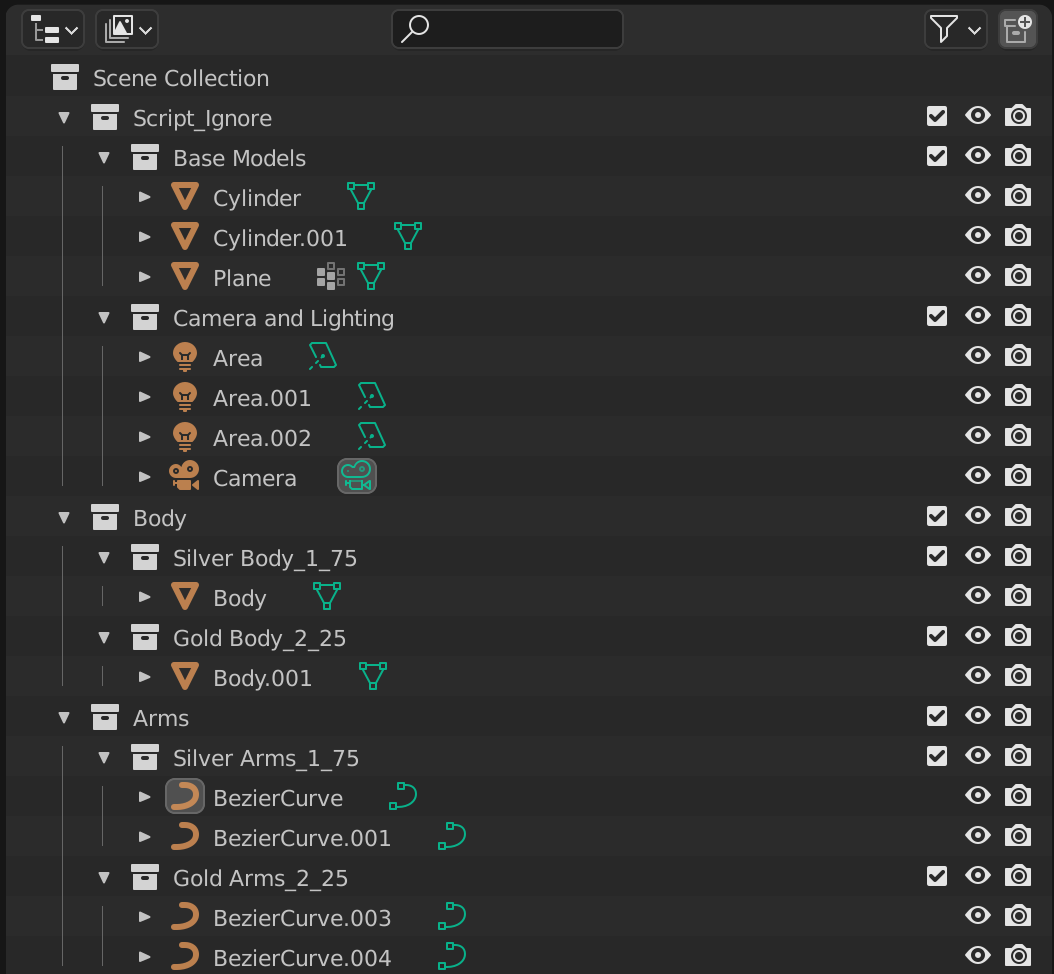 In this example, notice how the main components in `Script_Ignore` can be any type of object. The collections `Body` and `Arms` are both Attribute collections; `Silver Body_1_75` and `Gold Body_2_25` are Variants of the `Body` Attribute, and have a 75% and 25% generation chance. `Silver Arms_1_75` and `Gold Arms_2_25` are Variants of the `Arm` Attribute and have the same weighted distribution as the `Body` Variants. Notice how the Variant collections in the `Arm` Attribute can contain more than one object and object type, this principle can be applied to any Variant collections.
This repository contains three .blend example files that are compatable with Blend_My_NFTs: https://github.com/torrinworx/BMNFTs_Examples
# Steps to Generate NFTs
After you have formatted and organized your NFT collection in Blender to the rules outlined above in [Blender File Organization and Structure
](#blender-file-organization-and-structure) you can now go about generating your NFT collection. By the end of this process you will have a folder continaing the following:
1. NFT media files; images, animations, or 3D models in any format that you specify.
2. Json metadata files; one fore each NFT content filem, formatted to the blockchain standard that you set.
Before you get started, open the .blend of your NFT collection and open the side panel of the `Layout` tab so that Blend_My_NFTs is visible:
In this example, notice how the main components in `Script_Ignore` can be any type of object. The collections `Body` and `Arms` are both Attribute collections; `Silver Body_1_75` and `Gold Body_2_25` are Variants of the `Body` Attribute, and have a 75% and 25% generation chance. `Silver Arms_1_75` and `Gold Arms_2_25` are Variants of the `Arm` Attribute and have the same weighted distribution as the `Body` Variants. Notice how the Variant collections in the `Arm` Attribute can contain more than one object and object type, this principle can be applied to any Variant collections.
This repository contains three .blend example files that are compatable with Blend_My_NFTs: https://github.com/torrinworx/BMNFTs_Examples
# Steps to Generate NFTs
After you have formatted and organized your NFT collection in Blender to the rules outlined above in [Blender File Organization and Structure
](#blender-file-organization-and-structure) you can now go about generating your NFT collection. By the end of this process you will have a folder continaing the following:
1. NFT media files; images, animations, or 3D models in any format that you specify.
2. Json metadata files; one fore each NFT content filem, formatted to the blockchain standard that you set.
Before you get started, open the .blend of your NFT collection and open the side panel of the `Layout` tab so that Blend_My_NFTs is visible:
 Each Step below is represented by one panel; everything you have to do for that one step, is in the corosponding panel in Blend_My_NFTs.
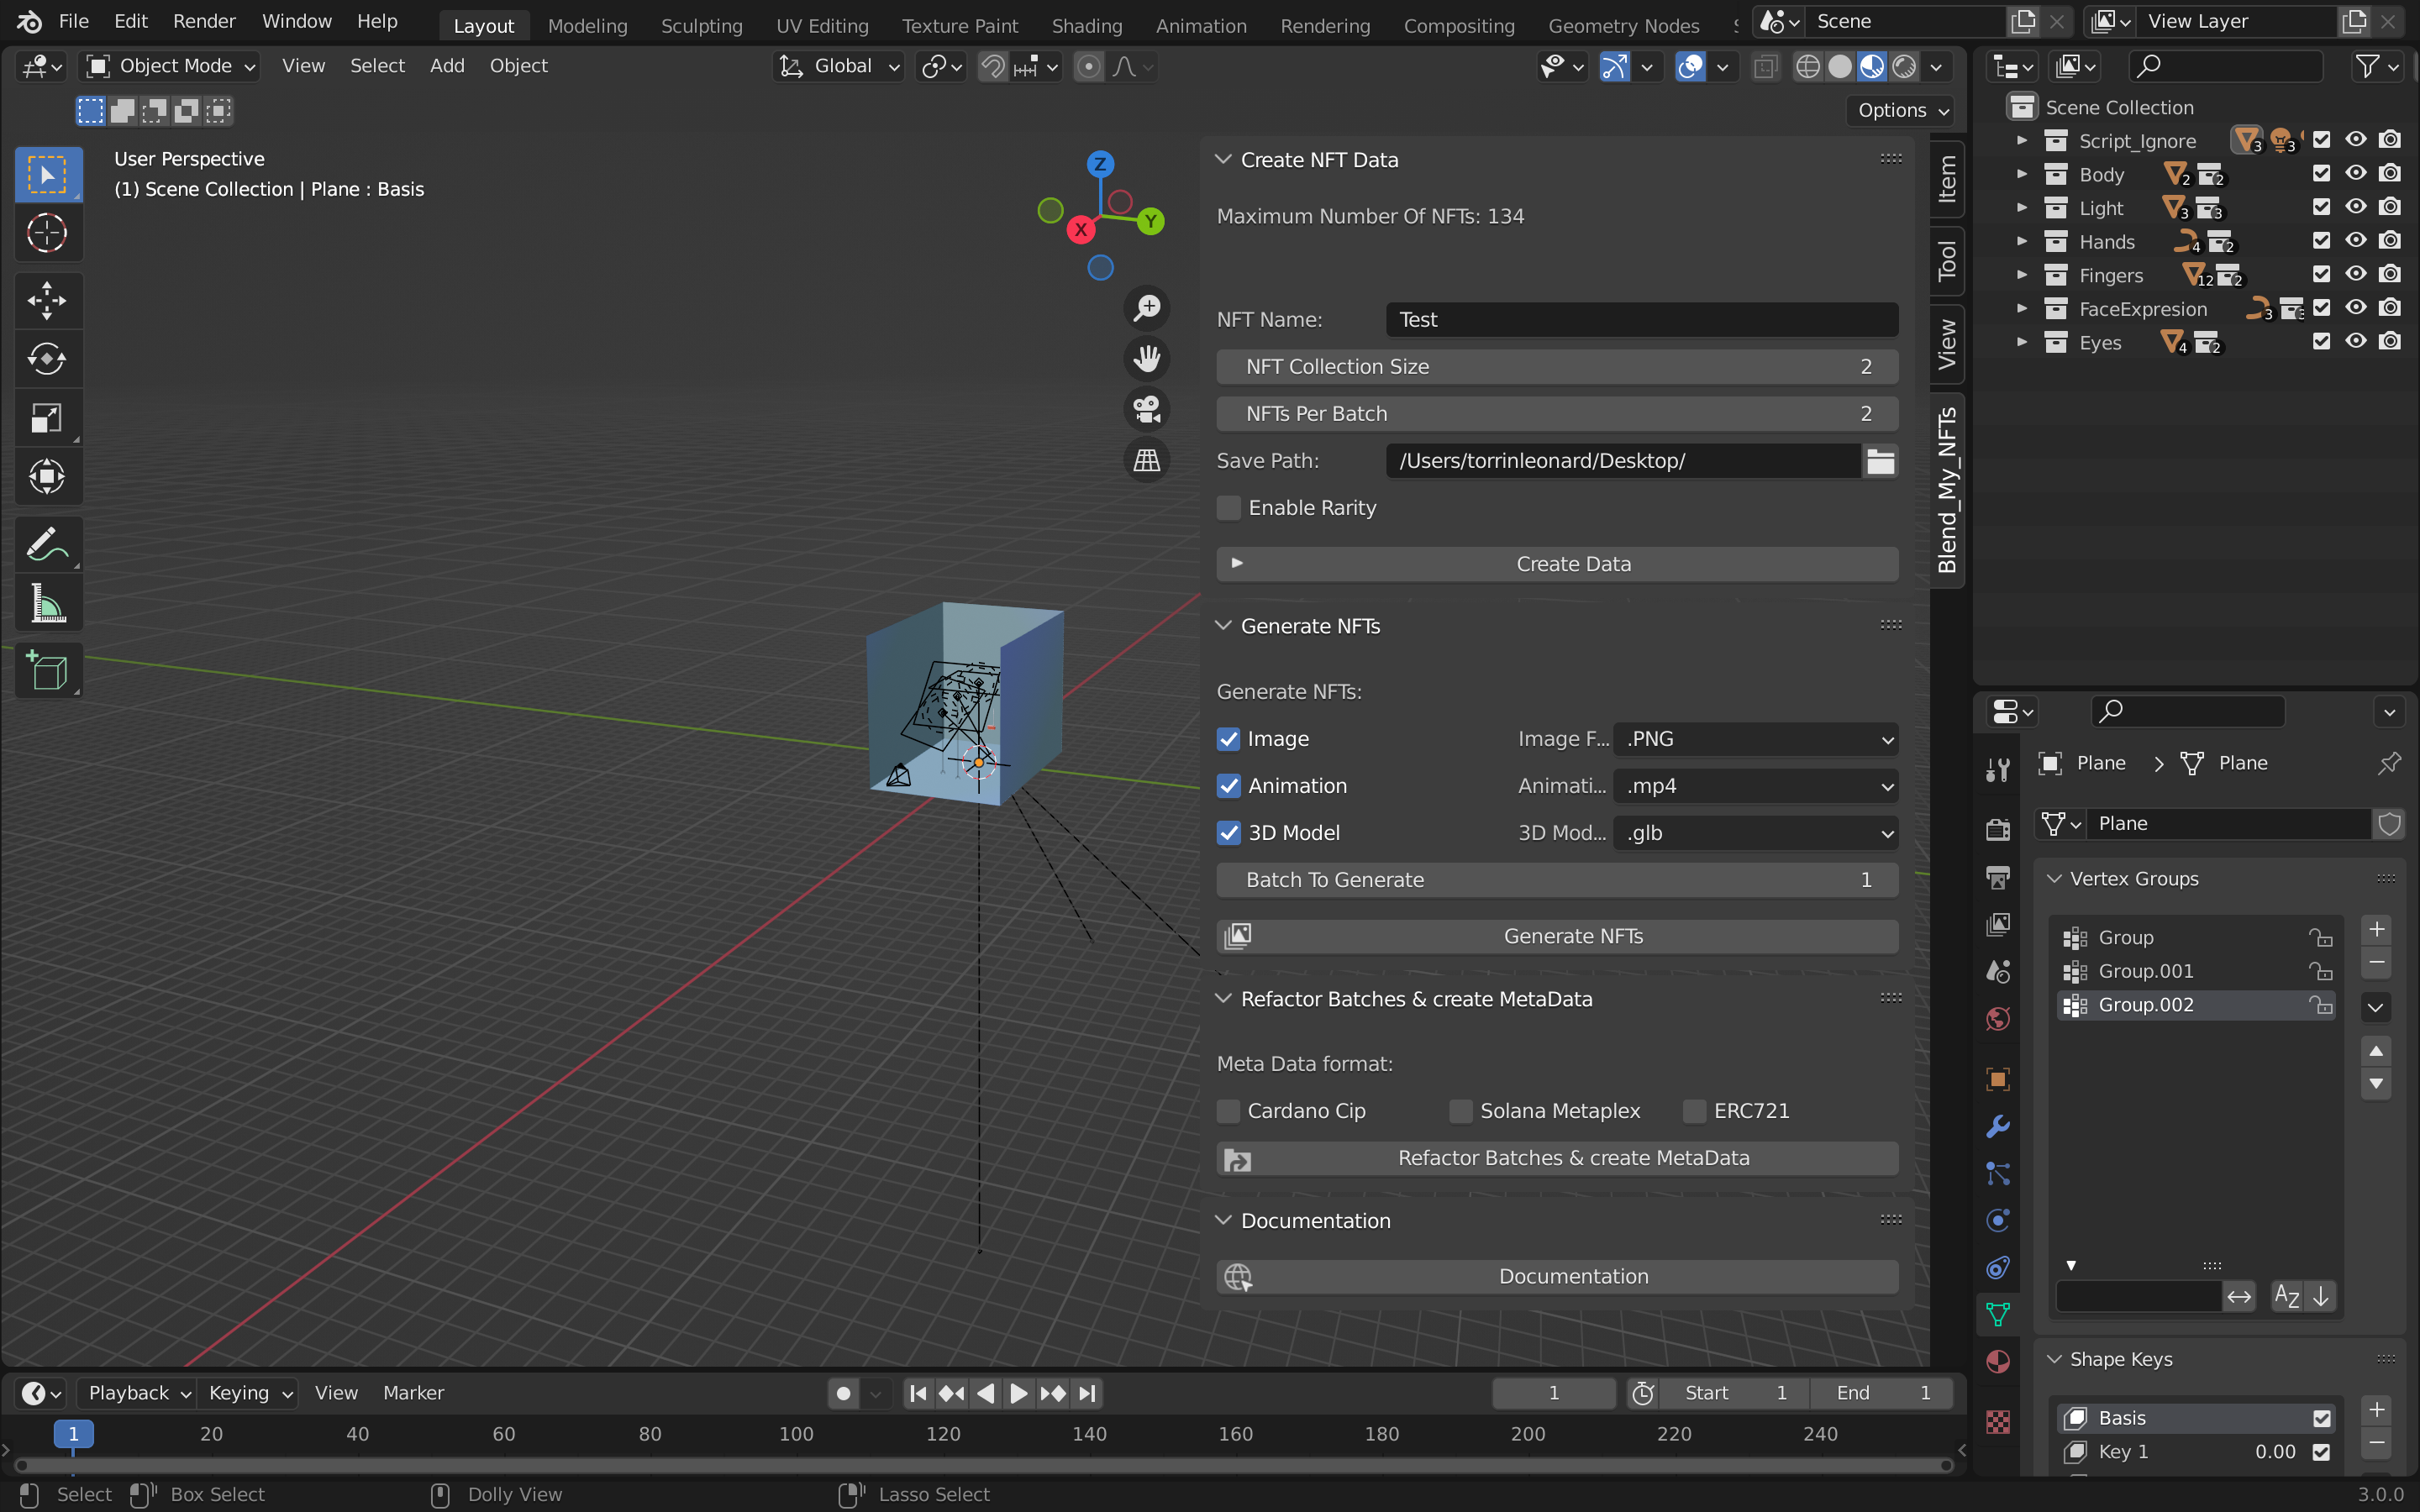
## Step 1. - Create NFT Data
Blend_My_NFTs needs data to understand your .blend file, in this step you will create that data.
1. Isolate or open the `Create NFT Data` panel in Blend_My_NFTs:
Each Step below is represented by one panel; everything you have to do for that one step, is in the corosponding panel in Blend_My_NFTs.
## Step 1. - Create NFT Data
Blend_My_NFTs needs data to understand your .blend file, in this step you will create that data.
1. Isolate or open the `Create NFT Data` panel in Blend_My_NFTs:
 2. Set the name of your NFT collection in the `NFT Name:` text field:
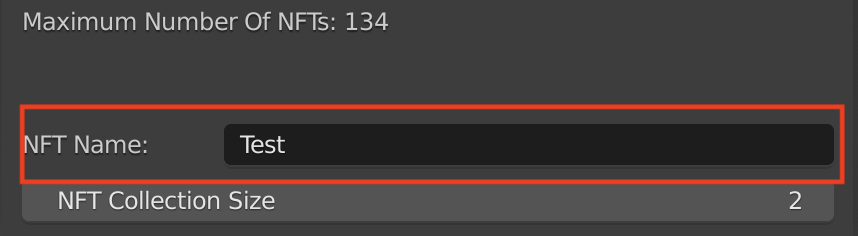 This name will be in the metadata and in the name of each NFT content file.
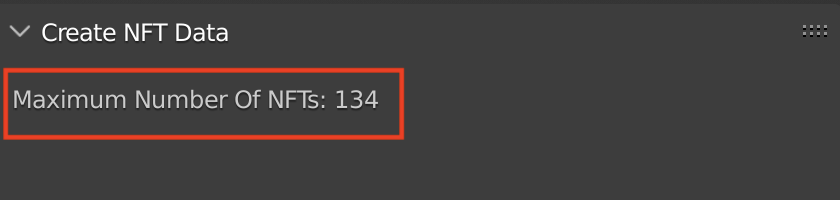
3. Note - `Maximum Number Of NFTs: ###` is the maximum number of NFTs your collection can contain with it's current number of Attirbutes and Variants.
This name will be in the metadata and in the name of each NFT content file.
3. Note - `Maximum Number Of NFTs: ###` is the maximum number of NFTs your collection can contain with it's current number of Attirbutes and Variants.
 4. Note - `Recommended Limit: ##` is the recommended number of NFTs Blend_My_NFTs is able to generate. Higher than this, e.i. closer to `Maximum Number of NFTs` can result it loss of NFT count and weighted Variants not appear as often as you expect them to. It is recommended that you keep your `NFT Collection Size` below this number.
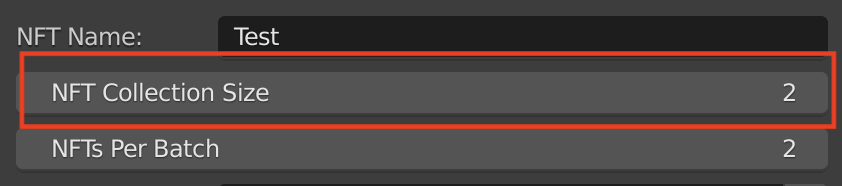
 5. Set your NFT collection size with the `NFT Collection Size` field:
 **Important:** This number must be greater than 0 and less than `Maximum Number Of NFTs` shown at the top of the `Create NFT Data` panel.
6. Set the NFTs per batch with the `NFTs Per Batch` field:
**Important:** This number must be greater than 0 and less than `Maximum Number Of NFTs` shown at the top of the `Create NFT Data` panel.
6. Set the NFTs per batch with the `NFTs Per Batch` field:
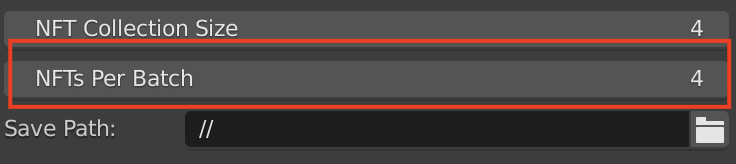 **Important:** This number must be greater than 0 and less than or equal to `Maximum Number Of NFTs` shown at the top of the `Create NFT Data` panel.
7. Set the `Save Path` of your `Blend_My_NFTs Output` folder by clicking on the file icon and navigating to a directory:
**Important:** This number must be greater than 0 and less than or equal to `Maximum Number Of NFTs` shown at the top of the `Create NFT Data` panel.
7. Set the `Save Path` of your `Blend_My_NFTs Output` folder by clicking on the file icon and navigating to a directory:
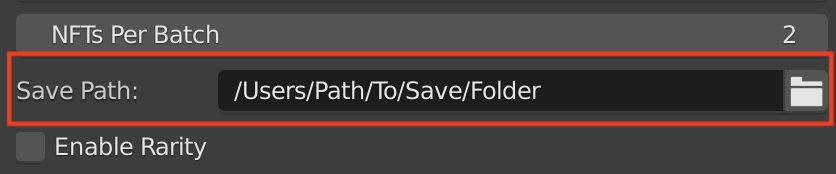 Then click the `Accept` button.
Desktop is recommended for easy access, but any directory will do.
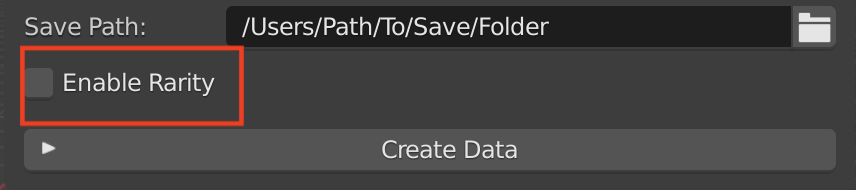
8. Enable or Disable Rarity and Weighted Variants with the checkbox `Enable Rarity`. For more information on what affect this has on your NFT collection, see [Blender File Organization and Structure](#blender-file-organization-and-structure)and [Notes on Rarity and Weighted Variants](#notes-on-rarity-and-weighted-variants).
Then click the `Accept` button.
Desktop is recommended for easy access, but any directory will do.
8. Enable or Disable Rarity and Weighted Variants with the checkbox `Enable Rarity`. For more information on what affect this has on your NFT collection, see [Blender File Organization and Structure](#blender-file-organization-and-structure)and [Notes on Rarity and Weighted Variants](#notes-on-rarity-and-weighted-variants).
 9. Enable or Disable Logic with the checkbox `Enable Logic`. For more information on what affect this has on your NFT collection, see [Logic](#logic).
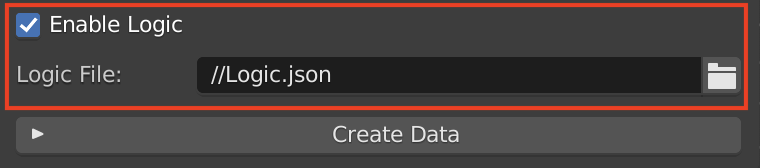 - If you enabled Logic, set the location of the Logic.json file you created in the ``Logic File`` field. Click on the file icon and navigate to the location of the json file. To create a Logic.json file, see the [Logic](#logic) section.
10. Lastly click the `Create Data` button:
- If you enabled Logic, set the location of the Logic.json file you created in the ``Logic File`` field. Click on the file icon and navigate to the location of the json file. To create a Logic.json file, see the [Logic](#logic) section.
10. Lastly click the `Create Data` button:
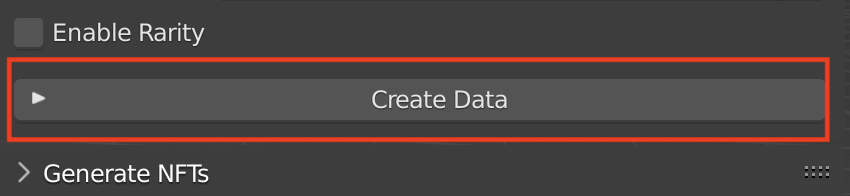 After completeing the `Create NFT Data` step, you should have the following files and folders located at the `Save Path` set in step 6. above;
- `Blend_My_NFTs Outuput` folder. A directory that contains all output files from Blend_My_NFTs.
- `NFT_Data` folder. This contains the following `NFTRecord.json` and `Batch#.json` files.
- `NFTRecord.json` file. A ledger that contains the NFT DNA of your collection.
- `Batch_Data` folder. Contains all `Batch#.json files`.
- `Batch#.json` files. Smaller chuncks of the `NFTRecord.json` that contain unique DNA.
- `Generated NFTs` folder. This directory will be empty, but is where your NFT content files will be exported to. once you've completed [Step 2. Generate NFTs](#step-2---generate-nfts).
## Step 2. - Generate NFTs
In this step, you will select the types of NFT content files you wish to generate, as well as the formats you want them in. You will then generate these files in batches, or all at once.
1. Isolate or open the `Generate NFTs` panel in Blend_My_NFTs:
After completeing the `Create NFT Data` step, you should have the following files and folders located at the `Save Path` set in step 6. above;
- `Blend_My_NFTs Outuput` folder. A directory that contains all output files from Blend_My_NFTs.
- `NFT_Data` folder. This contains the following `NFTRecord.json` and `Batch#.json` files.
- `NFTRecord.json` file. A ledger that contains the NFT DNA of your collection.
- `Batch_Data` folder. Contains all `Batch#.json files`.
- `Batch#.json` files. Smaller chuncks of the `NFTRecord.json` that contain unique DNA.
- `Generated NFTs` folder. This directory will be empty, but is where your NFT content files will be exported to. once you've completed [Step 2. Generate NFTs](#step-2---generate-nfts).
## Step 2. - Generate NFTs
In this step, you will select the types of NFT content files you wish to generate, as well as the formats you want them in. You will then generate these files in batches, or all at once.
1. Isolate or open the `Generate NFTs` panel in Blend_My_NFTs:
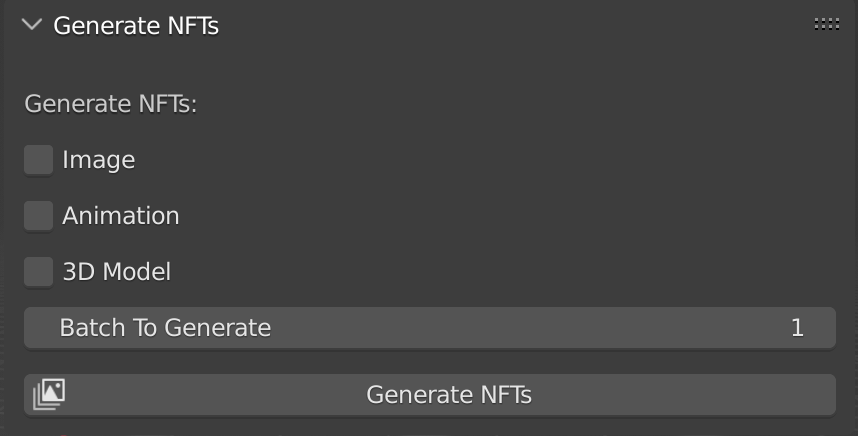 2. Check the NFT content files you wish to generate (you can select more than one):
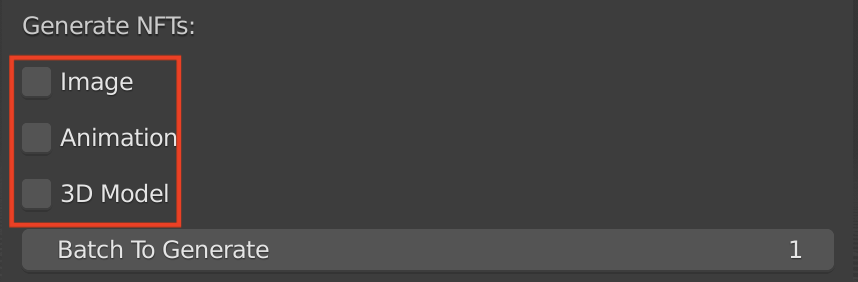 - If you check `Image`, choose the file format you want the NFT content files to be exported as from the `Image drop-down`:
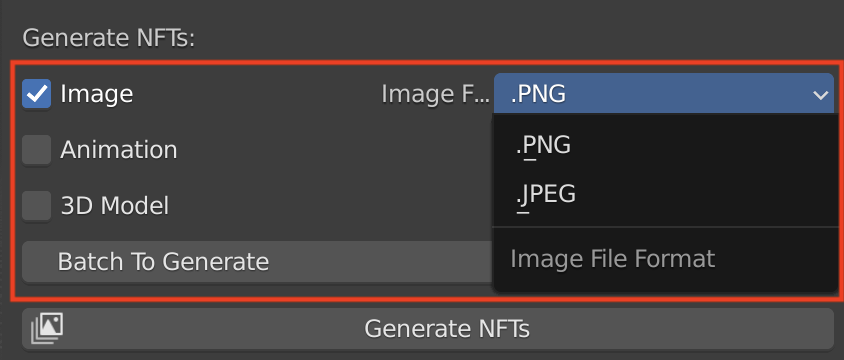 - `.png` --> Exports image as .png
- `.jpeg` --> Exports image as .jpeg
- If you check `Animation`, choose the file format you want the NFT content files to be exported as from the `Animation drop-down`:
- `.png` --> Exports image as .png
- `.jpeg` --> Exports image as .jpeg
- If you check `Animation`, choose the file format you want the NFT content files to be exported as from the `Animation drop-down`:
 - `.avi (AVI_JPEG)` --> Exports animations in AVI_JPEG encoding to .avi file format. See [Blender API](https://docs.blender.org/api/current/bpy.types.Image.html#bpy.types.Image.file_format) for more information.
- `.avi (AVI_RAW)` --> Exports animations in AVI_RAW encoding to .avi file format. See [Blender API](https://docs.blender.org/api/current/bpy.types.Image.html#bpy.types.Image.file_format) for more information.
- `.mkv (FFMPEG)` --> Exports animations in FFMPEG Blender default encoding and container to .mkv file format. See [Blender API](https://docs.blender.org/api/current/bpy.types.Image.html#bpy.types.Image.file_format) for more information.
- If you check `3D Model`, choose the file format you want the NFT content files to be exported as from the `3D Model drop-down`:
- `.avi (AVI_JPEG)` --> Exports animations in AVI_JPEG encoding to .avi file format. See [Blender API](https://docs.blender.org/api/current/bpy.types.Image.html#bpy.types.Image.file_format) for more information.
- `.avi (AVI_RAW)` --> Exports animations in AVI_RAW encoding to .avi file format. See [Blender API](https://docs.blender.org/api/current/bpy.types.Image.html#bpy.types.Image.file_format) for more information.
- `.mkv (FFMPEG)` --> Exports animations in FFMPEG Blender default encoding and container to .mkv file format. See [Blender API](https://docs.blender.org/api/current/bpy.types.Image.html#bpy.types.Image.file_format) for more information.
- If you check `3D Model`, choose the file format you want the NFT content files to be exported as from the `3D Model drop-down`:
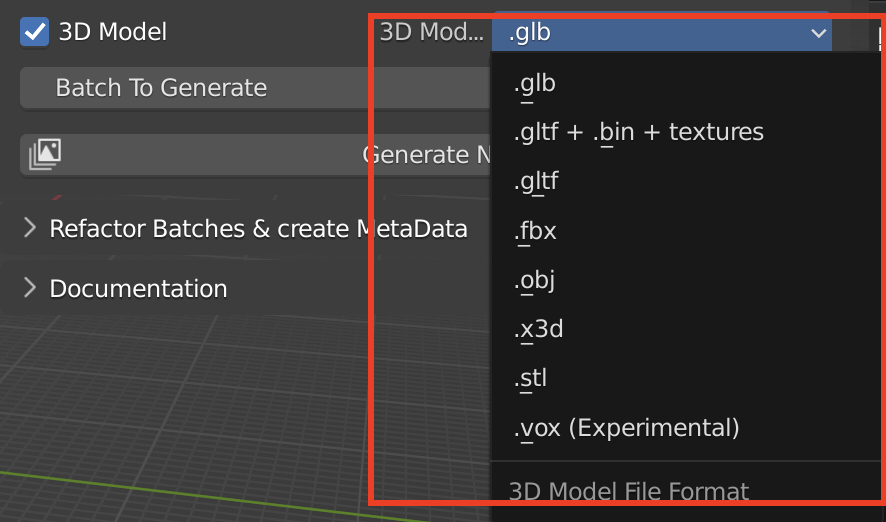 - `.glb` --> Exports .glb 3D models
- `.gltf + .bin + textures` --> Exports .gltf 3D models with seperated textures
- `.gltf` --> Exports .gltf 3D models with embeded textures
- `.fbx` --> Exports .fbx 3D models
- `.obj` --> Exports .obj 3D models
- `.x3d` --> Exports .x3d 3D models
- `.stl` --> Exports .stl 3D models
- `.vox` --> Exports .vox MagicVoxel 3D models. **Experimental:** This file format is still in development and might not work as intended. **Important:** You must install the [voxwritter Blender add-on](https://github.com/Spyduck/voxwriter) for this feature to work.
3. Select number of the Batch you wish to generate in the `Batch to Generate` feild:
- `.glb` --> Exports .glb 3D models
- `.gltf + .bin + textures` --> Exports .gltf 3D models with seperated textures
- `.gltf` --> Exports .gltf 3D models with embeded textures
- `.fbx` --> Exports .fbx 3D models
- `.obj` --> Exports .obj 3D models
- `.x3d` --> Exports .x3d 3D models
- `.stl` --> Exports .stl 3D models
- `.vox` --> Exports .vox MagicVoxel 3D models. **Experimental:** This file format is still in development and might not work as intended. **Important:** You must install the [voxwritter Blender add-on](https://github.com/Spyduck/voxwriter) for this feature to work.
3. Select number of the Batch you wish to generate in the `Batch to Generate` feild:
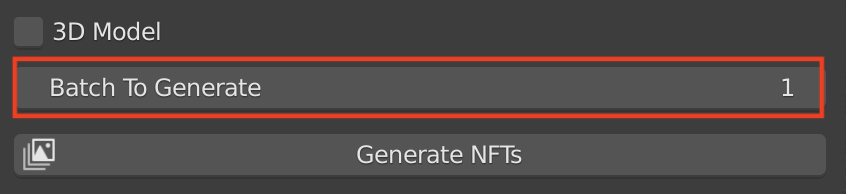 4. Click the `Generate NFTs` Button. This will generate the NFT content files from the Batch set in above step 3:
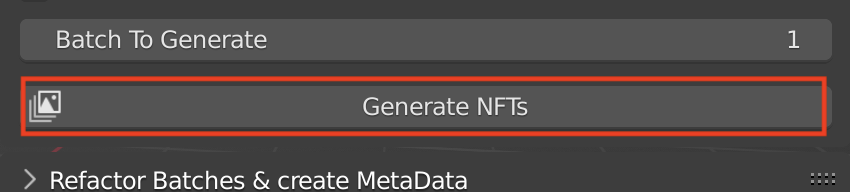 5. To generate the rest of the Batches you have, repeat steps 3. to 4. and increment the `Batch To Generate` number.
After completeing the `Create NFT Data` step, you should have the following files and folders located at the `Save Path` set in [Step 1. Create NFT Data](#step-1---create-nft-data) above;
- `Blend_My_NFTs Outuput` folder. A directory that contains all output files from Blend_My_NFTs.
- `NFT_Data` folder. This contains the following `NFTRecord.json` and `Batch#.json` files.
- `NFTRecord.json` file. A ledger that contains the NFT DNA of your collection.
- `Batch_Data` folder. Contains all `Batch#.json files`.
- `Batch#.json` files. Smaller chuncks of the `NFTRecord.json` that contain unique DNA.
- `Generated NFTs` folder. This directory will be empty, but is where your NFT content files will be exported to. once you've completed [Step 2. Generate NFTs](#step-2---generate-nfts).
- `Batch#.json` folder. There should be one folder for each batch that you generated.
- `Image` folder. The folder where all the NFT Image content files are stored for a given `Batch#.json`.
- `Image` files. These images will contain have the name you specified in [Step 1. Create Data](#step-1---create-nft-data), an incrementing number, and the file extension you specified above.
- `Animation` folder. The folder where all the NFT Animation content files are stored for a given `Btach#.json`.
- `Animation` files. These animations will have the name you specified in [Step 1. Create Data](#step-1---create-nft-data), an incrementing number, and the file extension you specified above.
- `3D Model` folder. The folder where all the NFT 3D Model content files are stored.
- `3D Model` files. These 3D models will have the name you specified in [Step 1. Create Data](#step-1---create-nft-data), an incrementing number, and the file extension you specified above.
- `BMNFTs_metaData` folder.
- `Data_#.json` files. These files are used by Blend_My_NFTs backend in [Step 3. - Refactor Batches & Create MetaData](#step-3---refactor-batches--create-metadata). These can be ignored, unless you are customizing the metaData.py script.
## Step 3. - Refactor Batches & Create MetaData
In this step you will combine the batch files created in [Step 2. - Generate NFTs](#step-2---generate-nfts) into one cohesive folder that is ready to be uploaded to the blockchain of your choice. This step will also generate the metadata needed for smart contract minting sites.
This step is to be done after you have completely rendered and generated all of your NFT batches; once you complete this step, you cannot undo the changes.
1. Isolate or open the `Refactor Batches & Create MetaData` panel in Blend_My_NFTs:
5. To generate the rest of the Batches you have, repeat steps 3. to 4. and increment the `Batch To Generate` number.
After completeing the `Create NFT Data` step, you should have the following files and folders located at the `Save Path` set in [Step 1. Create NFT Data](#step-1---create-nft-data) above;
- `Blend_My_NFTs Outuput` folder. A directory that contains all output files from Blend_My_NFTs.
- `NFT_Data` folder. This contains the following `NFTRecord.json` and `Batch#.json` files.
- `NFTRecord.json` file. A ledger that contains the NFT DNA of your collection.
- `Batch_Data` folder. Contains all `Batch#.json files`.
- `Batch#.json` files. Smaller chuncks of the `NFTRecord.json` that contain unique DNA.
- `Generated NFTs` folder. This directory will be empty, but is where your NFT content files will be exported to. once you've completed [Step 2. Generate NFTs](#step-2---generate-nfts).
- `Batch#.json` folder. There should be one folder for each batch that you generated.
- `Image` folder. The folder where all the NFT Image content files are stored for a given `Batch#.json`.
- `Image` files. These images will contain have the name you specified in [Step 1. Create Data](#step-1---create-nft-data), an incrementing number, and the file extension you specified above.
- `Animation` folder. The folder where all the NFT Animation content files are stored for a given `Btach#.json`.
- `Animation` files. These animations will have the name you specified in [Step 1. Create Data](#step-1---create-nft-data), an incrementing number, and the file extension you specified above.
- `3D Model` folder. The folder where all the NFT 3D Model content files are stored.
- `3D Model` files. These 3D models will have the name you specified in [Step 1. Create Data](#step-1---create-nft-data), an incrementing number, and the file extension you specified above.
- `BMNFTs_metaData` folder.
- `Data_#.json` files. These files are used by Blend_My_NFTs backend in [Step 3. - Refactor Batches & Create MetaData](#step-3---refactor-batches--create-metadata). These can be ignored, unless you are customizing the metaData.py script.
## Step 3. - Refactor Batches & Create MetaData
In this step you will combine the batch files created in [Step 2. - Generate NFTs](#step-2---generate-nfts) into one cohesive folder that is ready to be uploaded to the blockchain of your choice. This step will also generate the metadata needed for smart contract minting sites.
This step is to be done after you have completely rendered and generated all of your NFT batches; once you complete this step, you cannot undo the changes.
1. Isolate or open the `Refactor Batches & Create MetaData` panel in Blend_My_NFTs:
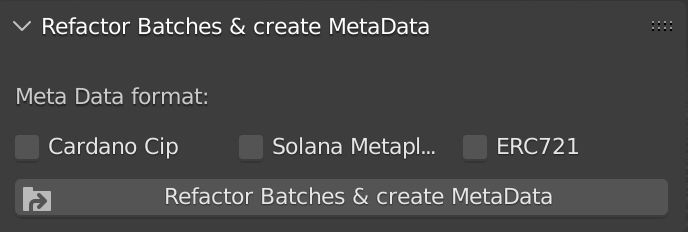 2. Check off the metadata templates you wish to generate (You can create more than one):
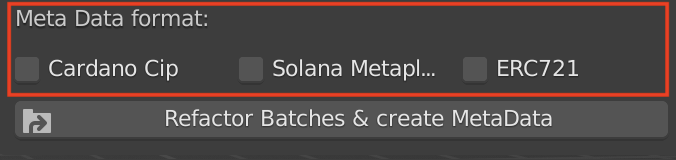 For more information on the metadata generated by Blend_My_NFTs and the standards that are followed see [Notes on Meta Data and Standards](#notes-on-meta-data-and-standards).
3. For each metadata template standard you can set a description, this will appear in the metadata json file of the given template.
For more information on the metadata generated by Blend_My_NFTs and the standards that are followed see [Notes on Meta Data and Standards](#notes-on-meta-data-and-standards).
3. For each metadata template standard you can set a description, this will appear in the metadata json file of the given template.
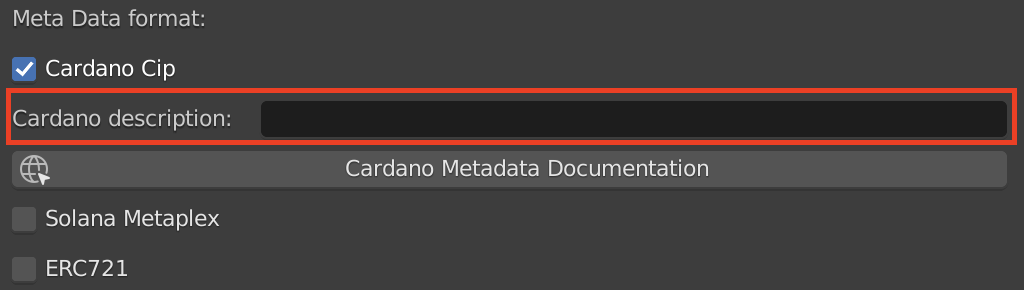 4. If you want custom metadata fields, check the `Enable Custom Metadata Fields` checkbox and set `Custom Fields File` to the Custom_Fields.json file you create in the [Custom Metadata Fields](#custom-metadata-fields) section.
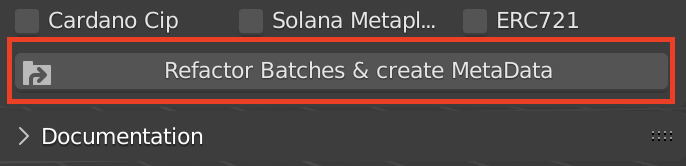
5. Click the `Refactor Batches & Create MetaData` button:
4. If you want custom metadata fields, check the `Enable Custom Metadata Fields` checkbox and set `Custom Fields File` to the Custom_Fields.json file you create in the [Custom Metadata Fields](#custom-metadata-fields) section.
5. Click the `Refactor Batches & Create MetaData` button:
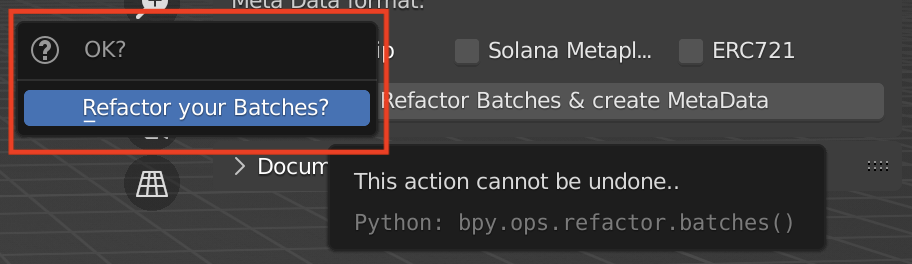
 6. Confirm you wish to refactor your batches by clicking the `Refactor your Batches?` button in the popup dialogue:
 After completeing the `Refactor Batches & Create MetaData` step, you should have the following files and folders located at the `Save Path` set in [Step 1. Create NFT Data](#step-1---create-nft-data) above:
- `Blend_My_NFTs Outuput` folder. A directory that contains all output files from Blend_My_NFTs.
- `NFT_Data` folder. This contains the following `NFTRecord.json` and `Batch#.json` files.
- `NFTRecord.json` file. A ledger that contains the NFT DNA of your collection.
- `Batch_Data` folder. Contains all `Batch#.json files`.
- `Batch#.json` files. Smaller chuncks of the `NFTRecord.json` that contain unique DNA.
- `Complete_Collection` folder. A refactored version of the `Generated NFTs` folder, with all batches reordered and refactored and generated metadata templates.
- `Image` folder. The folder where all the NFT Image content files are stored.
- `Image` files. These images will contain have the name you specified in [Step 1. Create Data](#step-1---create-nft-data), an incrementing number, and the file extension you specified above.
- `Animation` folder. The folder where all the NFT Animation content files are stored.
- `Animation` files. These animations will have the name you specified in [Step 1. Create Data](#step-1---create-nft-data), an incrementing number, and the file extension you specified above.
- `3D Model` folder. The folder where all the NFT 3D Model content files are stored.
- `3D Model` files. These 3D models will have the name you specified in [Step 1. Create Data](#step-1---create-nft-data), an incrementing number, and the file extension you specified above.
- `BMNFTs_metaData` folder.
- `Data_#.json` files. These files are used by Blend_My_NFTs backend in [Step 3. - Refactor Batches & Create MetaData](#step-3---refactor-batches--create-metadata). These can be ignored, unless you are customizing the metaData.py script.
- `Cardano_metaData` folder; will appear if specified in Step 2. above.
- `Cardano_Data_#.json` files. Will contain metadata template in Cardano CIP 25 format.
- `Solana_metaData` folder; will appear if specified in step 2. above.
- `Solana_Data_#.json` files. Will contain metadata template in Solana Metaplex format.
- `ERC721_metaData` folder; will appear if specified in Step 2. above.
- `Erc721_Data_#.json` files. Will contain metadata template in ERC721 format.
Congratulations!! You now have a complete 3D NFT collection that is ready to upload to the blockchain of your choice!
# Randomizing Materials
To enable the Material Randomizer check the `Enable Materials` check box in the `Create NFT Data`:
After completeing the `Refactor Batches & Create MetaData` step, you should have the following files and folders located at the `Save Path` set in [Step 1. Create NFT Data](#step-1---create-nft-data) above:
- `Blend_My_NFTs Outuput` folder. A directory that contains all output files from Blend_My_NFTs.
- `NFT_Data` folder. This contains the following `NFTRecord.json` and `Batch#.json` files.
- `NFTRecord.json` file. A ledger that contains the NFT DNA of your collection.
- `Batch_Data` folder. Contains all `Batch#.json files`.
- `Batch#.json` files. Smaller chuncks of the `NFTRecord.json` that contain unique DNA.
- `Complete_Collection` folder. A refactored version of the `Generated NFTs` folder, with all batches reordered and refactored and generated metadata templates.
- `Image` folder. The folder where all the NFT Image content files are stored.
- `Image` files. These images will contain have the name you specified in [Step 1. Create Data](#step-1---create-nft-data), an incrementing number, and the file extension you specified above.
- `Animation` folder. The folder where all the NFT Animation content files are stored.
- `Animation` files. These animations will have the name you specified in [Step 1. Create Data](#step-1---create-nft-data), an incrementing number, and the file extension you specified above.
- `3D Model` folder. The folder where all the NFT 3D Model content files are stored.
- `3D Model` files. These 3D models will have the name you specified in [Step 1. Create Data](#step-1---create-nft-data), an incrementing number, and the file extension you specified above.
- `BMNFTs_metaData` folder.
- `Data_#.json` files. These files are used by Blend_My_NFTs backend in [Step 3. - Refactor Batches & Create MetaData](#step-3---refactor-batches--create-metadata). These can be ignored, unless you are customizing the metaData.py script.
- `Cardano_metaData` folder; will appear if specified in Step 2. above.
- `Cardano_Data_#.json` files. Will contain metadata template in Cardano CIP 25 format.
- `Solana_metaData` folder; will appear if specified in step 2. above.
- `Solana_Data_#.json` files. Will contain metadata template in Solana Metaplex format.
- `ERC721_metaData` folder; will appear if specified in Step 2. above.
- `Erc721_Data_#.json` files. Will contain metadata template in ERC721 format.
Congratulations!! You now have a complete 3D NFT collection that is ready to upload to the blockchain of your choice!
# Randomizing Materials
To enable the Material Randomizer check the `Enable Materials` check box in the `Create NFT Data`:
 Materials are deterimened by a .json file that you manually create. For the purposes of this documentation, just think of JSON as a text file (.txt) that we can use to store information. You can name this file anything, but for this tutorial lets call it `Logic.json`.
If you need help creating a JSON file, checkout this tutorial: [How to Create JSON File?](https://codebeautify.org/blog/how-to-create-json-file/)
To learn more about JSON files and how to structure data read this article: [Working with JSON](https://developer.mozilla.org/en-US/docs/Learn/JavaScript/Objects/JSON)
Material Randomizer compatable materials must follow this naming convention: `
Materials are deterimened by a .json file that you manually create. For the purposes of this documentation, just think of JSON as a text file (.txt) that we can use to store information. You can name this file anything, but for this tutorial lets call it `Logic.json`.
If you need help creating a JSON file, checkout this tutorial: [How to Create JSON File?](https://codebeautify.org/blog/how-to-create-json-file/)
To learn more about JSON files and how to structure data read this article: [Working with JSON](https://developer.mozilla.org/en-US/docs/Learn/JavaScript/Objects/JSON)
Material Randomizer compatable materials must follow this naming convention: `